Home
Repair And Restoration
Seized Nissin 2 Pot Sliding Calliper Rebuild
Rebuild Date - December 2014
By Ren Withnell
Why oh why oh why oh why oh why oh why oh why oh why oh why oh why oh why oh why oh why oh why oh why...
Nissin eh? Suppliers of brake bits to many motorcycle manufacturers. Years and years of experience. So why is it they can't make a decent basic calliper for a decent basic motorcycle? It's not rocket science, it's not brain surgery. When you've been doing something for so long it should be as simple as making a cup of tea. My CBF 125 has a 2 pot Nissin calliper. Several motorcycles, indeed many budget / small / cheap motorcycles have the same calliper. I've had the misfortune of dealing with this brake (and other types of brakes) for 25 years now. I wish I hadn't
Why? They work well enough but oh my goodness do they rust up, seize up and crud up like no other. Well...apart from Yamaha's blue dot(Blue Dot Service) and just about any motorcycle system. So today I'm going to cover what was planned to be a simple pad swap but turned out to be a complete rebuild. I should have known, I've done this often enough.
Lets start with the basics. Remove the whole calliper. Why? Doesn't that mean I'll have to fill them with fluid again? Doesn't that mean I'll get brake fluid that eats paint everywhere? It sounds like a lot of work. Yep. But as the sliders WILL be stuck tighter than my grip on my wallet there's no way of budging them while in situ. Take steps to protect any paint from the brake fluid that will come out, remove the banjo bolt and remove the brake retaining bolts.
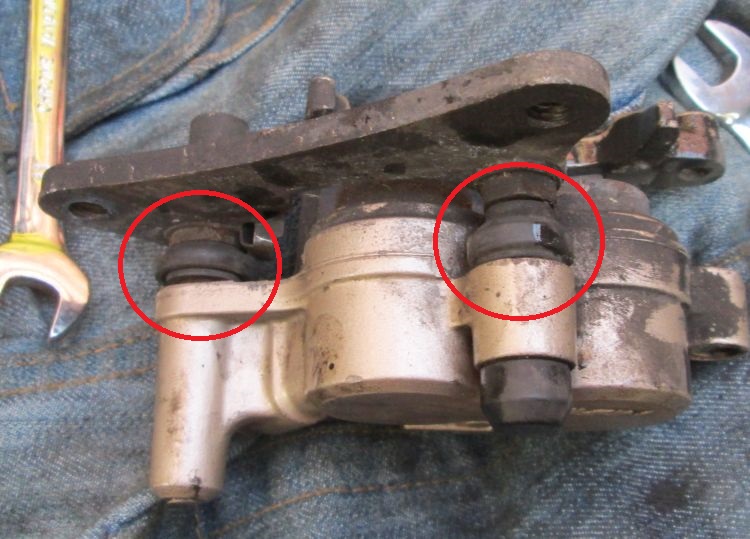
The calliper, showing the sliders that will be seized.
The next stage is not pleasant. By hook or by crook, usually with a big hammer, you'll have to get the mounting plate with it's pins out of the body of the calliper. Typically I hold the mounting plate in a vice and whack the body with a rubber mallet. When this proves to be fruitless I then use a hammer and a block of wood to protect the body. When this proves to also be useless I take to whacking the body with a big hammer and ignore the damage...
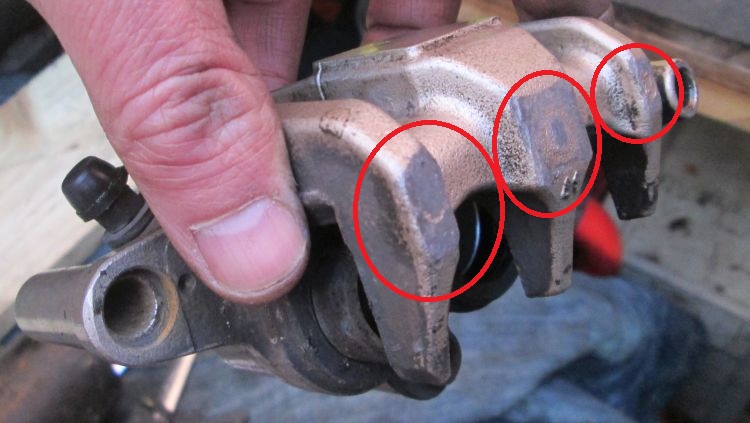
The damage. It's not pretty but there's just no other way to get it out this time around.
If I'm lucky and the gods are with me the body will finally come away. The pins can be removed with a spanner for the short one and an Allen key for the larger one. Now it's time to clean the pins. I set up a drill with a wire brush bit. With patience, chaffed fingers, blood and injury I use this to remove all the rust. In fact it is quite effective and the finished item looks very nice. But...as the material obviously rusts be sure to accept that soon enough after the rebuild the rust will return, with avengance.
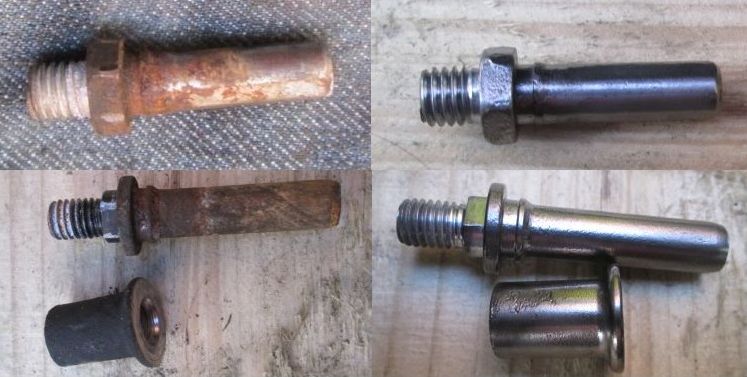
Before and after. Ooooh that's better. There is corrosion damage though.
Now I could just give the body a wipe down and scrub the pistons up a little. But I've come this far, everything is in bits so I might as well do the job properly. I have a crafty technique to "grab" the pistons and pull them out. Get a set of circlip pliers and set them to remove an outer circlip, ie set to OPEN when I squeeze the handles. Now insert a random socket inside the piston, the socket should be a little smaller than the piston. In the gap insert the pliers closed and squeeze them open, this will provide a good grip onto the piston and allow movement to wobble, ease and pull the pistons out.
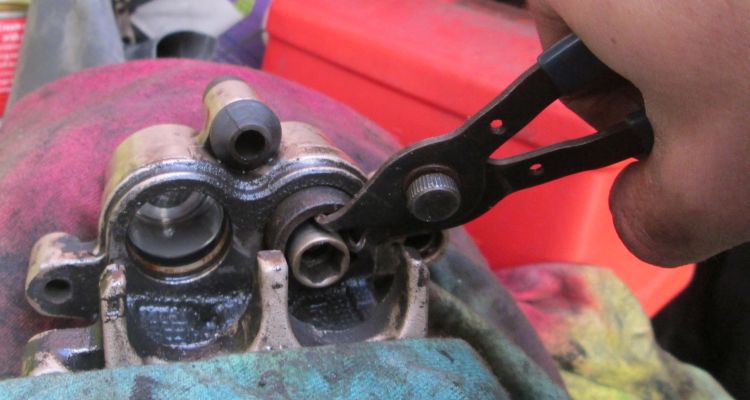
Using Circlip Pliers and a socket to grab the piston and ease it out.
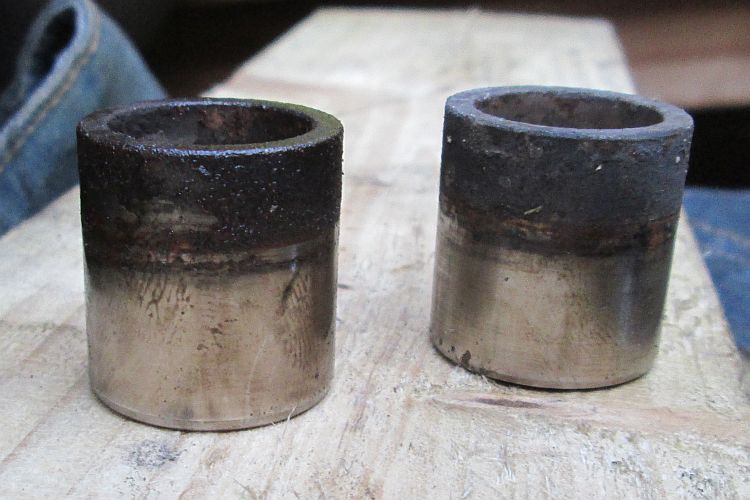
The pistons, once removed, obviously need a darn good clean.
With the pistons out I use the wire brush drill bit to remove all the dirt. The pistons have corroded and the surface is pock-marked. If I were a proper mechanic I would strongly advise my customer to replace the pistons as these marks can tear the seals and cause leaks. But I'm not so I ensure there's no sharp edges and give them a wipe down.
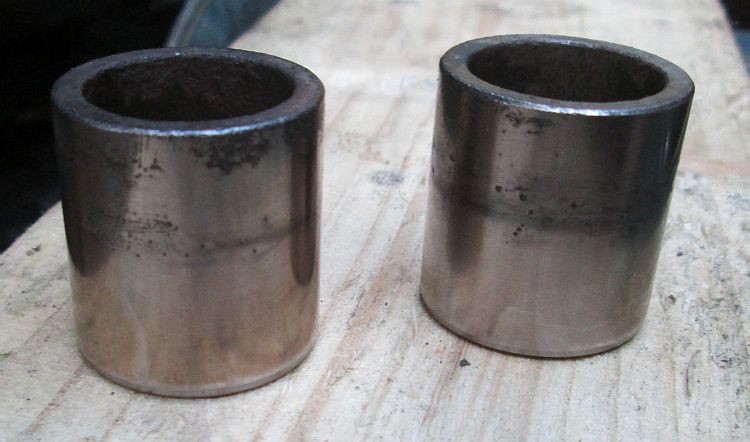
The corrosion damage can be clearly seen. I've seen worse though.
Now I clean the body. Using paraffin and my (old) tooth brush I scrub and scrub at the caked on layers of dirt and brake dust. much of it falls away quite easily but some is as stubborn as the oil stains in my best trousers. To remove the dirty paraffin I wash the calliper body in water and repeat until everything is something like clean. Of course water and brake fluid do not mix so I need to thoroughly dry out the body before rebuilding. I consider putting the body in the oven on gas mark 2 for half an hour, but then I think I might melt the seals. Instead I use my workshop hairdryer for a half hour.
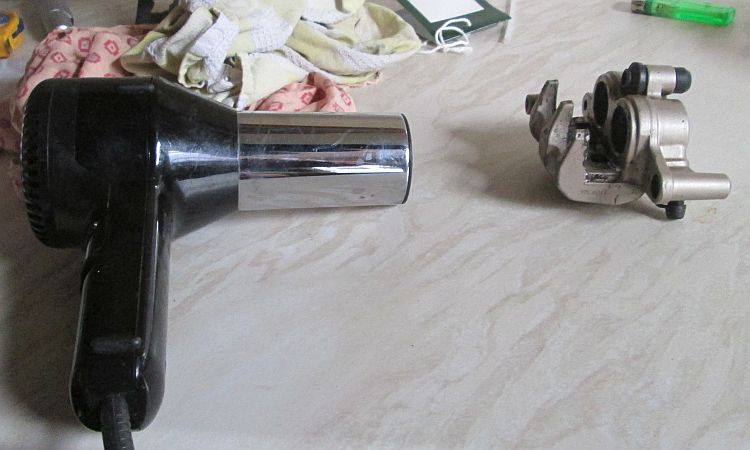
Yip, that's the way to do it. A bit of brushing and the calliper will be full of body and shine too.
While the calliper is drying I clean the spring clip and retaining pin on the wire brush drill bit. I re-assemble the pins onto the mounting plate with a little copper slip to ease the inevitable strip down next time. Now here's a question. Should I grease the pins? Logic dictates yes. It will stop them rusting and help the pins continue to slide as they should. BUT! But when I've done this in the past the grease simply collects the brake dust and the road dirt and coalesces into a solid mass that causes seizure even quicker than when there is none. There is perhaps a reason why these things are not greased at the factory in the first place. I apply a thin smear of copper slip as an experiment, to see what happens.
By now the calliper body is piping hot from the hair dryer. Using a dab of brake fluid as lubricant I slide the pistons back into place. Don't use any other lubricants such as oil, WD40 or grease as there's rumours this can affect the rubber seals. Brake fluid must be a safe bet as the seals are there to hold brake fluid in. I refit the mounting plate and then the new brake pads and check everything is as it ought to be. It all looks quite smart now.
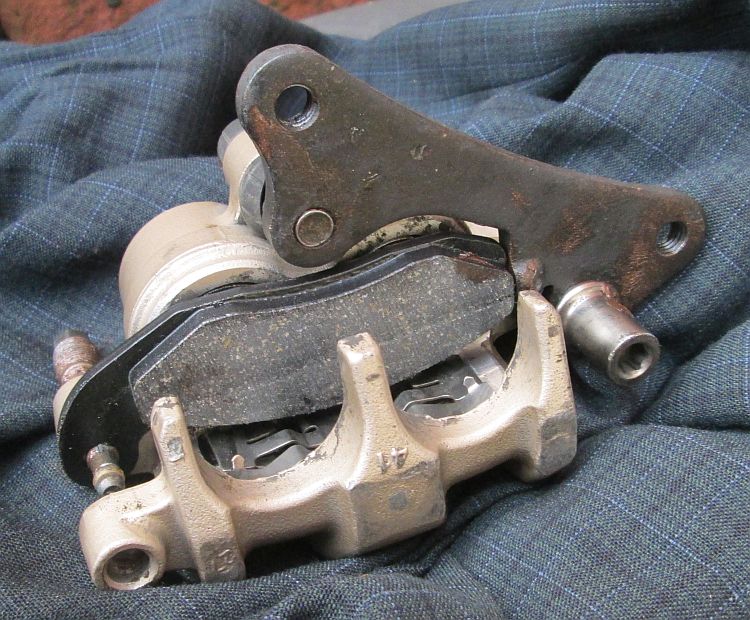
One pad in, looking all clean and ready to roll.
With the calliper back on the bike, the pipe reconnected and a tub of brake fluid I bleed the system. Unlinke 2 calliper set ups and the SLR 650 I used to own bleeding this system is a doddle. It's not long before I have a lever and then I make sure to keep on pumping to clear out any hidden droplets of water or dirt that may be lurking in the system. I close everything up then I wrap a bungee around the brake lever and the bars, pulling the brake lever on hard. Why? I have no idea why this works at all but I was told to do this once. After an hour of the lever being pulled on the brake feels perfect. Somehow the pressure seems to clear out any of remaining trapped air.
So now I have a front brake that is working perfectly. Will it seize up again? Will it become all rusty and crudded up? Of course it will, of that I am certain. I ride the bike through the wind and the rain, the salty roads of winter and the dirty back roads. It gets washed once every Preston Guild.
Which bike had the most reliable front brake calliper? The Honda CLR 125 City Fly with it's cheap Grimeca 2 pot slider. Yes, it corroded and the paint came off the body. Yes it was a strange set up that went rusty. Yes the brake was only effective not brilliant. But the pistons were made of some strange metal that never ever corroded. After 15,000 dirty miles with off roading and winter thrown in I popped them out and wiped them down and they looked like new. The pins did rust but the tolerances were slack so they never seized up. That brake just worked and worked and worked and worked.
Why the hell can't Nissin follow Grimeca's lead?
Reader's Comments
Mark said :-
Silicon paste on guide pins bro )
21/09/2016 20:38:03 UTC
Pocketpete said :-
My friend who actually owns a spanner thingy unlike me said he uses silicone spray. A bit like wd40 but no oil it dries up completely and leave a silicon residue. I used it on my locks very effective.
Aren't you worried you have forgotten to put stuff back in. I would be to scared to touch brakes
22/09/2016 06:56:41 UTC
Ren - The Ed said :-
I've never come across Silicon Paste Mark so I'll look into that. My concern is that it will be just like the grease I used to use. The grease acts as an agent to collect dirt, brake dust and road salt and harden into a turgid mass. I'll get a small tube and see where it leads.
Pocket Pete - Yeah, getting the brakes wrong is not a good idea at all.
22/09/2016 12:08:58 UTC
jerome said :-
hello
You do good job here, and nice pictures!
You help me with this post.
My old 125 (a MZ 125RT,german manufacture, year 2008 ) use same caliper ( I saw "5K6 " on the body !? )
Best regards,
JEROME (from FRANCE,sorry but I m learning English )
05/01/2017 00:57:17 UTC
Ren - The Ed said :-
Bonjour Jerome. Votre anglais est tres bien merci. Much better than my French.
Glad the article was helpful. I never knew MZ used the same calliper.
05/01/2017 07:45:01 UTC
Savva said :-
Real nice post.
My Yamaha moped T110 (Crypton-R mod. 2004) has exactly the same caliper.
I have already restore caliper, two or three times. Was in the same condition, like your's, maybe worse, due I live on an island (Greece). I use something like dental pick to clean seal's grooves, and dremel with wire brushes. After I use red synthetic grease for the sliders (in the boots), and copper grease on pin's threads, and brake fluid for the seals. Piston's quality is... "sh1t"... -;)
14/05/2017 16:07:24 UTC
Ren - The Ed said :-
Hi Savva. I've heard good things about "red" grease. What is red grease, why is it special or any better than regular grease?.
There are stainless steel pistons available for this particular Nissin brake, but at 40 GBP each they are not cheap. I was about to buy some then I saw a second hand calliper for £15 in very good condition so I purchased that instead?.
15/05/2017 06:32:36 UTC
Ian Soady said :-
"Red" grease is a common name for castor-oil based rubber grease as made by Castrol and others (see link). It's useful stuff as it can (as its name suggests) be used on rubber components eg caliper seals.
Of course being castor based it'll smell nice if you set fire to it!
HOWEVER: you can also get red grease which is not compatible with rubber components. The colour tells you nothing, you need to look at the spec.
www.demon-tweeks.co.uk/motorcycle/grease/castrol-red-rubber-grease...
15/05/2017 09:31:51 UTC
Ren - The Ed said :-
Right so I've just fitted a new rear tyre. As part of this I ALWAYS put grease on the wheel spindle as well as over the bearing even though they have dust covers. Of course this grease will meet the seals.
Now I've not had any issues in the past with this - I use regular grease. Are you going to tell me the grease can affect the rubber(y) seals?
16/05/2017 07:59:44 UTC
Ian Soady said :-
No, because as you might have guessed by the (y), they're not rubber but a synthetic material such as nitrile.
Real (tree) rubber is only used in a few places, specifically hydraulic brake parts, as brake fluid is not mineral oil based (unless you own something like a proper Citroen DS which had a very interesting hydrodynamic brake system which did use mineral oil).
Ordinary high melting point grease is fine for wheel bearings although you can also get "waterproof" grease. I wouldn't use it in wheel bearings however as they can get quite hot and it melts at a lower temperature than HMP (usually lithium based) stuff.
16/05/2017 11:03:26 UTC
Ren - The Ed said :-
Phew! Thought I was gonna have to go out and buy some special grease and rebuild the rear wheel then.
Is there a magical way to know what's rubber and what's erm, er, not rubber?
16/05/2017 18:35:39 UTC
Borsuk said :-
Ren: Take the bike to your local fetish club and ask an "expert" to tell you which parts get him or her all hot and bothered. :-)
17/05/2017 00:32:19 UTC
Ren - The Ed said :-
Haha! I'm not so sure the local fetish club would be much help though, they're into cloth caps and steam engines.
17/05/2017 05:10:21 UTC
Ian Soady said :-
"Is there a magical way to know what's rubber and what's erm, er, not rubber? "
I think the clue might be where I mentioned something about brake parts.... And tyres obviously aren't keen although a small drip won't hurt (no that's not a reference to yourself).
Manufacturers (generally) know what they're doing so any component likely to come into contact with mineral oil / grease (like oil seals) will be safe.
17/05/2017 09:31:41 UTC
Ren - The Ed said :-
Small drip...pfffft! Is there a reason why rubber is used for brake systems as opposed to nitrile or similar? I'm guessing from touch that the hard seals for wheel bearings would be too hard to get the really good seal required for brake pistons. That said hydraulic rams - and by extension motorcycle forks - appear to use harder seals and they can operate at some serious pressures.
17/05/2017 16:49:33 UTC
Ian Soady said :-
I suspect it's for historical and backwards compatibility reasons.
You may remember DOT5 fluid that was briefly available. It was based on silicone rather than glycol, which previous versions (and in fact DOT5.1) were / are. Its advantage was that it didn't strip paint. Its disadvantage (amongst others) was that it didn't mix well with glycol based fluids therefore required extensive flushing. And there were some views that it was not compatible with existing seals.
18/05/2017 09:37:27 UTC
Ren - The Ed said :-
I remember DOT5 but I had absolutely no notion of what the differences were. That's the problem with new stuff...don't always mix with old stuff. I work in IT, these things I understand.
18/05/2017 14:52:30 UTC
Name
Comment
Add a RELEVANT link (not required)
Upload an image (not required) -
Uploading...
Home
Repair And Restoration