Home
Repair And Restoration
Replacing CBF 125 Head Bearings (Tapered All Balls USA)
By Ren Withnell
Some while ago I noticed the steering head bearings on the CBF 125 were getting a little notchy. In case you don't know what this means, I'll explain. With the bike on the centre stand and the front wheel off the floor as I turned the bars from side to side rather than running smoothly when the bars passed the straight ahead position there was a noticeable step. When the bike is being ridden more often than not the bars are in the straight ahead position. After many miles of bumps, braking and strain the ball bearings wear microscopic grooves in the races.
While not immediately dangerous this affects the handling. If it gets worse it makes the motorcycle hard to turn from the straight ahead position. Quite rightly this is checked on the MOT and can lead to a failure. The simple rule is, if it is even slightly noticeable it needs sorting sooner rather than later. A cursory look online showed that I could get a set of - ahem - All Balls USA tapered roller bearings for less than I could get Honda originals. Tapered rollers are considered stronger and last longer as the bearing surface area is considerably larger than with the originally fitted ball bearings.
The kit comes in a little plastic box. Inside is a generic set of instructions which would later lead to confusion. After removing the front wheel, mudguard and forks the act of removing the triple clamps, or yokes, is easy. Getting the bearing race off the bottom yoke's steering stem is another matter.
There is limited access to the race. It took me an hour of messing with hammers, chisels, knock through screw drivers and curses to get it off. Be patient...it will come when you can work out the correct places to lever it. A nice big fat screwdriver wedged between the steering stops and the race did the trick eventually. With a big smile I figured the worst part was over, the rest ought to be plain sailing.
The next thing to do is work out which bearing set goes where. They both look identical, but they are in fact not. I soon worked out that one is oh-so-slightly larger and this goes on the bottom. How did I work this out? I spent ages wondering why the other set wouldn't even slip down the steering stem let alone get to the bottom. Durgh. The next thing to work out is where the random washer in the kit is supposed to go.
It looks like it might be at the top end, where things get tightened up. But....but it fits perfectly on the bottom of the stem, it's a bit baggy at the top end where the threads are. Another look online offers up no specific instructions for the CBF 125 yet having looked through several other people's blogs about All Balls they mostly seem to have the washer at the bottom end beneath the lower bearing. I do not want to get this wrong otherwise it would mean stripping the whole lot down again and the painful task of hammering off the brand new lower bearing. I decide to fit it at the bottom, I hope to god I am right.
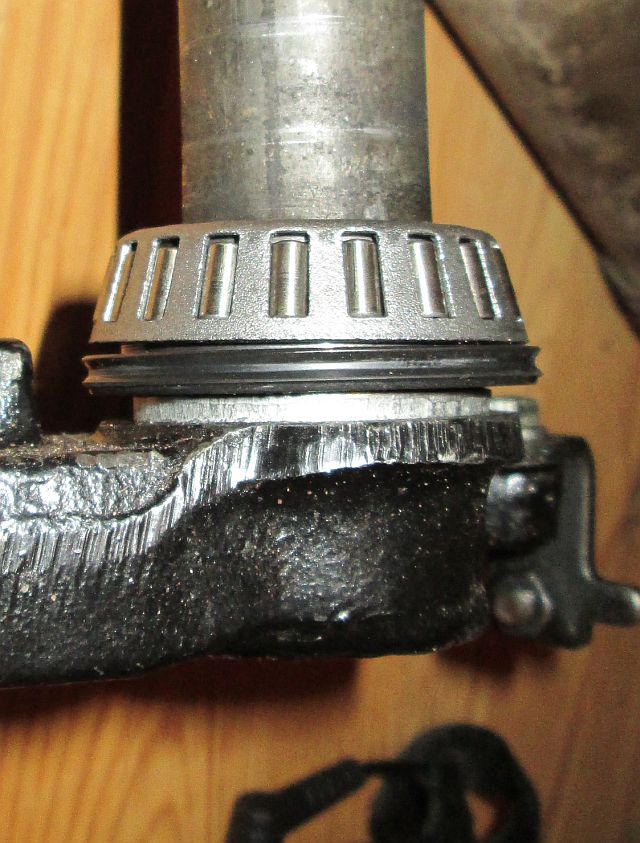
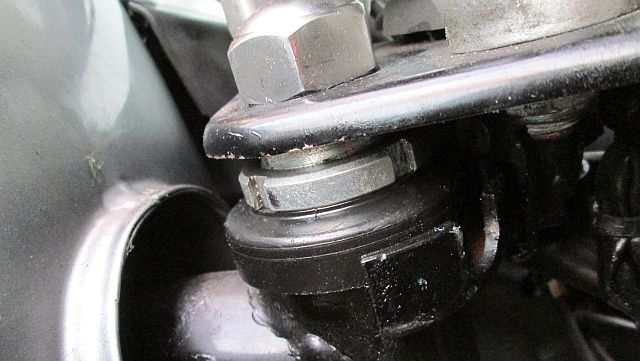
The tapered roller bearing, the seal and the washer - hopefully where it should be.
With the washer in place it's time to press on the lower race. I put the lower yoke into the freezer. The idea is cold metal shrinks and if it is smaller the new race will go on easier. After an hour in the fridge and with the new race warmed with the hair dryer to expand it I slip it down the steering stem. Does it slip gently on? What the hell do you think? Of course it's a tight fit, it's meant to be. I do not want to hammer the actual new bearing race for fear of smashing the shiny new rollers. I place the original race over the new race and bash that. Nope, no movement. I find a tube...an old piece of NTV 600 header pipe I have lying around as ya do, and use that to much greater effect. The lower race is fitted.
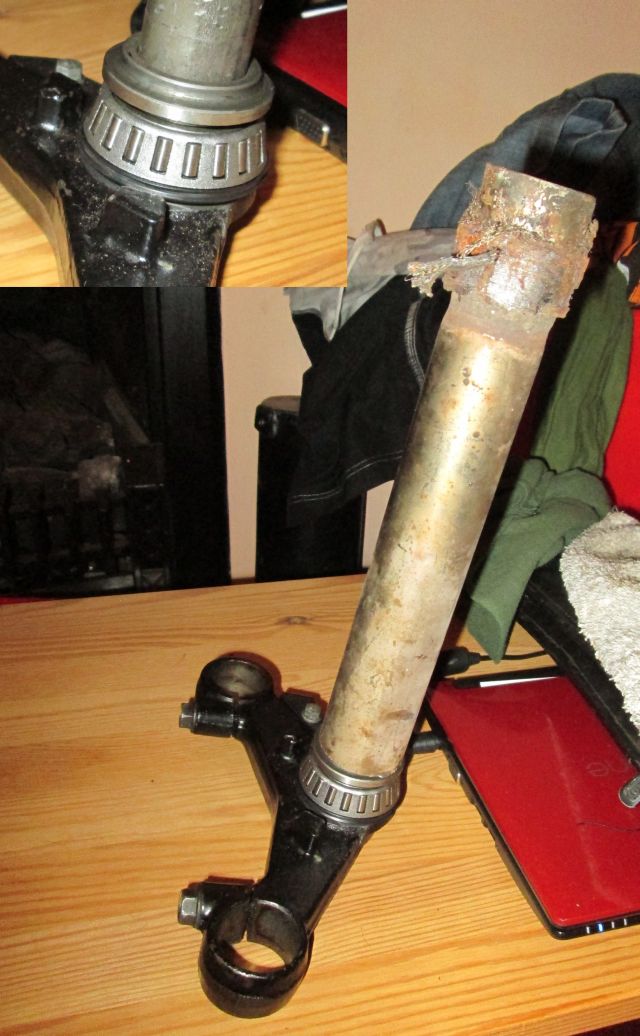
Using the old race for protection, and a tube to whack the bearing down.
I'm not convinced that freezing some parts and heating other parts makes much difference. Well, scientifically it does but I think -21 and plus 25 degrees is not really enough difference to make much difference. I think I'd need liquid nitrogen and an industrial oven to get that lower race to gracefully drop into place. I hope the races fitted to the headstock are easier.
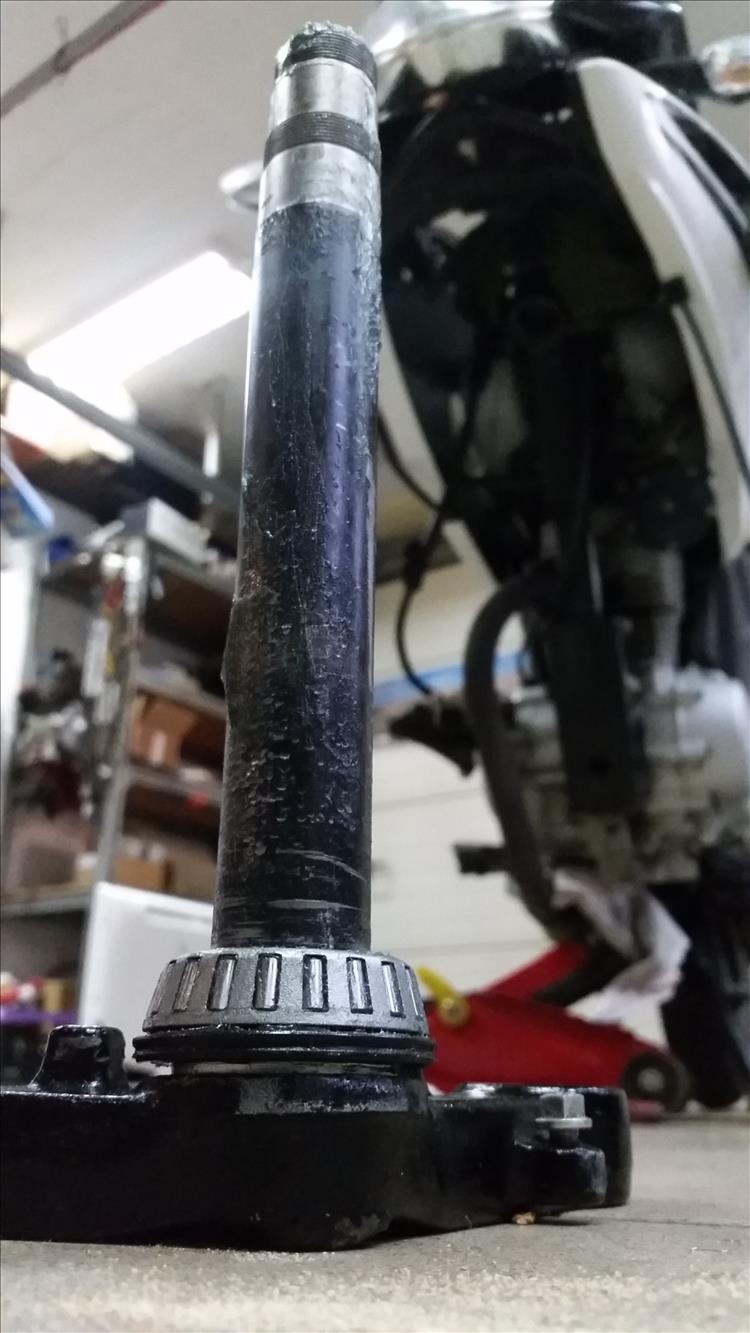
They are. A lot. Getting the old ones out is done in minutes with a hammer and a long drift (a drift is any old long bolt that I have lying around, usually an old front wheel spindle). Getting the new races in is just as easy, if a little worrying. The races have TINY edges. So once the bottom one is in beyond the point where you can tap the race there's nowhere to hit it without ruining the bearing face. I find the old race acts as a perfect safety disc to hit the new race home, it just means I have to drift the old race out again. The top race goes in easy...but..it protrudes the headstock! Being meatier it's actually too big. I just hope the top nuts have enough thread left to go on.
Oh crap. Oh poop. Oh god. Maybe...maybe the washer is NOT supposed to go on the bottom of the steering stem. Pants. Damn. Blast. Without that washer the stem would be higher and therefore there'd be more thread. Argh! I insert the lower yoke. The base of the headstock is close to the yoke, without that washer there the yoke would have hit the headstock. PHEW! It must be right, it must be. Still, I hope All Balls have got there sums right.
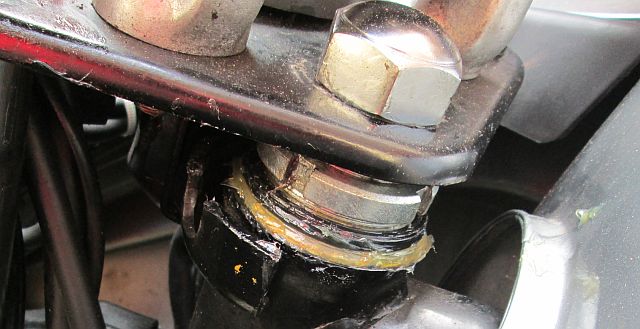
I grease everything. In my world you cannot actually grease a bearing, or anything else, enough. Actually as a safety note it is possible to over pack some bearings but not steering head bearings. While they take a fair load they do not rotate fast, only that slow side to side movement you make while steering. I fit the bottom yoke but the top nut will not go on. What now!
The top nut, the one with the awful notches in it rather than a nice friendly hex, comes complete with a plastic skirt to protect the bearings from the elements. This is shaped and designed for the original race and not the new one. I remove the plastic and curse some more. I do like tinkering with the bike but I curse a lot while working, it's a love hate thing with me and spannering. There is enough thread and soon the whole lot is back together and adjusted. I...I just don't like the exposed bearing edges.
Well greased, but I can't leave them open to the elements like that.
After a shake down ride and a brew at a friend's place I look at the exposed top bearing. OK, it's well greased. It's protected by the fairing. The steering is definitely better. But. But I can't look at those exposed parts. I decide to "adapt" the protective skirt. Half an hour with the Dremel sees the offending edge off. Another hour's tinkering sees the top yoke off, the skirt refitted and the top yoke back on. That's better.
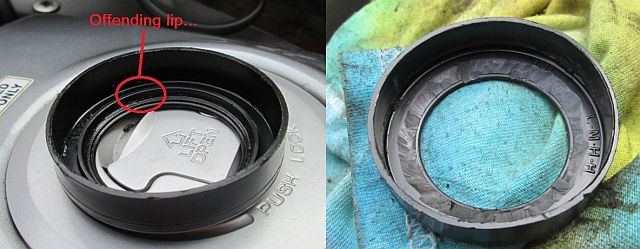
I removed the lip that prevents fitment.
Do I like it? There's little doubt the new bearings are better. The steering feels like new. In fact it's made the bike all twitchy and loose. I've grown so used to the poor bearings that the slow steering and dull cornering I've misinterpreted as "solid handling". I'll get used to it after a few miles. What I'm not best pleased with is the All Balls kit in terms of explanations, diagrams or ease of installation. That said it does appear to be of high quality. Only time will tell if that proves to be true. Miles are what matters, miles show the quality of an item. Don't take on fitting these bearings unless you're fairly experienced.
The's better!
Reader's Comments
matt said :-
Hi really good read been looking for a guide to do my head bearings and this was a pleasure to read. Hopefully I won't have a problem doing mine now :)
01/01/2000 00:00:00 UTC
Ren - The Ed said :-
Hi Matt
What bike are you replacing the head bearings on? CBF 125? My main advice is to get as much info as you can about your specific model. The instructions were generic which can be a little misleading.
www.allballsracing.com...
01/01/2000 00:00:00 UTC
matt said :-
Hi same bike. Annoying thing was the front tyre had a flat so replaced both boots for new expecting the problem to be resolved only to find out the head bearings have worn. Dealer quoted 250 plus vat so I decided to spend a Saturday doing it myself so just trying to do as much research as possible to make it go as Smooth as possible. :)
01/01/2000 00:00:00 UTC
Andy said :-
Hi Thanks very much for putting this online. In the process of doing mine at the moment and have stopped to google some advice. Will post back when completed!
01/01/2000 00:00:00 UTC
Ren - The Ed said :-
Cheers Andy. Be good to hear you've got it all done. Did you get the "All Balls" bearings or are you using another brand?
01/01/2000 00:00:00 UTC
Gary said :-
Hi guys, I have just carried out this repair and went well. The washer is a bit hit and miss. I measured as per instructions and fitted without and the washer and it works ok. The gap between the lower yoke and headstock is paper thin and I am wondering if the washer would of been better fitted ? My son took it all apart so I didn't see the standard factory gap !! Any suggestions ?
29/03/2016 08:29:32 UTC
Gary said :-
Without the washer, not 'and' the washer my apologies damm phone haha.
29/03/2016 08:33:50 UTC
Ren - The Ed said :-
Cheers Gary.
I do, with hindsight, strongly suspect the washer is supposed to go below the lower bearing, as I fitted it in the pictures above. Otherwise that lower bearing has no protection whatsoever save for any grease you put in.
While I do not doubt All Balls quality I am disappointed by their lack of proper instructions for each model.
Note also the modification I had to make to the top skirt to protect the upper bearings. Really, the kit is incomplete.
29/03/2016 12:06:25 UTC
Michal Wicenciak said :-
Here's my story. I got CBF125 for headstock bearings replacement. Just like here - replacing ball bearing with tapered rollers bearing.I'm not sure about the supplier, but the code on the bearings box was AB22-1029. Inside there were 2x bearings with races (only difference between them is the inside hole diameter, races are identical), 2x washers (one thin and one thick), 2x seals (one with larger hole than the other). I did it wrong at first. I put thick (fat) washer on the stem first. Then I beat the lower bearing on. Then I realized I may have done it wrong and started to take the bearing off again. I broke it, and the seal too. I had to buy another set. Then I found this guide, which has saved me some hassles. Ren describes that he had to put washer, because without it - there would be contact of bottom yoke and headstock. In comments someone wrote, that they didn't put any washer at the bottom and clearance is there but "paper thin". I ended up using thin washer and all was fine. Enough threads at the top visible. Also - once I put top bearing on the stem - I wanted to fit supplied seal but the factory one (the nut with plastic skirt) worked better! I did not have to take the offending lip off, just grease it all up and it made good seal. So from the whole supplied parts I used 2x bearings with 2x races, 1x washer (thiner one) and 1x seal (bottom). Rest is what was already on a bike, when Honda fitted their originals. And YES, the top race sticks out a little out of headstock but it does not matter. How is the steering now? Super light, bike is very keen to lean now. Whole bike feels much lighter.
 11/10/2017 05:19:55 UTC
Ren - The Ed said :-
Re-reading this after a couple of years have passed and reading you broke the first bearings makes my stomach turn. It's a horrible sickening feeling when you have the parts and the tools but not the right instructions. Does this washer or that washer go here or there? Will it make any difference? What if I get it wrong and it all falls apart at 60mph?
All we ask for are clear, concise instructions.
Thanks for sharing Michal Wicenciak
11/10/2017 12:12:52 UTC
Nicholas said :-
The instructions clearly state
" put some old bearing balls in the old race and measure the height .
If new and old race have same height don't use the washer"
What's confusing about that ?
Top washer is not needed.
Yes the lip from too dust cover must be shaved .
Please re adjust after 500_ 1000 klms.
I put CV joint grease.
The correct first adjustment is to tighten about 4 kgs and move with hand many times .
Then loosen the bolt to the point there is no play.
29/04/2020 05:01:12 UTC
Ren - The Ed¹ said :-
I can only assume Nicholas that All-Balls have updated their instructions in the intervening years. I can distinctly remember a small square of paper with about 4 cartoon-esque drawings, very little written instructions and certainly no explanation regarding the washer. Nor was there any useful information I could find online. Maybe I just got the duff instructions?
Not to worry, the washer has been in situ and the bearings too high at the top end now for at least 4 years and likely 45 to 60 thousand miles. All is well that ends well.
I don't suppose you've got any images of the instructions? Be interested to see what yours are like.
29/04/2020 08:11:17 UTC
Felix said :-
Excellent read. I ordered a kit with NTN conical bearings and installation was straight forward. But the top of the yoke is now a millimeter or so higher so the steering lock is inoperable, so I need to find a fix, either grinding down the locking tap coming out of the key cylinder, or enlarging the lock pin detent on the fork tube.
18/04/2021 12:30:13 UTC
Ren - The Ed¹ said :-
Felix - I didn't find this with my own CBF125 - is yours a CBF125?
19/04/2021 07:35:19 UTC
sla said :-
Comforted by what I read here (thanks very much for sharing) I bought an all-ball kit n° 22-1029 for my 2013 euro CBF 125. I have already had the steering bearings changed 2 times by Honda and they had to be changed again ! Clearly, the original bearings are not good ! There was an explanation on a small paper that said to measure the height of the original lower bearing and to compare with the new bearing. After disassembling everything, that's what I did and I was able to see with a caliper that the old bearing was 17.7 mm high and that the new one is significantly lower. But if we add the thinner washer, we obtain exactly the same height of 17.7 mm ! This reassured me because it is exactly the same washer that Michal used successfully. NB; before disassembling the fork, I measured the space between the lower T and the tube with shims: 1.8 mm. After assembling the kit with the thinner washer I had a little more gap due to the thickness of the added seal. But that's not a problem. I was able to use the original adjustment nut with its plastic skirt without having to remove the lip. I think it's because, like Michal, I didn't use the top seal that came with the kit. Indeed, if one want to use the seal supplied with the kit plus the adjustment nut with the skirt on top, one see that the small lip inside the skirt prevents a good fit. Now the steering of my bike is very smooth and I am very happy with the result ! In addition to this, in France, a new technical inspection will undergo in 2024. I think my bike would have been refused with the poor condition of the old steering bearings.Now I am confident !
13/10/2023 23:18:54 UTC
Ren - The Ed¹ said :-
Good to hear sla. What is this new technical inspection in France. I'm guessing it'll be similar to our UK MOT.
17/10/2023 07:53:19 UTC
Name
Comment
Add a RELEVANT link (not required)
Upload an image (not required) -
Uploading...
Home
Repair And Restoration