Home
Repair And Restoration
Cleaning Blue Dot Bike Brakes (Fazer) - By Ren Withnell
Yamaha first released these brakes onto an unsuspecting public when the R1 first came out. Since then they've turned up on quite a few of the Yamaha range. The includes my 2001 Fazer 600. They are very powerful brakes, in my opinion much more powerful than the Fazer ever required. And of course like a finely tuned race car or a thoroughbred horse, they are at best temperamental. The issue with such performance items is that they tend to fail more often. The Blue Dot brakes have a reputation for binding and sometimes even seizing.
When it comes to binding, mine have been temperamental. I've changed the fluid, the seals and still had no joy at getting the nice free-spinning front wheel. That said, after fitting the new seals and cursing in despair at my failure to eliminate the binding, I said stuff it and rode the bike anyhow. After a few months the brakes have eased off to an acceptable level now. The front wheel is not free, but it's acceptable.
Anyhow, the binding cannot be that bad as the pads have lasted over 20,000 miles, much more than just acceptable in my view. Now they are due to be changed. This of course means the pistons will need to be pushed back into the caliper. Which means the pistons will need cleaning otherwise I'll be pushing dirt and rust into the rubber seals which would tear them and ruin the brakes.
First off you will need
- Something to sit on (Toolbox, old car wheel, I've even heard of people using a chair...)
- Something to grip things (Pliers?)
- Some brake fluid (Old stuff will do, it's not going "in" the brakes)
- Cleaning brush (Toothbrush, preferably not the one you currently clean your teeth with)
- Somthing scrape-y (small file, blunt scredriver)
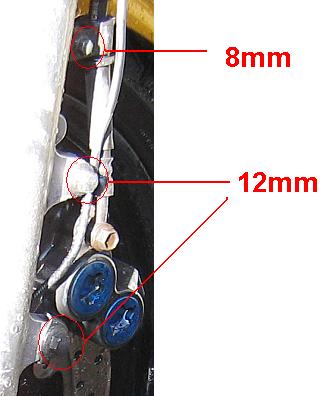
- Spanners (For the Fazer, 12mm and 8mm)
- Sheet of plastic (A large bin bag did me fine)
- Rags (The ex's old knikers, that t-shirt your dad thought would look cool)
- About 3 hours spare time (And some smokes if you want to do a proper job)
The first thing you need to do is remove one of the brake calipers. Only remove one, that way you've still got another working caliper to refer to if you forget what goes where, and you remove the possibility of cocking up both brakes at the same time. On the Fazer there's 2 12mm botls holding the caliper on and one 8mm bolt that claps the brake hose to the fork legs.
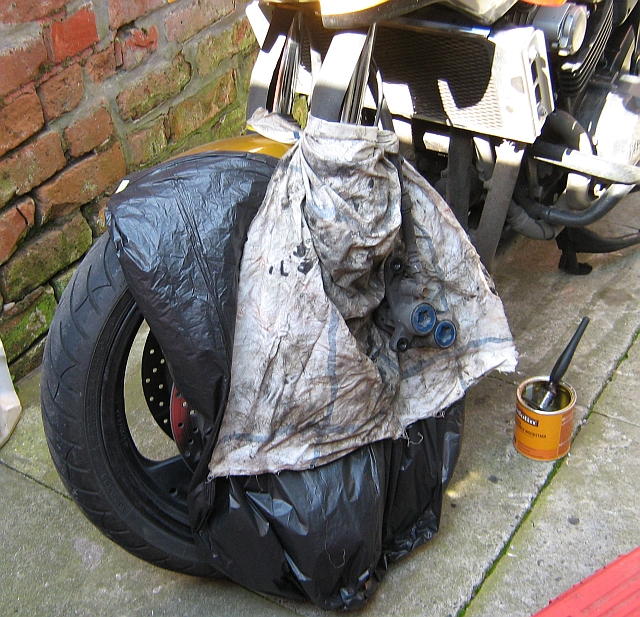
The caliper should no slide off the disk. You may need to apply a little leverage between the caliper and the fork leg if your brakes are particularly sticky. The next thing to do is protect the wheel from the cleaning process. Why? Some folks use fancy brake cleaners to treat their calipers. They sure work fine but you can't really "scrub" with them, they evaporate too quickly. I prefer to clean my brakes with brake fluid. Why? I've read that paraffin, WD40 and a whole range of other petrochemical cleaning products can cause the rubber seals to swell, crack, commit suicide or phone your mother and tell her you're a Nazi. I'm sure a lot of it is rubbish, but seeing as I don't actually know what is rubbish and what is fact...I'm hedging my bets.
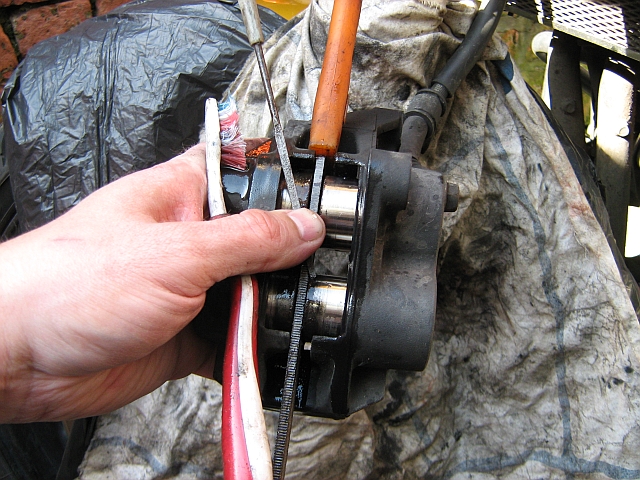
Brake fluid, I would hope, is safe to use in brakes. However brake fluid seems to be capable of eating paint. You do not want brake fluids sitting on your shiny wheels, mudguard, bodywork or even plastics. If you spill a bit here and there, don't panick, just wash it off thoroughly with water, but don't leave it there, it eats paint slowly. As a cleaning product though it is very effective at removing ground in dirt, brake dust and other nastiness. I use the plastic sheet, or bin bag, to cover the wheel and mudguard. I also use a rag to protect the wheel from being bashed by the caliper...thusly...
Genious?!? OK Fair enough. The next step is to remove the brake pads. Blue Dot brake pads are held in place by a pin held in place by 2 "R" clips. Unlike several Honda calipers I've worked on, once the "R" clips are removed the pin normally comes out with only the minimum of fuss and the help of some pliers. Place the brake pads, pin and "R" clips somehwere SAFE. Not on the floor, not on the workbench, them "R" clips are tiny. Put them in an old jam jar with the lid on or something like that.
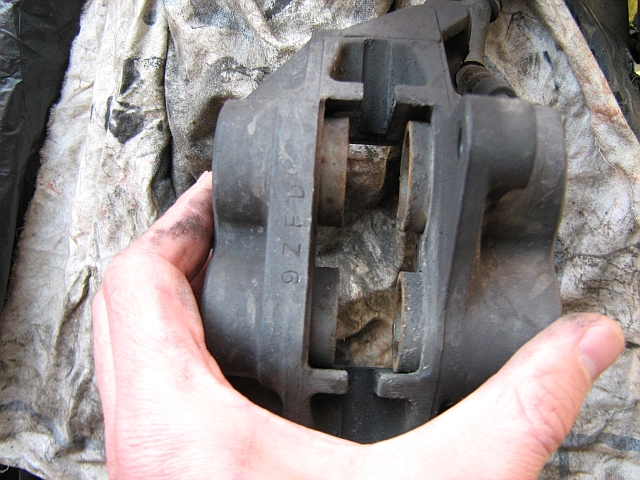
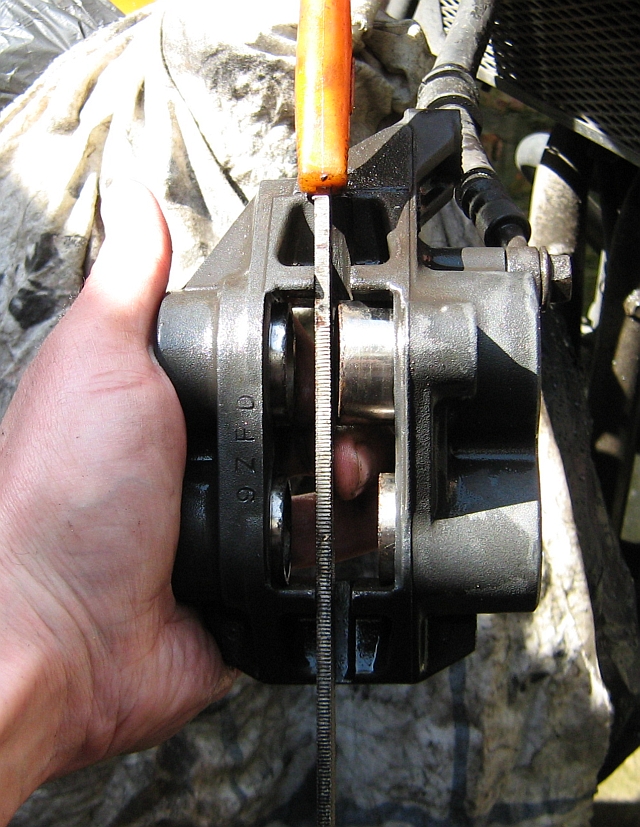
There's 2 things you should notice here. Firstly how dirty and rusty the pistons are. If you're unsure which part is the piston...you probably should stop reading now and find a proper bike mechanic. The second thing is to note the pistons are still fairly deep into the barrels which makes cleaning difficult. Now today we are simply cleaning the brakes, not rebuilding them. You DO NOT want the pistons to come all the way out of their barrels. If that happens you're going to have to re-assemble and re-bleed the whole system. As such we need to ensure the pistons cannot come out too far. Anything similar will do, but I find my flat file works a treat.
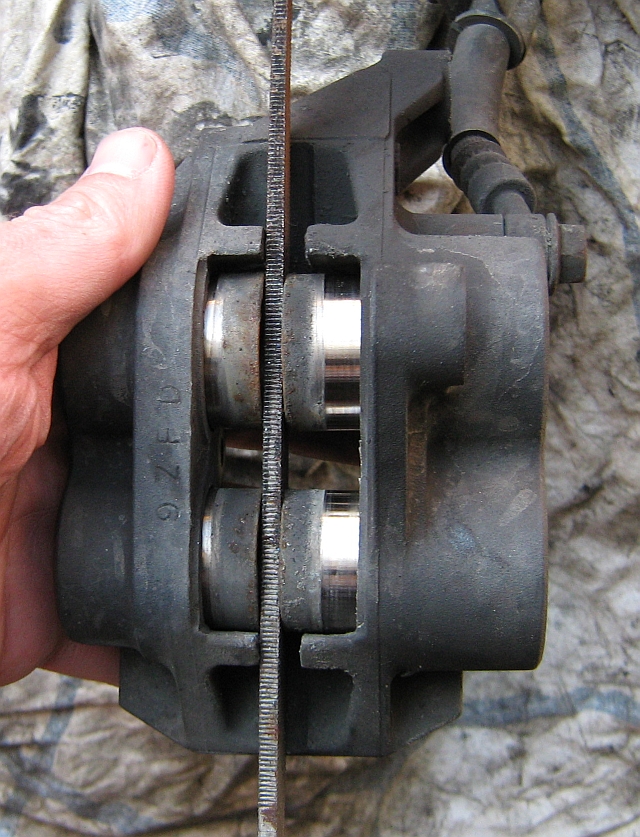
So I've placed the file essentially where the brake disc would be. Then I've pumped the brake lever until the pistons have emerged from the barrels. There's a good reason for this. It means I can see the condition of the pistons and it also makes rotating the piston a lot easier. Notice from the picture that one pair will tend to pop out further than the other. Clean this side first. You should be able to rotate the pistons with your fingers. If you cannot rotate the pistons with your fingers, DO NOT use pliers, grips or anything else that could mark the pistons. Keep on plugging away with your bare fingers, wobbling, jiggling and twisting until the piston rotates. Also do not be tempted to remove the file, the piston will fall out and you're onto that rebuild we're trying to avoid.
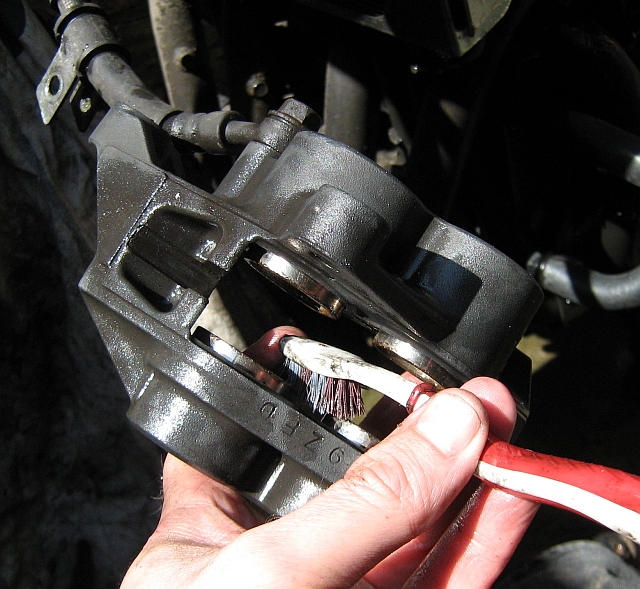
Now we can start cleaning. Making sure the rest of the bike is protected, put a small amount of brake fluid inot an old jam jar, dish, cup or anything else old and knackered (not the wife). Dip your old toothbrush into said brake fluid and start scrubbing. Be sure to keep the file or spacer in place. Scrub scrub scrub, more brake fluid, scrub, clean and scrub. For stubborn bits I GENTLY apply the file, anything similar is fine but you need to be sure not to scratch the piston. I have to admit I work a little harder to remove any rust as this may tear the seals when the piston is pushed back in.
The piston will, if aged, have corrosion on it. If it's excessive there's no other option than to replace the pistons, in which case you may as well replace the seals as well. There are kits available online for this job. I'd recommend stainless pistons, they'll last forever. A small amount of corrosion is fine. When the part of the piston facing you is clean, use your fingers to rotate the piston to the next dirty part. You can see in the image above I've cleaned the top right piston and I'm working on the bottom right.
When these 2 pistons are cleaned, I need to push them back in a little and pump out the opposite side. Essentially you aim to get the "out" pistons in a bit and the "in" pistons out a bit. Pliers and screwdrivers help lever things about. Remember, keep the file or spacer in place at all times!!
Clean the next pair of pistons.
By now about an hour or two will have passed if you're doing a proper job. It's time for a smoke break. The next job is to push all 4 piston back into the barrels. Remember keep the file or spacer in place! Using scredrivers as levers, gradually push each piston back into the barrels. Take your time, slowly, gently. As one is pushed in another may come out. Keep on pushing them back and eventually you'll get there. We're not aiming to get them all the way back into the barrels. The piston will be most rusted around the part closest to the pad, if we can keep that bit out them we avoid scratching the barrels and seals.
In this above picture, the pistons on the left are about right. The top right one will get pushed back in...which will cause the others to pop out a little. Keep at it. Whena ll the pistons are back it's time to give the caliper a clean. Again using the toothbrush and brake fluid, scrub scrub scrub. Scrub inside the caliper, around the pistons.
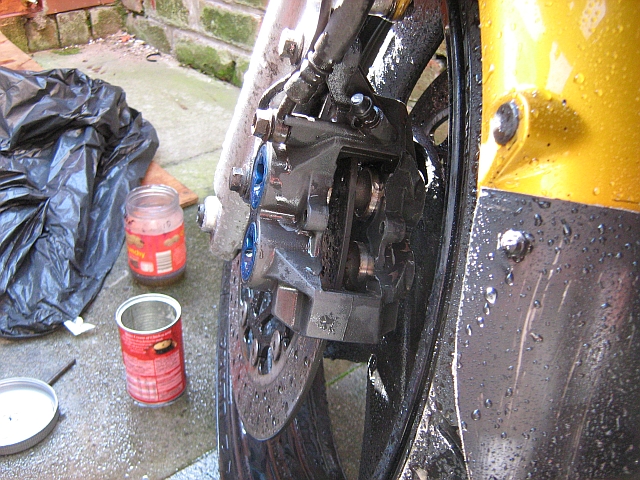
At this point it's a good time to clean all that brake fluid away. Get the hosepipe. Hose down the caliper thoroughly, hose down the floor then you can remove the rag and the plastic bag from the wheel. Hose everything down here too, just in case. Now would be a good time to clean the fork leg - not with brake fluid - just your favouite cleaner (paraffin). When everything is nice and clean an all is well with the world, replace the caliper back onto the fork leg. Be sure to grease the bolts with a spot of grease, not too much as you don't want it to get on the brakes.
By now everything should be clean, wet and shiny. If you are fitting new pads, slot them in, if not clean the old pads and place them in. Then clean the pin, give it a rub down with the file you've been using to hold the pistons in place. Replace the pin through the pad eyes then re-fit the "R" clips.
PUMP THE BRAKES!. Because you've pushed the pads back there'll be no braking until you've pumped the brakes quite a few times. I've had a few scary moments after messing with brakes. Clean the other side in the same manner then PUMP THE BRAKES. Take the bike for a slow and careful test ride.
Then have another smoke...
Reader's Comments
Ali said :-
thanks for such thorough explanation, I had just bought a R1 and the rear brake ( blue dot) is seizing up after riding the bike for half an hour.Your article is great help , hope cleaning yip calliper will solve the problem.
Thanks a lot agin.
01/01/2000 00:00:00 UTC
vinny said :-
Thank you for the very useful information.
Ready to get cracking with mine now.
Thanks again.
Vince
01/01/2000 00:00:00 UTC
said :-
A very clear and comprehensive guide -this should be posted up as A STICKY ON YAMAHA FORUM SITES.
Well done that man.
01/01/2000 00:00:00 UTC
john said :-
great that Ren.
Thing is , I don't smoke so should I really attempt the job.
Also, would that method apply to my Brembo brakes on the Honda ???
01/01/2000 00:00:00 UTC
Ren - The Ed said :-
Hi John. If you dont smoke I'd recommend you make sure there's a kettle...cup...tea bags...milk and sugar to hand. I dont think not smoking precludes you from the job.
My only concern about using the same method on any brake at all is what the brake fluid might do to the paint on the brakes. As such I'd recommend putting some old brake fluid on a tiny part of the caliper that you cant see, and leave it there for a couple of hours. See if there is any adverse effects...
Otherwise...take your time and enjoy!
01/01/2000 00:00:00 UTC
Dax said :-
Awesome .. gives me the confidence to have a go myself. Much karma to you. Cheers.
01/01/2000 00:00:00 UTC
nud said :-
Great write up - very comprehensive!
01/01/2000 00:00:00 UTC
Ren - The Ed said :-
I'm glad you all like this! I should do more bike fixing stuff...
01/01/2000 00:00:00 UTC
R6zer said :-
Cheers buddy you're a legend!
18/10/2017 12:39:02 UTC
Ren - The Ed said :-
Thanks R6zer, we try our best :)
19/10/2017 09:38:53 UTC
Name
Comment
Add a RELEVANT link (not required)
Upload an image (not required) -
Uploading...
Home
Repair And Restoration