Home
Repair And Restoration
Z250SL Tappet Check And Adjust
By Ren Withnell
Job Date 19th-20th October 2018
Please note - many thanks to Snod who's earlier blog put Sharon and I on the right track. He's also kindly allowed me to use some of his images because I got carried away with doing the job rather than recording it. You can find Snod's humorous and thorough guide at http://justbikethings.blogspot.com/2018/07/ho-to-check-valve-clearances-of.html
Sharon's Z250SL now has an impressive 15,600 miles on the odometer. This means it is in fact overdue it's service by 600 miles. Today we will be tackling the worst of those tasks, checking and adjusting the tappets.
The setup on the 250 is a pretty standard bucket over shim affair. This has the advantage of being reliable and simple but draws huge frustrations to a mechanic such as I.
Firstly it means that once access to the valves is achieved and measurements are taken THEN the camshafts need to be removed. Secondly unless you have a comprehensive stock of shims everything will need to be left until shims of the correct size are ordered and received. While screw and locknut rocker valves may have more moving parts and more to go wrong, at least they can be adjusted immediately.
I am assuming you the reader has experience of adjusting tappets on other motorcycles or cars. This is NOT a beginner's guide. If you have previous experience with bucket over shim valves then all the better.
------------------------------------------------------
Start off by removing the rear seat and front seat. This is covered here on Kawasaki Z250SL Battery Access
Next is tank removal. There are 2 bolts, one either side of the tank that can be removed.
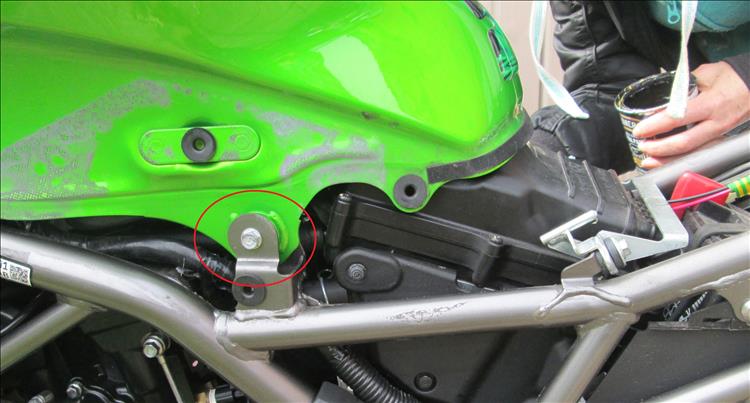
One on this side and a similar one on the other side.
I'd strongly recommend disconnecting the battery at this point. While I doubt it is essential it certainly won't do any harm and may prevent a dangerous short if any wires are damaged.
Next lift the tank SLOWLY and delicately at the rear. Once the rear is up by about the width of a hand you can look underneath. Underneath you will see a wire from the harness into the tank's fuel pump (a white plastic circular item). Unclip this by pressing the tab near to the tank's side of the connection.
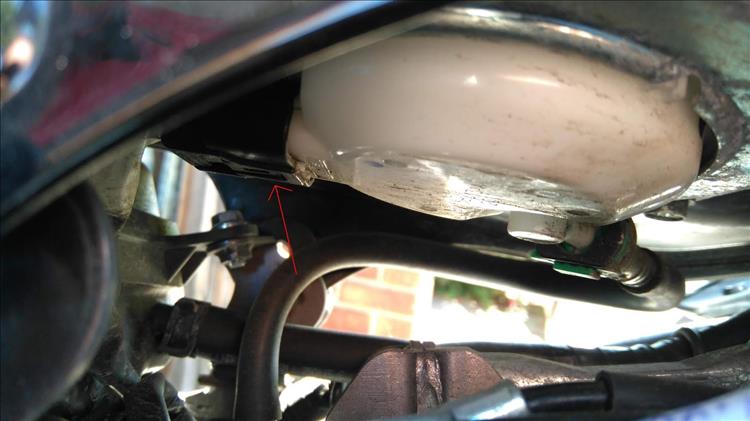
The fuel pump connection (Snod's image)
The high pressure fuel pipe also comes from the fuel pump. This has a green tab that can be pulled approximately 2mm outwards. Once this is released pull off the pipe. It is likely a few drops of fuel will spill from the pipe and the tank - ensure the engine is cold, the area is ventilated and tell ya mate to put his bloody fag out!
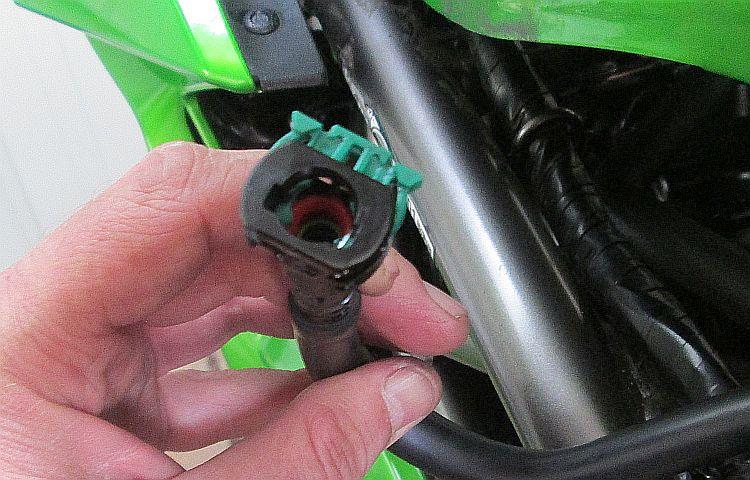
Delicately pull the green tab out into this position to allow the pipe to be removed from the tank.
Next there are 2 breather pipes at the front left of the tank. These can be pulled off firmly. Once done the tank pulls out rearwards.
We found that while the tank was full the fuel stayed in the tank - MOSTLY! While storing the tank it did leak slowly. As such you'll need to find something to cover the end of the pipe that comes out from the tank's fuel pump and again store it somewhere ventilated and ignition free.
With the tank removed we can see the frame - which appears to block any hope of access to the rocker cover. The sharp among you will notice a section of the frame can be unbolted. Why this was deemed necessary is unknown to me but it is in the way and luckily it is easily removed.
While it may not be actually completely necessary I consider it helpful to remove the 2 throttle cables. Strangely the small 10mm M6 nuts are unnervingly stiff, they feel like they are cross threaded. However once removed with a little cleaning the nuts spun as freely as I'd expect. I suspect some form of locking compound or glue has been used.
Hell of a job to get these off, but there was nothing wrong with them after a clean.
There is also a rubber pipe from the airbox to a valve just behind the headstock. This is easily removed and now you have access to the rocker cover.
Unbolt the 4 10mm headed nuts from the rocker cover and with a tap the rocker cover should come loose. Now the fun begins. After much fiddling, moving, trying, looking, experimenting the only way we could get the cover through the tight gap between the engine and frame was to remove the gasket.
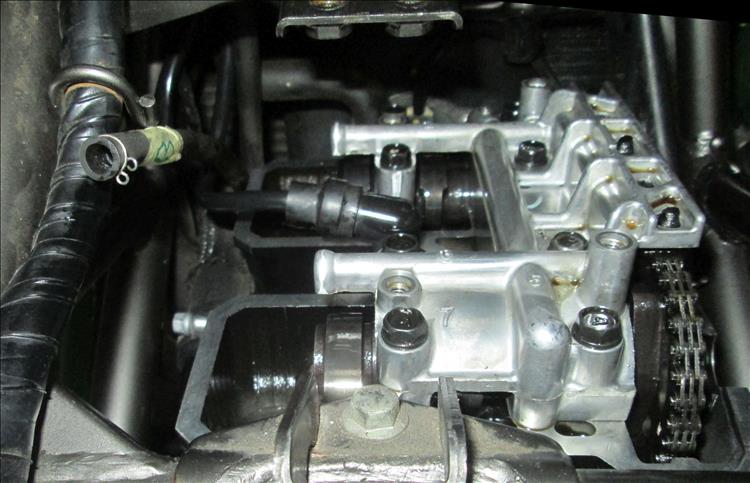
At last!! We're in.
As a note when we rebuilt the engine it is always better to have the gasket seated in the rocker cover before fitting. As such I expected we'd have a hell of a time getting the cover and the gasket back in. Sharon somehow weirdly just slipped it back in with barely a nudge. The point is that there IS in fact just one very very specific way the rocker cover and gasket can come out and go back in. No - I don't know what it is...
With the valvetrain exposed it is now time to set the engine to top dead centre. On the left side of the engine are 2 covers with large slots. I saw a tip the other day that I'll share - don't use a big screwdriver use a coin held in a pair of pliers. Go through your change and find the coin that fits each slot best and use that. Like OMG, if only I'd know that years ago.
Top Dead Centre next. The markings on the flywheel are "F" for fire then "T" to TDC. The letters are very small and they are on on their side, "lying down". They are also on the outer edge of the flywheel making them all the harder to find. Spend a while with a torch rotating the engine until you find the marks, it'll be worth the effort.
It is there! It looks like my little drawing in the corner.
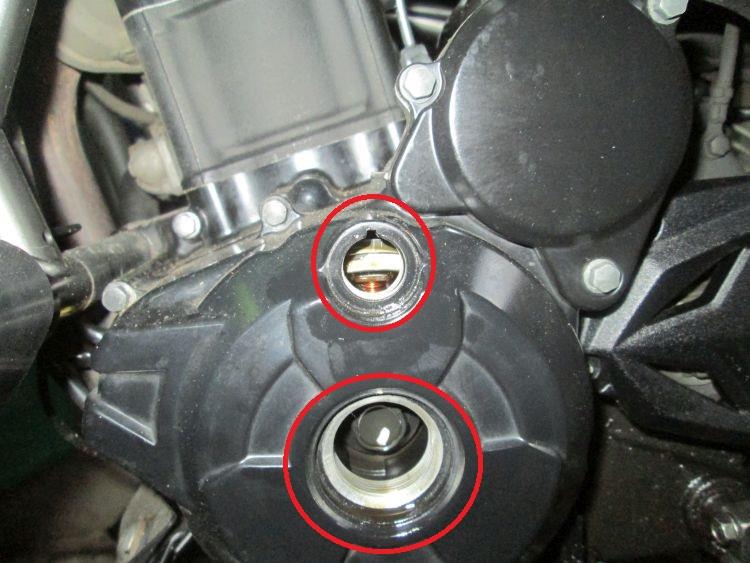
With the covers removed.
Of course lady luck says you''ll be at the wrong TDC between blow and suck. Being an experienced veteran mechanic you'll know this by the position of the cam lobes but just in case look at the camshaft sprockets. If you are on the correct TDC between squash and bang then the inlet sprocket's "IN" markings will be the right way up and inline with the cylinder head's edge. Same with the Exhaust.
It is worth noting the sprockets appear to be the same from the inlet to the exhaust. There are markings for both "IN" and "EX". So be sure once you remove the cams to make absolutely certain to mark each one and not to confuse them.
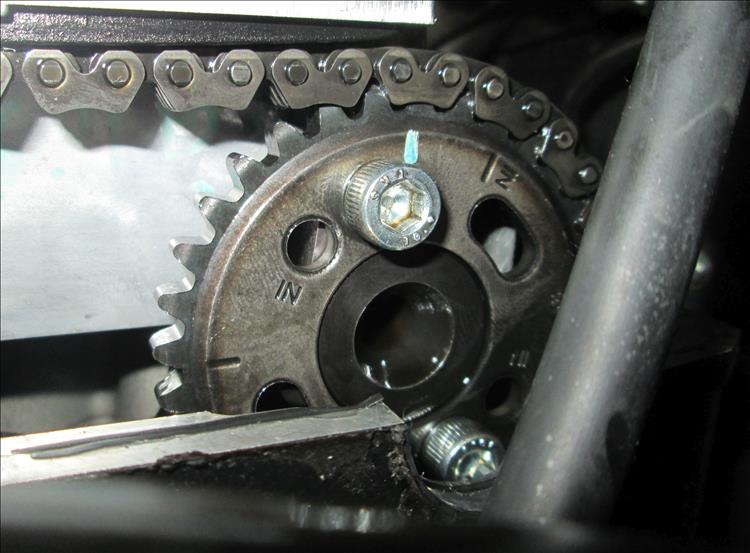
Exhaust "in line" with the cylinder head - NOTE! The "IN" markings too so don't mix up the cams.
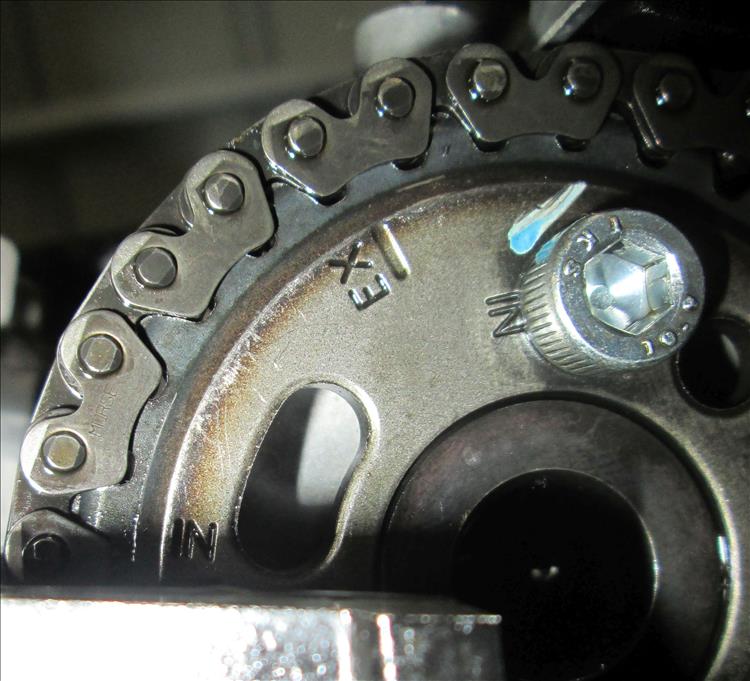
Again this inlet is in the right place - note the "EX" though.
It is also worth noting there is a bolt between the 2 sprockets. I am uncertain as to it's mechanical purpose but it is very very handy. So long as you don't remove that bolt this can be used to prevent loss of the camchain down the camchain tunnel. Very useful.
With the engine at TDC and the camshaft lobes at 9 and 3 (as in clock time) it's time to check the tappet gaps. Snod's blog gave us our initial settings but in the interest of being thorough I checked these at my local Kawasaki dealer.
Inlet - 0.10 to 0.19 millimetres
Exhaust - 0.15 to 0.24 millimetres
We found the following gaps.
Inlet left 0.11mm
Inlet right 0.10mm
Exhaust left 0.15mm
Exhaust right 0.13mm
Apart from the right side exhaust valve everything is within tolerances. But - everything is at the lower end of the tolerances. We decide the following.
Inlet left 0.05mm smaller shim to bring the gap to 0.16mm
Inlet right 0.05mm smaller shim to bring the gap to 0.15mm
Exhaust left 0.05mm smaller shim to bring the gap to 0.20mm
Exhaust right is awkward. With a 0.05mm smaller shim we'd bring the gap to 0.18mm, within tolerance but still at the lower end. With a 0.10mm smaller shim we'd be up at 0.23mm, the upper end of the range. I believe a slack tappet is a happy tappet so we'll aim for 0.10mm smaller.
The next step is to undo the 8 times 10mm headed bolts that hold the chamshaft retainer in place. Once removed the retainer might take some gentle jiggling before it comes away from the cylinder head.
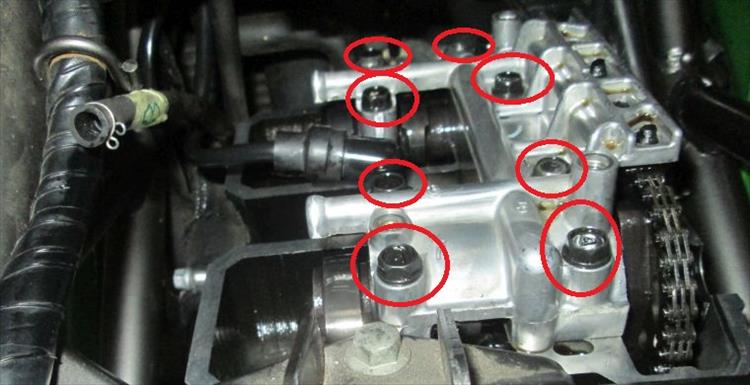
Undo all this lot and get jiggling.
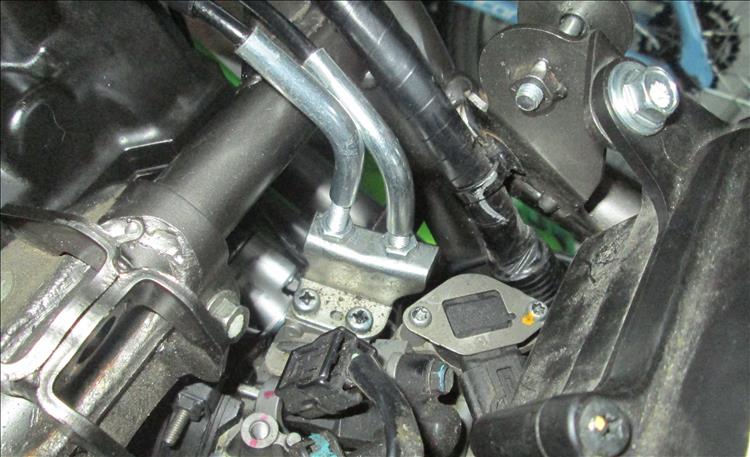
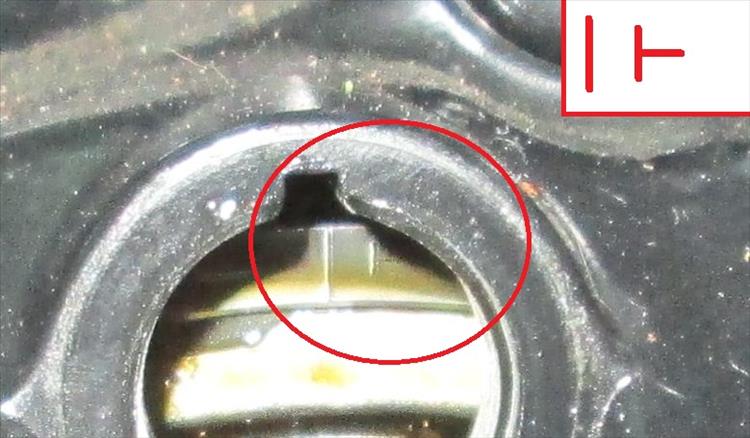
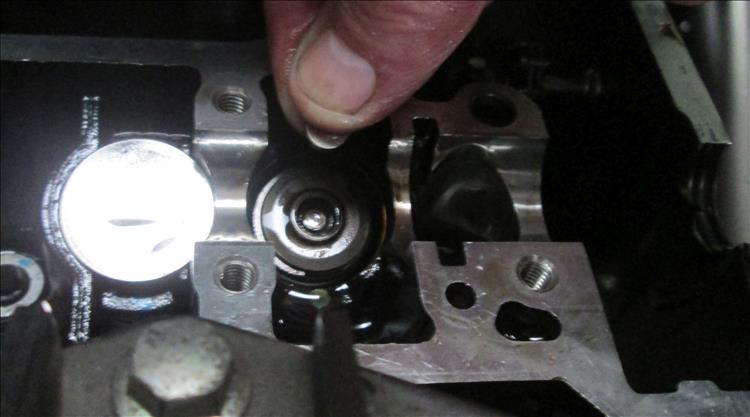
Before the cams can be removed we need to remove the can chain tensioner. This, as with most bikes is held in place with 2 times 8mm headed bolts. Getting to the bolts behind the frame is a fiddly affair but manageable. Take note - the tensioner is a ratchet system. The ratchet will fully extend on removal. As such you must remove the spring and by pulling up the ratchet pawl return the ratchet to it's fully home (shortest) position. When replacing do not fit the spring until the tensioner housing is bolted fully home.
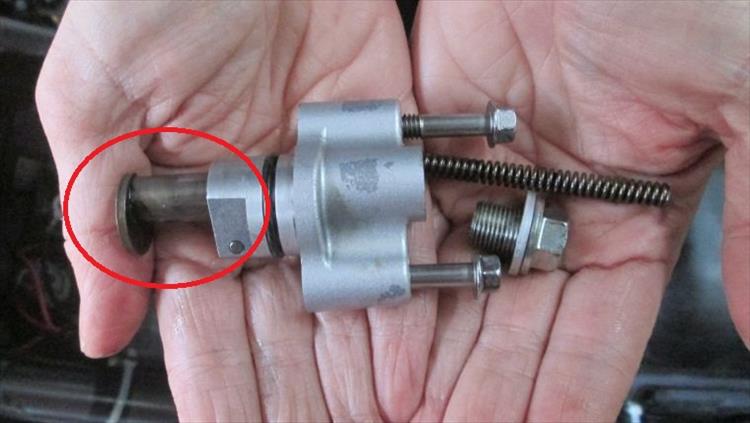
Be sure the part circled is all the way home and not out as in this image.
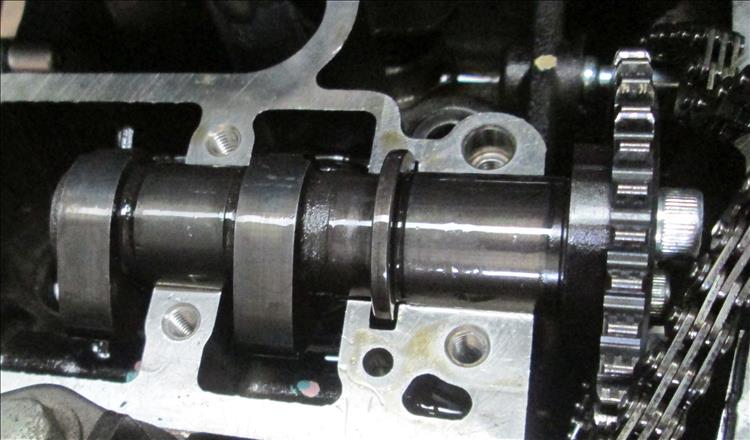
Oddly some tension remains on the chain. It seems the guide that the tensioner pushes against has plenty of spring of it's own. There is sufficient flex though to pull the inlet camshaft out which loosens the chain making taking the exhaust camshaft out easy. Do ensure you take time to mark or tag or somehow note which camshaft is which.
As a matter of caution now would be a good time to stuff a lint free rag down the camchain tunnel. This should hopefully prevent any dropped shims from disappearing into the engine which would require a total strip to retrieve.
With the buckets removed from the top of the valves the shims are located as you'd expect beneath. I am not going to cover how to calculate what size of replacement shims here as this guide is aimed at people with sufficient experience to know this already.
Under here...
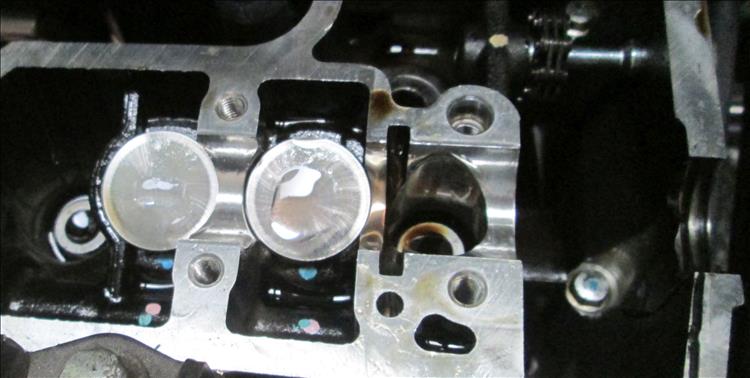
Then under here...
You'll find the shim! Note - often the shim comes off inside the bucket - don't lose it.
Notes for rebuilding.
As ever spend some time, lots of time taking your time to ensure the timing chain and timing marks are all correct. Ensure the cam chain tensioner is ratcheted such that it is in it's "loose" position before replacing and only when the housing is secured replace the spring and its holding bolt. Always turn the engine over slowly by hand before starting to ensure everything is OK. Double check the timing marks after doing this.
Take your time with the rocker cover. The correct procedure would be to fit a new gasket each time but we did not. It's fiddly as hell but there is just one very specific way to get the rocker cover complete with gasket in under the frame.
Inspect the tank and fittings, might as well if you've got it off. Ensure the high pressure fuel pipe is fully home and the green clip is seated. We took several attempts to get this right, I think we were holding our tongues out wrong. Turn on the ignition and check for leaks before starting and after starting.
Finally don't forget to refit the removable part of the frame before refitting the tank and the seat and the plastics and the rear seat.
"Oh what's this Ren?"
"ARGGGGGHHGGHGHGH!!!!"
Yes, we forgot.
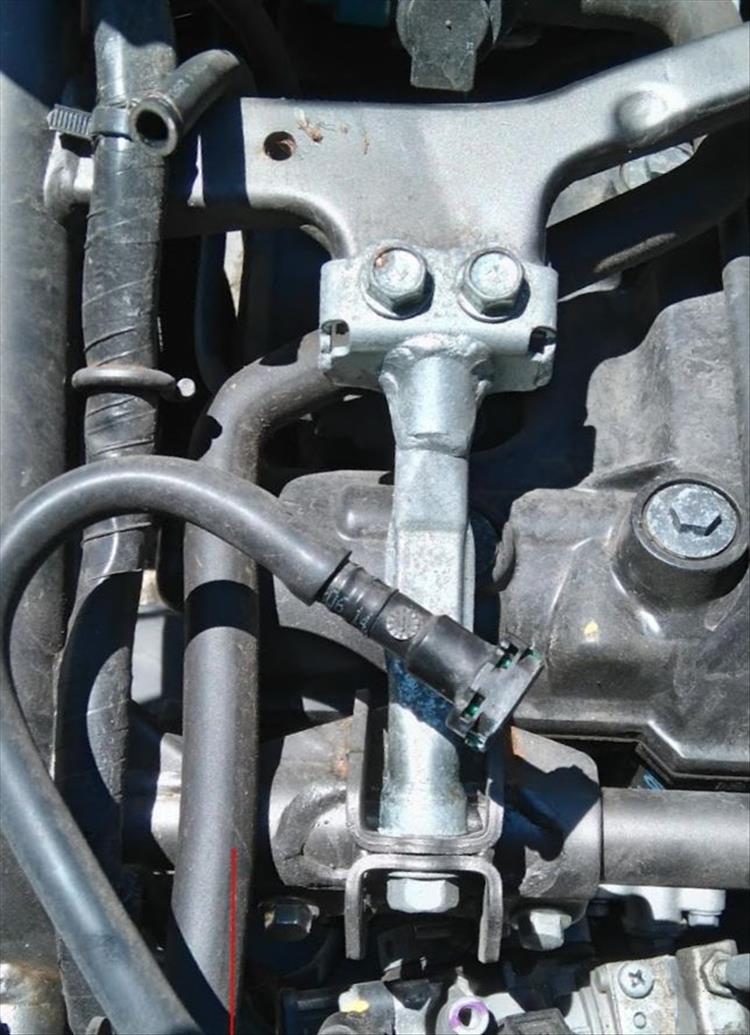
Snod didn't forget. Snod's image.
Finally I would again recommend reading Snod's take on this, There are items he covers more clearly than I and the more information you have the more likely you'll have a good outcome.
If you'd like to post your maintenance guide here on Bikes And Travels contact ren@bikesandtravels.com
Reader's Comments
Snod said :-
Ohhh I see how it is, MY hand is not pretty enough to model the fuel pipe!
Nice to see it's the usual faff though and not an extra fun one. Why does the tensioner fully expand when you remove it? Did you remove the big bolt from it before you removed it?
Also, why does Sharon's bike still seem quite shiny but mine is half rust? Questions questions..
05/12/2018 21:41:22 UTC
Ren - The Ed said :-
Nope definitely not Snod. You've got tough manly hands, my delicate readers like to see my delicate soft clean pinkies. We don't want none of your butch types here I'll have you know.
Erm. IF we'd removed the large bolt that keeps the spring under tension BEFORE we'd removed the whole tensioner system then no the "plunger" for want of a better word would have stayed put. We make these mistakes so you don't have to you see.
Sharon's bike is shiny because she polishes the living be-jeezus out of it all the time. That's why. Then she complains that she's always tired and never got any spare time.
06/12/2018 08:49:20 UTC
Snod said :-
Just checked mine at a smidge under 19500 miles and found clearances very similar to what you reported above. I'll have to buy a couple of shims for the exhausts but the ones that were in the exhausts are slightly thinner than what was in the inlets so they can be used on the inlets.
Anyone got a 2.80 and 2.85 shim kicking about? Give you a fiver for them, can't say fairer than that..? Kawasaki appear to want £9.65 for each one :(
20/10/2019 19:43:21 UTC
Ren - The Ed¹ said :-
Ebay 7.48mm dia shims. You'll find plenty at around £3 a pop. Grab a couple up and down of your sizes because, well, things settle.
20/10/2019 22:29:37 UTC
Snod said :-
True enough, already found a place selling them for £2.50. I guess I can live with that though I miss being able to adjust tappets and locknuts for free..
20/10/2019 22:55:59 UTC
said :-
22/03/2020 04:57:43 UTC
Bob said :-
I bought a "hotcams" shim set for about £80 for my KLX (same engine), since I've got 4 bikes and I'm actively running 2 of them it saves a lot of time and hassle having the right shims to hand.
You mention about tension on the chain with the tensioner removed. This engine has a secondary tensioner mounted in the crankcases - there is no ratchet, just a strong sping. If you look below the camchain tensioner you'll see a large diameter bolt head, that is the spring retainer for the secondary tensioner.
I've got manual tensioners on my KLXs, sooner or later the original will let you down - as evidenced by a distinctive klacking noise from the right hand side of the engine between 5K and 7K RPM
I've just checked my valves at 36000 miles on the KLX, not a lot of movement since the last check at 24000, which is nice.
09/03/2021 10:07:17 UTC
Ren - The Ed¹ said :-
I have a hot-cams kit kindly donated by a certain Pocketpete. Yay great! Except, of course, inevitably, with 8 shims on the CB500X and 3 shims per size in the kit... You guessed it, you need 4 of the 215s and you only have 3. In a perfect world you'd have a bucketful of each size.
Cheers for the tip on the "hidden" tensioner. I'll look out for that next time.
09/03/2021 18:25:44 UTC
Bartosz said :-
I can see that you put breathing hose over the frame part. Don’t do that! It needs to go under! In my bike was like that and it destroyed fuel pump outlet.
05/03/2025 05:01:56 UTC
Ren - The Ed¹ said :-
Which hose, which image are you talking of Bartosz?
05/03/2025 18:13:50 UTC
Name
Comment
Add a RELEVANT link (not required)
Upload an image (not required) -
Uploading...
Home
Repair And Restoration