Home
Repair And Restoration
CB500X Tank Removal
Guide Date - 07 February 2017
By Ren Withnell
Removing the fuel tank on the CB500X is not a simple 5 minute task. First you'll need to get to grips with the side panels then the remarkably fiddly fairing panels. Then you'll need to learn how to disconnect the fiddly "Quick Release" fuel tap. If you're still here then read on...
Remove the side panels. See CB500X Side Panel Removal
Remove the fairing panels. See CB500X Fairing Panel Removal
Straighten out the handlebars and remove the 2 bolts as below.
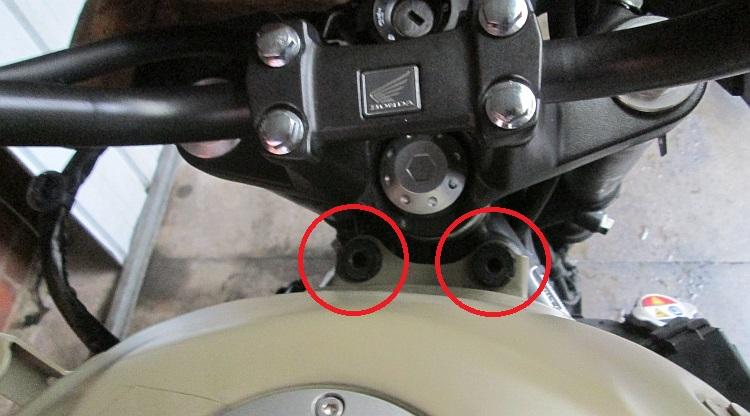 Keep the 'bars straight and remove the bolts as circled.
This should allow you to lift the tank up about 10cm at the front, pivoting around a bolt at the back of the tank. You can now peer underneath for the first time. The next step is to disconnect 2 rubber pipes.
On the left side of the tank near the front is a slim rubber pipe. Initially it looks easy to disconnect this from the tank but the pipe is clamped to the tank further down. Fear not! Just by the frame rail is a push connector. Disconnect the pipe at this point. Be sure to note where the connector is, it hides behind the frame.
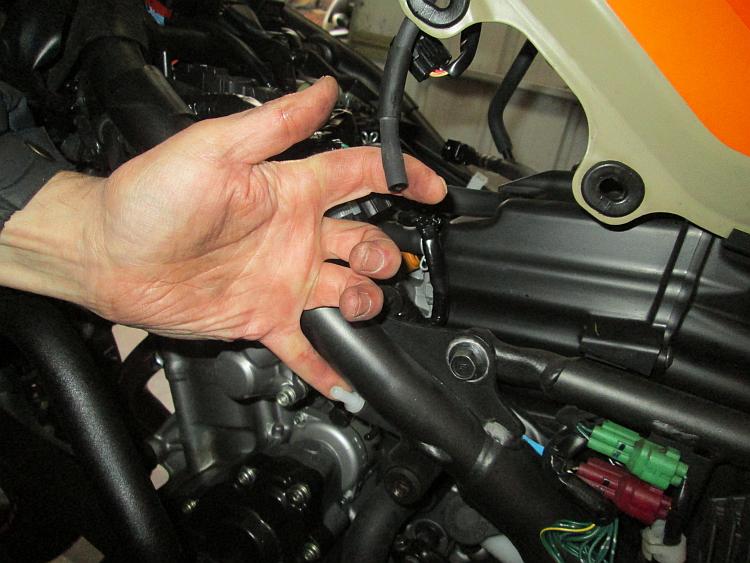 This pipe...to this connector...behind the frame...left side.
On the right hand side there is a similar but larger, thicker rubber pipe. Again this looks easy to remove from the tank but is clamped half way down. Again this also has a connector behind the frame too.
 This pipe...to this connector...behind the frame...right hand side.
Next unplug the wires. The connector has a "squeeze" clip on the side that leads to the tank. Take your time, work it out and don't be yanking hard. Once you work out the clip it will come apart as you'd expect.
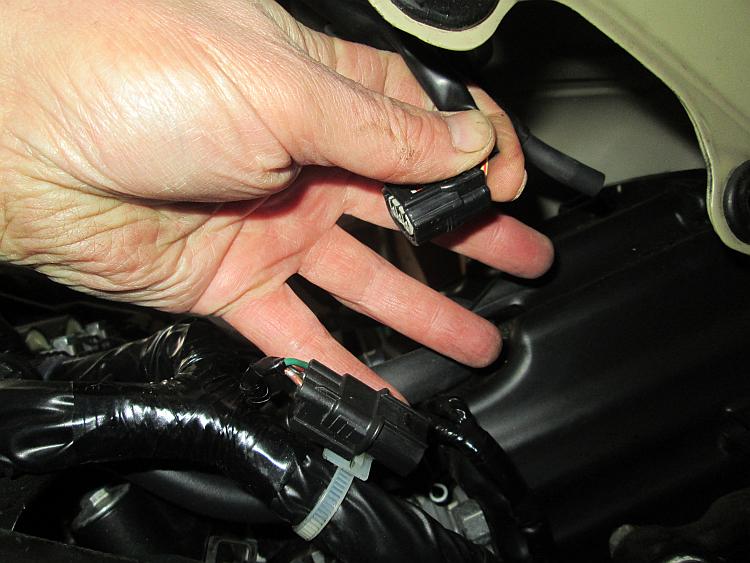 Squeeze the side where my thumb is.
You can now lift the tank a little more. Be sure not to lift the tank harshly as you could damage the fuel pipe and the rear of the tank where it is still bolted to the frame.
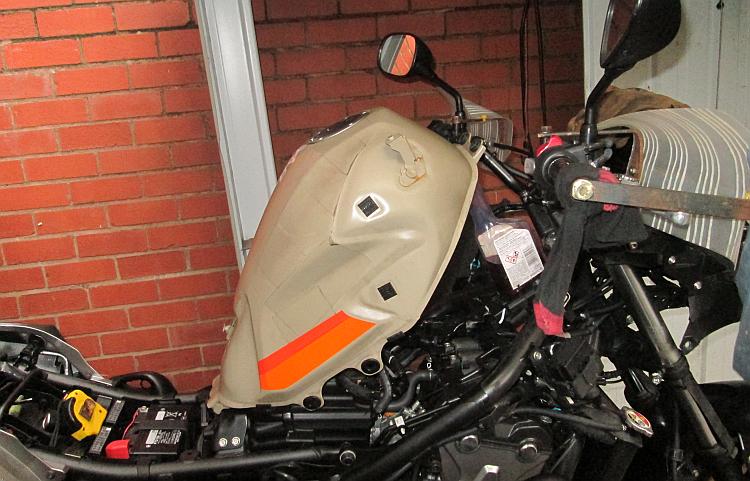 This is about the maximum lift at present. Be sure to be gentle.
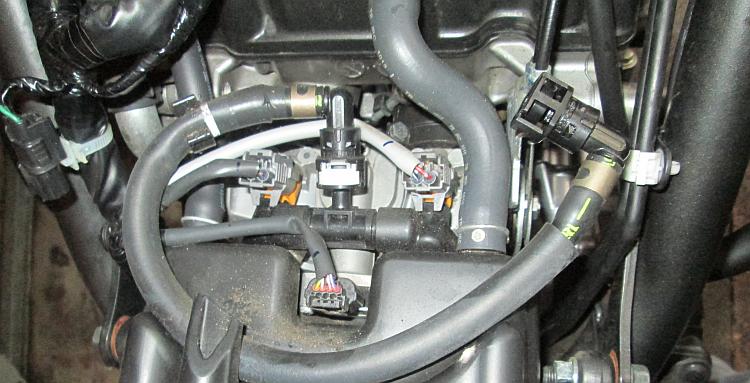
Next we need to disconnect the fuel pipe. Look under the tank and you will see the pipe running from the middle of the tank then down into the bowels of the engine area. Disconnect the fuel pipe's "Quick Release" connector using the method shown on this page Honda High Pressure Fuel Connector
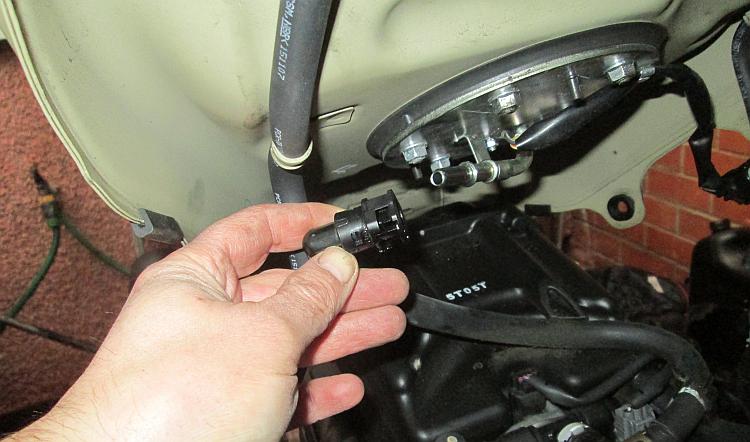
 This is the pipe you are disconnecting.
All the pipes and wires should now be disconnected. Don't take my word on this, check for yourself. Prepare somewhere to place the fuel tank. I have an old thick motorcycle jacket, you could use an old bedsheet. You need something to protect the paintwork and that is soft.
Once ready lay the tank flat to the frame again, make sure you don't crush any wires, pipes or connectors as you do this. Undo the bolt at the rear of the tank and lift the tank away.
 Remove this bolt and lift the tank away.
Reader's Comments
Archie said :-
Ren,
Using your pictures above, and looking at the connector attached to the injector rail you can see the white plastic clip in situ . And, removed from the connector at the tank end. Push the white clip into the the QR connector and pull off whilst holding the plastic spring clip in. It should slide off without too much trouble.
07/02/2017 22:26:44 UTC
Ren - The Ed said :-
I shall have a go Archie. Wish me luck.
07/02/2017 23:00:49 UTC
Stuart said :-
Hi.
When I take a tank off I try and have an old rear tyre ready to put the tank onto. As it's rubber it won't damage any paintwork and there is usually enough of a gap between the top of the tyre and floor to keep any pipes / taps from making contact with the ground.
Stuart.
07/02/2017 23:46:14 UTC
Ren - The Ed said :-
That's rather a smart idea Stuart. As you say many tanks have sticky outy bits that don't need bending. Good call.
08/02/2017 06:29:57 UTC
Ian Soady said :-
"Push the white clip into the the QR connector and pull off whilst holding the plastic spring clip in."
That sounds rather like the way the metal connectors I pointed to come apart.
I must say the way you (Ren) did it does seem over-complicated, and adds to my view that these things are a bloody nuisance. What we need is a comprehensive catalogue of electrical and fuel connectors with how to detach and reattach each.
I must say that the bike is generally much more accessible than the car where you're usually standing on your head trying to get at connectors under the dash where only your fingertips will reach and have no idea whether to push, pull, twist, prise or wobble.......
08/02/2017 10:22:31 UTC
Pocketpete said :-
I presume the tank removal is so you can gain access to the engine.
My identical ish bike is going to need it's shims doing at 16000miles.
Will you be doing a tappet shim video.
Not that I know what a tappet or shim is...
12/02/2017 17:22:04 UTC
Ren - The Ed said :-
I'll not be doing a video Pocketpete but another few articles regarding the tappets on the CB500X. Do you think you'll be run your 500 up to 16k before the warranty is up?
12/02/2017 22:15:25 UTC
pocketpete said :-
Ive done 4400 miles since July which is much more than I expected to do, but since I have better waterproofs and boots I've managed most of the winter. Looking at my service book it looks like 16k for the tappetey shim things. I usually change cars and bikes at the point where I need an mot so My bike might not last that long its going to be very close call milage wise
Also when I went to key my new key I stumbled upon at Honda 800 cross tourer in the shop. Had a little sit on it. Very similar to my 500 not much bigger but much bigger engine and power.
I must admit I was very tempted to take a test drive. It had full touring kit with center stand and tomtom sat nav panniers that simply clipped on no special frame needed. Big bike envy nearly got me.I really have to keep away from these bike shops.
13/02/2017 18:28:39 UTC
Latchy said :-
The quality of them there hand guards looks a bit iffy, there seems to be a bit of rust already, dig out ya guarantee and claim a new set hehe
14/02/2017 18:40:09 UTC
Pocketpete said :-
The handguards are very over engineered. They could rust for 100 years at the bottom of the sea and still be pretty tough.
If you dropped the bike one things for sure the bars will be fine.
14/02/2017 21:57:52 UTC
Ren - The Ed said :-
Yeah there's little chance of them rusting through. My concern is the levers may be fine but the guards will bend the bars!
14/02/2017 22:06:39 UTC
pockepete said :-
You could carry panniers on them maybe its a method to free up more room at the back of your bike have you patented it.
15/02/2017 08:02:49 UTC
Ren - The Ed said :-
Handlebar mounted luggage you say? Not quite so sure how that would affect the handling. If I patent the idea I'd just end up getting sued by some buffoon crashing because he had 25kg on each side.
15/02/2017 10:34:07 UTC
Ren - The Ed said :-
Handlebar mounted luggage you say? Not quite so sure how that would affect the handling. If I patent the idea I'd just end up getting sued by some buffoon crashing because he had 25kg on each side.
15/02/2017 10:34:07 UTC
Name
Comment
Add a RELEVANT link (not required)
Upload an image (not required) -
Uploading...
Home
Repair And Restoration