Home
Repair And Restoration
Honda High Pressure Fuel Connector
Guide Date - 06 February 2017
By Ren Withnell
Oh my, how embarrassing. If you read the rest of the post I concocted a complex and confusing "How To" guide to removing and replacing the high pressure fuel line connectors on my CB500X. Archie then suggested I just press the white bit (see the comments section).
Pah! What does Archie know? Quite a lot it seems. Using the connector to the injectors I created the following video -
So basically give the white clip a firm squeeze in, noting the tiny tang at the top. While squeezed wiggle the connector away. Replacement doesn't require squeezing the clip just a firm push until it clicks into place. Give the connector a gentle tug as though you're taking it off again to make sure it remains fimly in place.
My thanks to Archie for putting me straight and showing good grace over on the CB500X.com forum.
Original Post
When removing the tank from my CB500X I came across this connector. "Quick Release" apparently. It is...as long as you know HOW it works. As such here is my guide.
Let is look at the connector. For the purposes of demonstration the connector is attached to a spare throttle body to allow me to take better images.
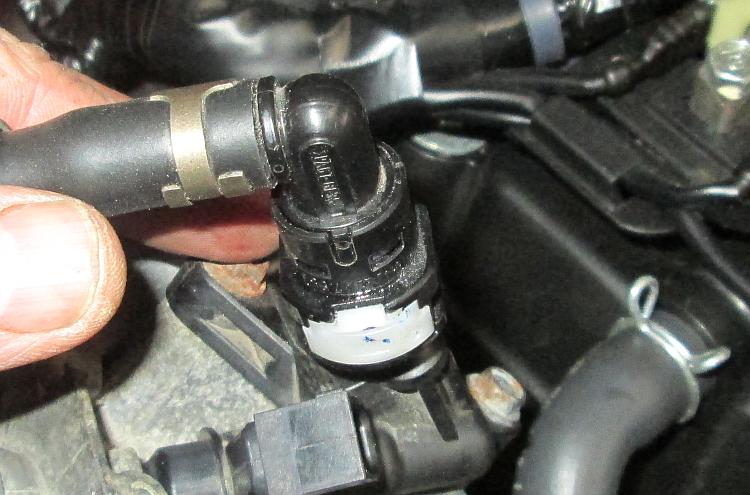 Well it doesn't look complicated.
Let us start to remove it. The first task is to pry out the white retaining clip. This clip stops the fuel line from coming off accidentally. Use a flat bladed screwdriver to pry it out from the position shown in this image.
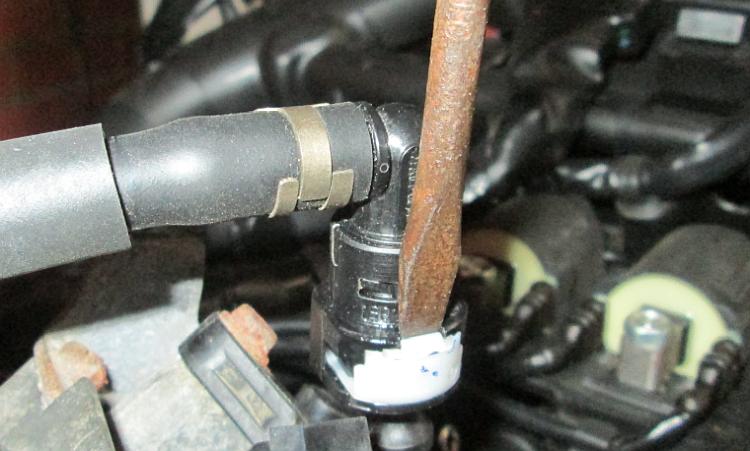 Just a little leverage should pop it out.
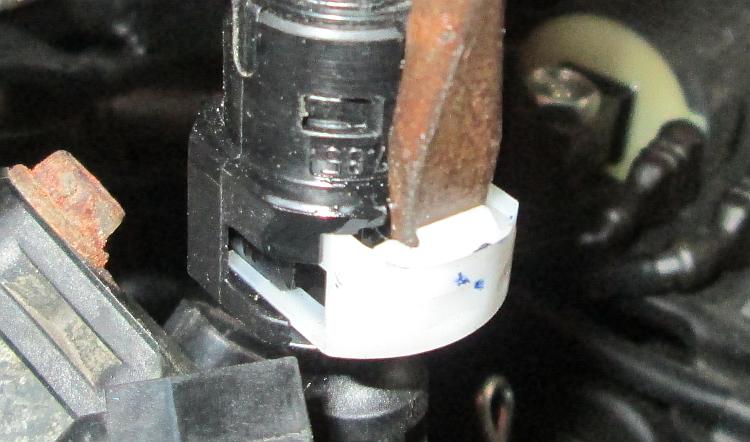 Half way out.
Ensure the clip is on good order. Nothing bent, cracked or broke. If there is ANY doubt get a new one. I can't imagine they're expensive and you don't want pressurised petrol all over your hot engine.
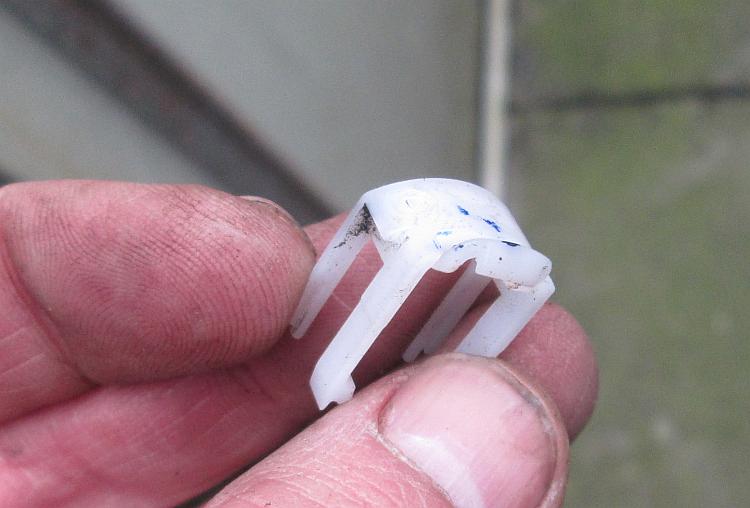 Make sure all is well.
Now at this point I thought the connector would just slide off. Not so. Where the clip has come out from there are 2 tangs or spring loaded pieces of plastic that keep the connector in place. These need to be gently pryed open too. Remember there are 2 of these so it may be fiddly.
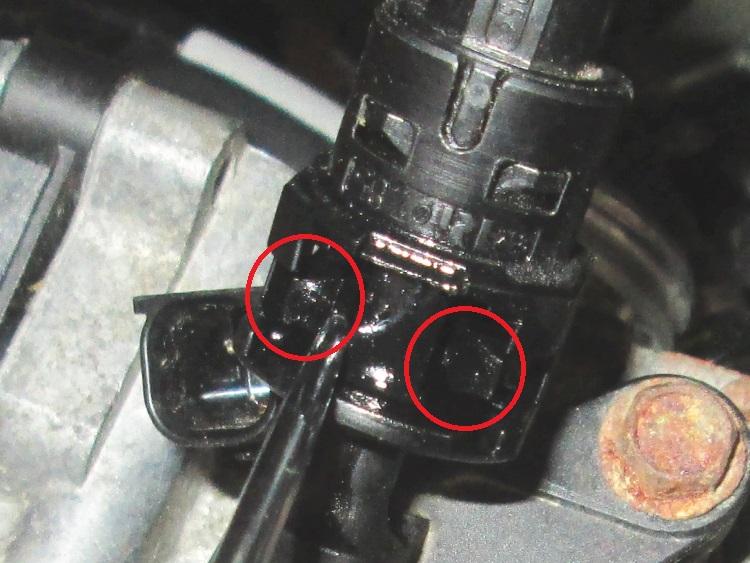 Just a gentle nudge to open the tangs and the pipe should come off.
And that is that...or so you'd think. Re-assembly is also not as straightforward as you may hope. Start off by replacing the white retaining clip back into the connector. BE CAREFUL and patient. The clip doesn't just slide back into place. It will try and fold in so slowly persuade it back into place using care, patience and a poking pin to position it so it looks like this.
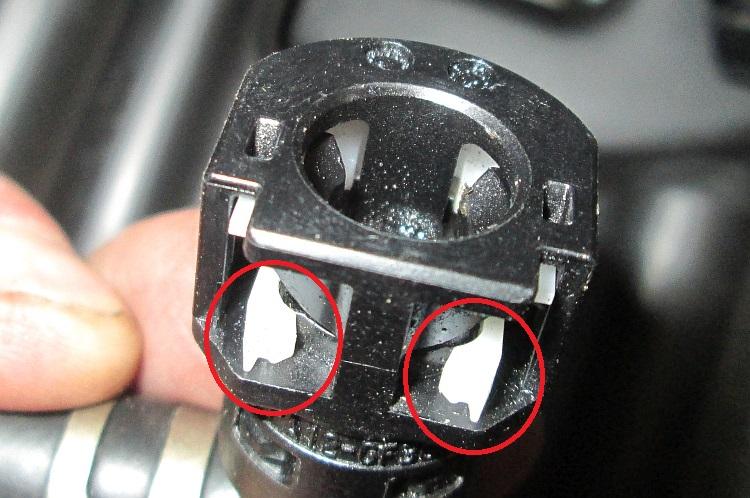 Be sure these circled bits don't try to fold into the centre off the connector. This is their correct position.
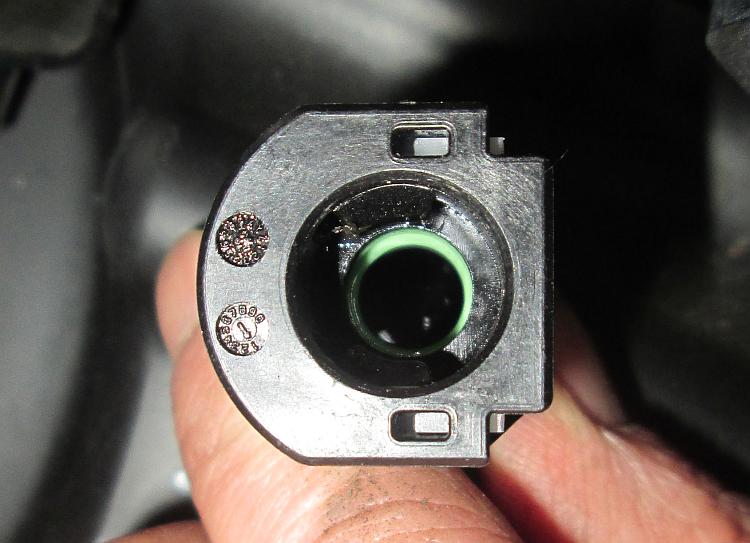 The clip will try and get into this part, the hole. When it's good this is what you should see.
Once the white clip is back in place be sure the connector is clean, particularly inside as dirt may cause a leak or get into your injectors. The connector should slide over the pipe and make a smooth satisfying click when it is fully home. Give the connector a tug, not so hard as to break things but firm enough to ensure it won't fall off on it's own. It should stay firmly in place.
I hope this helps.
Reader's Comments
Ian Soady said :-
I really hate things like that especially as they're usually tucked away in inaccessible corners where you can neither see them nor get your fingers in. How did you work out how to do it?
The Tiger 955i had quick release fuel connectors but these had a metal sliding "guillotine" affair that you just squeezed and the fitting popped out. Sadly, Triumph in their wisdom had these made out of plastic material that became brittle and several people had them snap off, pouring petrol all over the hot engine. No joke especially with a full tank although I'm not aware of any that actually caught fire.
The metal replacements were quite pricey but well worth fitting for peace of mind.
ps - is that a rusty bolt head - already? And that screwdriver is rusty as well. Tut tut.
07/02/2017 10:03:43 UTC
Ren - The Ed said :-
I must admit there MUST surely be better connectors out there. I suppose it all comes down to price in the end, as usual. Can you send me a link to the metal connectors? It might be worthwhile creating a new, safer and easier to use pipe.
Oh you are a cheeeeeecky swine! Right, Mr smarty-pants. The rusty bolt head is on and OLD CBF125 throttle body that I have as spares. Getting good usable images of the tank and the connector would be fiddly in-situ so for demonstration purposes I used the old throttle body, hence the rusty bolt head.
As for the rusty screwdriver. This again is an old screwdriver I have as many bodgers do. It's used for poking, prying, stabbing and wedging and at the time of taking the images it was the first thing that came to hand.
Anyhow I don't want people thinking I work in some exotic climate controlled sterile engineering lab because 99.9% of those reading will like me work in cold draughty and somewhat damp sheds.
Go and polish ya tools boy, I'll be using mine to dig earwax out me lugholes.
07/02/2017 10:55:18 UTC
Ian Soady said :-
The link shows the Triumph style ones but I would imagine the manufacturer makes something that would fit your situation. Even these aren't perfect as they have an internal Viton O ring which is very easy to trap and distort.
They are as you see not cheap however!
Polish tools? No need, they're used frequently enough so that they don't go rusty. It's a bit like brains - if you keep using them they stay in good condition.....
You didn't say how you worked out how the thing worked though. These things do sometimes drive me mad.
Totally O/T, I dragged the CB400 out and changed the coolant as what was in looked a bit murky. Struggled a bit getting hoses etc off the tank (why on earth do you have to remove it to get to the coolant filler?) until I realised I could prop the back end up to give a bit more room.
On coming to start it, just a click - a sharp blow on the starter motor sorted that out. Possibly sticky brushes? And it churned over for ages before it started up as the carbs were empty. I think it has some sort of vacuum-controlled tap as there's a little pipe going to the LH inlet port.
Anyway, once warmed up a bit it was running very nicely.
www.omega.co.uk/pptst/FTLC.html...
07/02/2017 12:17:27 UTC
Ren - The Ed said :-
Youch! Yep, pricey but perhaps worth it.
How did I suss it? Well my tools are rusty but the brain isn't. I slowly, carefully, gently squeezed and pressed and levered and cajoled. Eventually that didn't work so I had a look online. That didn't help either so I got firmer until the white it popped out. Thinking I was good it was still stuck so I prodded and poked until I spotted the tangs.
Once it was off I carefully went through the procedure with the 125 throttle body until I'd sussed what was supposed to actually happen. Sometimes ya just gorra work it out bit by bit little by little.
I had the use of a CB400 Super Four like yours when I was an instructor. You know...in about 50 or 60 thousand miles I never once had the tank off except to bypass the ignition when some toerag tried to steal it and broke the ignition barrel.
07/02/2017 12:33:35 UTC
Archie said :-
Good job Ren nice simple video.
Archie
10/02/2017 14:34:56 UTC
Ren - The Ed said :-
Cheers Archie. I'd still be poking around with screwdrivers without you.
10/02/2017 14:43:55 UTC
Dipak kamble said :-
Honda hiprosecantniter
15/10/2024 16:09:44 UTC
Ren - The Ed¹ said :-
I've Googled "hiprosecantniter", I got nothing. Deep man, real deep.
16/10/2024 07:19:01 UTC
Timbo said :-
There’s an easier way to do it, push the fitting back onto the tank/injector, it’s should move about a mm, with it pushed back press that white clip inwards, as in towards the centre of the fitting, again this should go in a mm or 2, then the fitting just slides off no tools required and no risk of breaking anything
16/09/2025 16:14:45 UTC
Ren - The Ed¹ said :-
Hi Timbo. You're quite right and that's why I had to edit the article after I wrote it - adding the video at the start of it.
I'm still learning... Thanks for the tip.
17/09/2025 08:21:07 UTC
Name
Comment
Add a RELEVANT link (not required)
Upload an image (not required) -
Uploading...
Home
Repair And Restoration