Home
Repair And Restoration
Making Your Own Control Cables
Post Received 21 November 2021
By Ian Soady
WARNING: Failure of cables such as brakes and throttle could cause a severe risk and possibly result in personal injury or worse. Ian Soady and Ren Withnell can take no responsibility for any negative results from following the procedures described here, which are based on personal experience over a number of decades and are offered for general interest rather than as direct instruction.
Note: the photos here are mockups as I’m not currently making any cables but I hope give the flavour.
Introduction
OK, having got that out of the way. Motorcyclists have been making their own control cables since the dawn of time. The procedure described here applies to the conventional (“Bowden”) cables commonly used for brake, clutch and carburettor control. It follows, but is not necessarily identical to, that outlined in publications such as “The Motorcyclist’s Workshop” and “The Vintage Motorcyclist’s Workshop”. I recommend getting hold of a copy of the latter although I believe it is now out of print and has become a “collectors’ item”.
The cables consist of a spiral wound outer normally covered with a plastic material (known as the conduit), a ferrule at each end of the conduit, an inner cable of wound steel wire which is either galvanised or stainless steel, and a nipple at each end – normally made of brass. There may be other components such as adjusters – either part way along the run of the cable or at one or both ends.
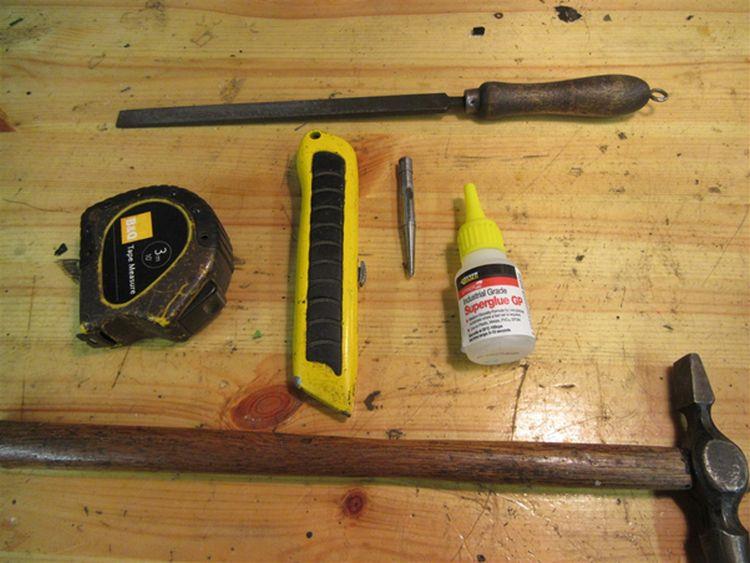
The tools and materials required for the job are:
• Bench vice.
• Steel rule.
• Measuring tape.
• Digital calipers.
• Stanley knife.
• Pair of old snipe nosed pliers.
• Small smooth file.
• Scriber or other fine pointed instrument.
• Superglue.
• Paste type flux. I use Fluxite.
• Resin cored 60/40 tin/lead solder as used for electrical work. NOT plumbers’ solder, silver solder or other varieties.
• A small pen type butane soldering torch (refillable from a cigarette lighter gas cylinder).
• Dremel or similar small rotary tool with thin cutting discs.
• A small panel pin type hammer.
• A small centre punch.
• Carburettor cleaner spray.
• Appropriate conduit, inner cable, ferrules and nipples as required. I buy mine from Venhill Engineering.

Measuring up
If you are replicating an existing cable and are happy with its dimensions then the easiest way to meaure is to lay out the old cable, line up the new conduit beside it and cut to the exact same length. Pull the old inner cable through the conduit till one nipple is hard against the ferrule and measure carefully between the end of the other ferrule and the end of the corresponding nipple. Add this measurement plus a centimetre (to allow for the other nipple) to the conduit length to establish the length of inner wire required. Use the digital calipers to measure the OD of the conduit, the diameter of the inner cable and the diameter and shape of both nipples. These do come in a variety of shapes and it’s important to get it right.

If for some reason the old cable is incorrect – for example if you’re fitting different handlebars – then the best way to measure is to take a length of conduit longer than necessary, fit it to the bike where it will live and mark up appropriately. Use the same technique as above to measure the length of the inner from the old cable. It’s also possible to make new cables without having an old one to work from but the way of doing this is a bit involved so I won’t discuss it here.
As always, check and double check all measurements!
At this point you can purchase all the parts you need from Venhill. I use their nylon lined conduit and galvanised inner wire – stainless is not easy to solder and is unnecessary for most bikes. I generally buy twice as much inner as I really need – it’s relatively cheap compared to postage costs and it’s very easy to make a cable too short. Anyway, once you’ve mastered this technique you’ll be making more cables so the extra will come in handy.
Making the cable
Carefully measure the length of conduit required and cut squarely using the Dremel. This ensures a nice square end on the steel conduit, however it can partially melt the outer plastic coating so this may need cleaning up with the stanley knife. Use the scriber to ensure that the inner plastic sleeve is clear. Fit a ferrule to each end of the conduit. Professional manufacturers us a crimping tool to fit these but I find a carefully applied dab of superglue does the job.
Take a length of inner wire and clean with carb cleaner. Dry this off with a kitchen towel or similar and make sure it is dry. Coat the cable end with paste flux for about 10mm. Put the cable in the vice with the end protruding 30mm or so vertically. Slide the first nipple over the cable – I usually start with the handlebar end – so it rests on the vice jaws. Make sure that the recess in the nipple faces upwards ie towards the end of the cable.
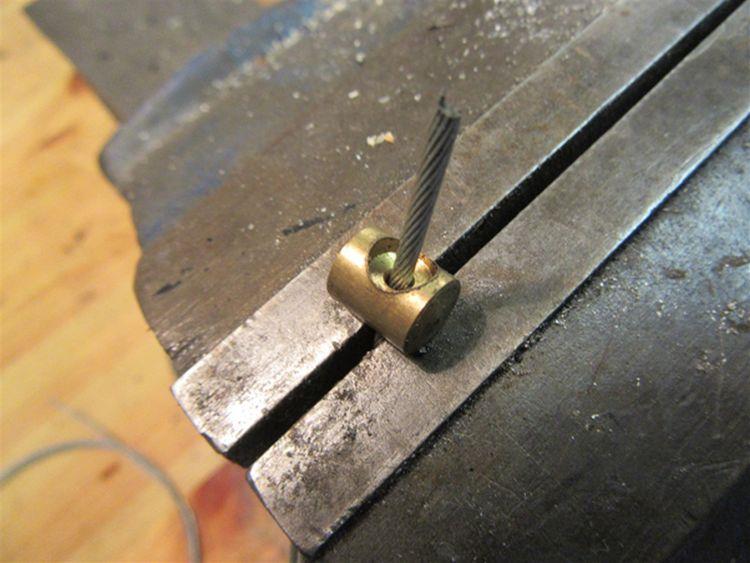
Take the butane torch and warm the end of the cable till the flux starts to melt and bubble. Now very carefully keep the heat on the cable and introduce the multicore solder. As the cable heats up the solder will start to melt and will coat the end of the cable. This is known as “tinning” and is an essential part of all soldering. Don’t use too much solder as it will go too far down the cable and can stop it from bending. Also make sure that you don’t overheat the wire – it shouldn’t get anywhere near red hot. If it does, cut the affected portion off with the dremel and start again. Take the torch away and let the solder harden.
Now take the nipple with the snipe nosed pliers and slide it up the cable, at the same time heating it with the torch. As you get to the tinned section the heat in the nipple will cause the solder on the cable to melt. Very carefully draw the nipple up the tinned area until 2 – 3mm of cable protrude past the end of the nipple. Withdraw the torch and let the solder set, holding the nipple in position with the pliers. The nipple is now secured to the cable – as it is brass, it does not need flux as it has a great affinity for the solder.
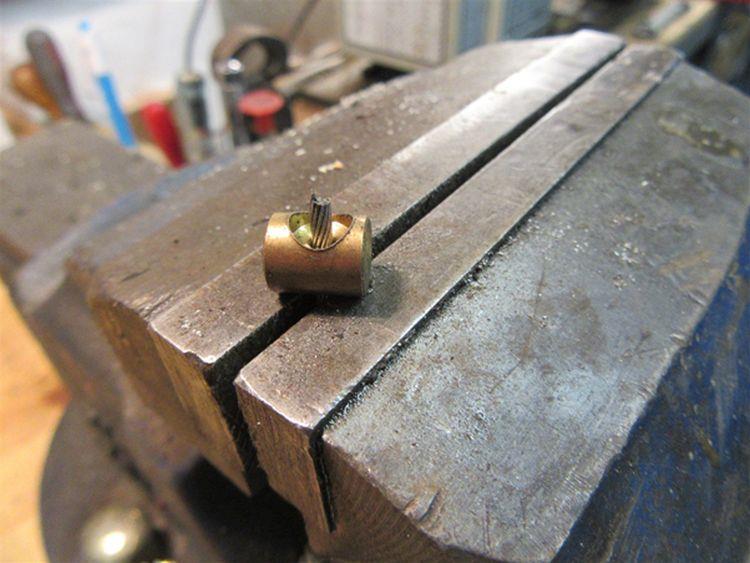
Now comes the most crucial part of the operation. Although the nipple is soldered to the cable it has little strength and could pull off. Open the vice jaws slightly and bring the cable through till the nipple is resting on top of the jaws. Tighten the jaws but just enough to hold the cable firmly – don’t squash it. Using the small hammer start the splay out the protruding wire strands, then use the fine centre puch to firmly splay them into the countersunk. Venhill sell a “birdcage” tool to do this but at nearly £100 it’s overkill for the average home mechanic.
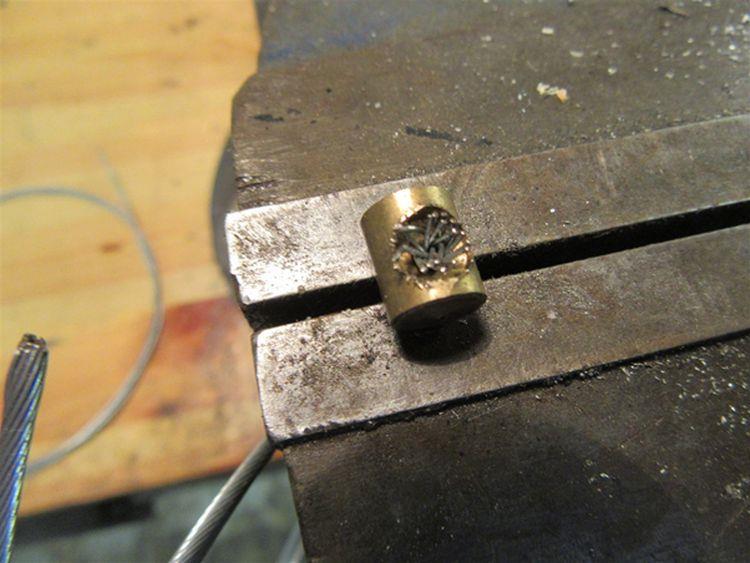
Finally use the scriber or similar to spread some paste flux into the splayed out wires. Heat the nipple up with the torch until the solder softens, and apply multicore to the splayed wire in the countersink to fill it up. Again, don’t use too much and the temperature is critical – too little and the solder won’t penetrate, too much and the cable will oxidise. The strength of the assembly comes from the fact that the solder blob surrounding the splayed cable cannot physically pass through the nipple.
Finally use the small file to tidy up any surplus solder and make sure the nipple is free to move in the control lever or wherever it fits.
Now slide the inner cable through the conduit, not forgetting any adjusters etc. Use the measurements previously made to cut the inner to length, remembering to allow a couple of mm for splaying the cable. Now repeat the process to attach the nipple on the other end and the job’s done.
IMPORTANT
Even though the utmost care has been taken, it is possible that a good job has not been made. So, for example in the case of a brake cable, assemble the whole thing and test by using both hands on the lever and applying far more force than would ever be applied in use.
I have done dozens of cables using this technique and have never had one fail. However, I did once try a vintage Ariel at a Vintage Motorcycle Club event and the nipple pulled off the front brake cable in fairly gentle use. The owner was not at all pleased but I did point out to him that it was better doing it at an off-road event than when it was desperately needed!
I hope this short introduction proves useful. Making control cables is a very satisfying process although can be a bit scary at first. Like most mechanical jobs, if care is taken and the right tools and techniques used it is a valuable addition to the motorcyclist’s armoury.
Share your tremendous tips and words of wisdonm - click here.
Reader's Comments
CrazyFrog said :-
Very informative article Ian, thanks.
08/12/2022 07:49:33 UTC
Ren - The Ed¹ said :-
He does do this writing thing rather well doesn't he CrazyFrog, proper words and sentences and everything! At present I have no need of making my own cables although I find life has a way of throwing these things at you from time to time. I think Sharon's 250 will look great with a set of "cowhorns" on it.
08/12/2022 08:28:49 UTC
Ian Soady¹ said :-
Once would have done Ren....
Glad you found it interesting Pete.
08/12/2022 11:05:30 UTC
Ren - The Ed¹ said :-
I like repeating myself... I said I LIKE REPEATING MYSELF!!
Sorry, I'd delete it but then Ian's comment wouldn't make sense.
08/12/2022 11:57:37 UTC
Ian Soady¹ said :-
So why change the habit of a lifetime? Making sense is only a philosophical construct and like beauty is in the eye of the beholder.
08/12/2022 12:12:05 UTC
Ren - The Ed¹ said :-
That's deep maaaaaan, real deep.
08/12/2022 16:14:19 UTC
nab301 said :-
Interesting article , in recent years I did pick up a copy of the "motorcyclists workshop" at an auto jumble but my cable making days began as a pre teenager in the 70's when repairing a clutch cable on an old (at the time) Ransomes cylinder lawnmower.
In the days before Dremel tools I used to sandwich the inner cable between two slim pieces of plywood and use a hacksaw to cut the inner with acceptable results...
Fast forward a few decades and I purchased an "upgraded" brake cable from an established purveyor only for the cable to fail at an inopportune moment! ( I diagnosed a dry joint) After that I had no qualms about making my own ( for older type bikes) and have never had a failure. I use the test method on hydraulic systems also , (I had a commercially manufactured brake hose fail on a car before driving on public roads)
Nigel
11/12/2022 15:44:03 UTC
Ian Soady¹ said :-
One reason I always make my own.... I've also made braided brake hoses using Venhill materials but as I've only done it a couple of times feel less confident about them especially when the hose has 2 banjo fittings that need to be specifically aligned.
12/12/2022 12:01:41 UTC
Glyn said :-
Good write up Ian and very useful for owners of Classics. I had an issue with a Japanese bike cable (Yam RD400) being too long so thought I could heat up the nipple (small barrel shaped) and slide it along the cable. When I hit it with the blow torch the entire nipple melted instantly as it consisted of "shaped" solder formed around the cable and not a separate nipple as I had assumed. I bought a new cable and it was very poor quality.
26/12/2022 16:07:20 UTC
Ian Soady¹ said :-
Yes, that's the way most are made these days. Very irritating!
27/12/2022 10:07:53 UTC
Ian Soady¹ said :-
Too cold to do anything in the garage the last couple of days so to pass the time I revisited a site created by an acquaintance from Real Classic magazine. He suggests a way of crimping ferrules (in his case for fuel lines) by using the 3 jaw chuck in the lathe. I must give this a try as it's a bit more elegant than my superglue solution. See link below. Charlie's web site has lots of useful hints and tips so well worth a browse in these dark winter days.
By the way the Honda project is coming on well and I'm pleased with progress. When things warm up I'll attempt painting the tank - the side panels have come out fairly well - I'd say 80-90%. The paint is a 2 stage metallic - first stage is silver, followed by a red "dye" then finished with lacquer. Paint provided by a local paint specialist who matched the colour on the original side panels.
The picture is a dry build with the tank primed and with a guide coat of black to identify where it still needs filling / flatting. The seat is a spare XBR one which I've modified the base and had the foam reshaped and a cover made by a local upholsterer. Beautiful job and at £90 a reasonable price.
https://ariel-square-four.blogspot.com/2022/01/tools-new-connector-for-fh-tyre-i...
 20/01/2023 16:37:58 UTC
Lewis Cassidy said :-
I realise this is an old thread n stuff but I was looking to make the original propriatary cables for a Raleigh Superbe 1950-1960. when you use the brass piece and form the end nipple how would you remove it if both sides are done? am i an idiot?
25/05/2025 07:43:58 UTC
Upt'North ¹ said :-
"Am I an idiot"?
Well I hardly know you Lewis so I'll hold my judgement. But probably not.
Ian and Glyn will probably be your saviours, I'm sure they'll be along soon.
Good luck.
Upt.
25/05/2025 09:33:43 UTC
Ian Soady¹ said :-
I'm not quite sure what you mean Lewis. Do you mean removing an existing nipple? Remember that most proprietary cables have the nipples cast on so can't be unsoldered as they just melt.
25/05/2025 09:46:26 UTC
Name
Comment
Add a RELEVANT link (not required)
Upload an image (not required) -
Uploading...
Home
Repair And Restoration