Home
Repair And Restoration
Tour-A-Plank V2.6
Creation Date - Late August Early September 2020
By Ren Withnell
Regular readers will recall the issues Madam Parker aka She With The Garden aka The Hobbit aka Keeper Of The Squidgy... no stop... was having with luggage for the Z250SL. Initially Kriega bags and straps seemed to be the solution but due to the small narrow rear seat these proved "wobbly" at times.
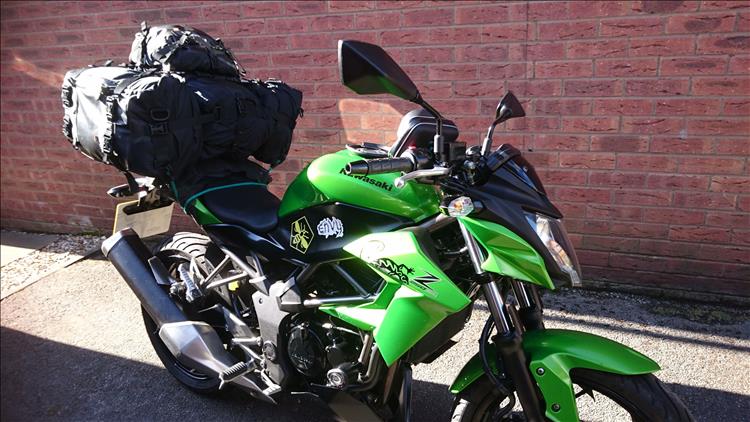
Narrow seat, big luggage, VERY wobbly.
Luckily she's a lucky lucky girl and she told me I was now her boyfriend, I had no say in the matter. Anyhow being a cunning and genius bodger I created for her the amazing, wonderful, mind blowingly creative "Tour-A-Plank" which worked a treat. Well, until it didn't always.
Tour-A-Plank V1. A great improvement but still not rock solid.
Stability was vastly improved but wobble was not completely eliminated. Taut straps to wider anchor points are good, but not as good as solid lengths of stiff steel. As I stood waiting at various campsites as she heaved, yanked, pulled and stretched straps to their elastic limit I still yearned for the solution where she could plonk, clip and go.
More tension than an episode of 24.
This last month or so I and at times we have been tinkering. Rose joints have been purchased. Threaded steel has been purchased. Random sheets of old kitchen worktop have been gouged up with my wayward jigsaw and much much MUCH head scratching has been itched.
I am most definitely absolutely certainly NOT allowed to drill holes, no matter how small, into any body panels to facilitate anchoring to the rear sub frame. Any and all attachments must be easily removable to return the beautiful Kwakker to it's original state of perfection. No only this but the actual attachment, while not required to seamlessly match Kawasaki's sleek lines, must at least look acceptable to an onlooker's eye.
Regular readers will also know "pleasing to eye" is not really in my vocabulary when it comes to creating my own add-ons and - ahem "improvements". Still, if I am to reduce Sharon's packing time to less than 3 hours and avoid her further injuring herself by pulling her shoulder out as she heaves on another strap then try I must to meet all these - to my mind - ridiculous demands.
Then this happens. She utters something akin to "...no, no I get it now. I do want it to be pretty but I also need it to be useful, to work for me. Please please don't ruin my bike but I can live with perhaps a little modification, just check with me..."
After a short spell of dizziness came the hyper-ventilation, then denial, anger, bargaining, depression then acceptance. It took me 10 minutes to overcome the shock and grief then I/we got to work.
Tour-A-Plank v2 was started.
The first version was an improvement that involved threaded bar going to the rear footrest mounts. This worked better than the original v1 and I thought to myself "there is hope..."
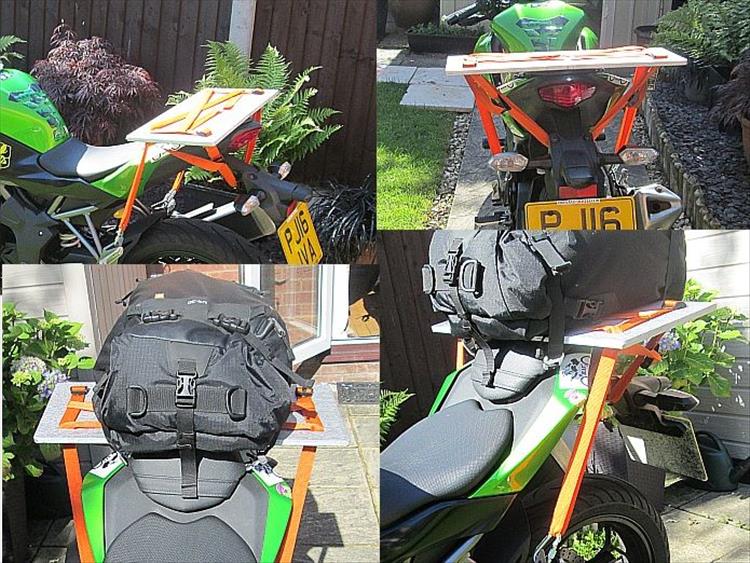
V2 stage 1. Threaded bar to the footrests. Note the metal straps going under the seat.
A solid mount point, cheap metal brackets.
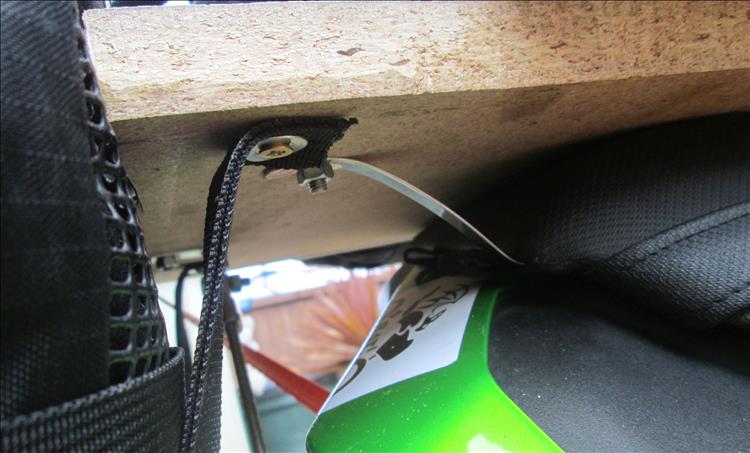
Thin metal straps secure the plank to the seat - but these worry me.
A narrower choice of plank means the side luggage can be mounted lower.
Development is another word that has been missing in my vocabulary most of my life. "That's good enough" was always my attitude but I think I am getting old. I kept on looking and looking at our creation and thinking "it's still not as good as it could be". I stare. I ponder. Sharon asks perfectly logical questions like "could we put this there, is that strong enough to hold this, how about using a bolt rather than a screw?"
While Sharon lacks my years of bodging experience that helps me understand angles, forces and how bendy things get bent, she is improving. I listen, I try her suggestions and they help me form my own additional notions. Some ideas fall flat on their face, others lead to a dead end but the odd ones seem to work. What's the phrase, genius is 1% inspiration and 99% perspiration.
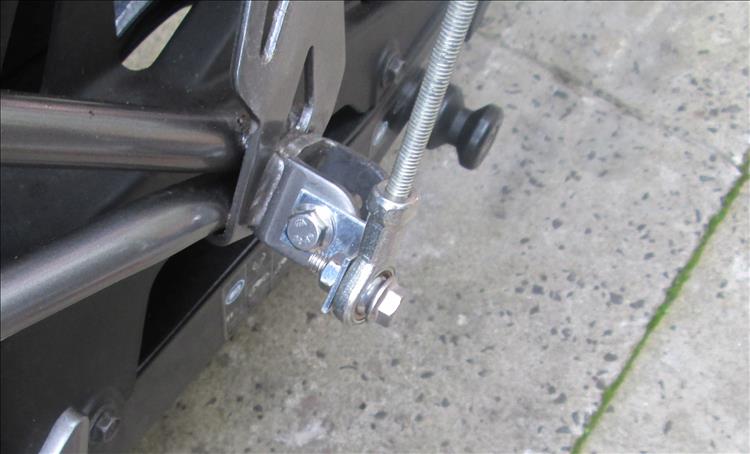
There are 2 threaded holes on the underside of the number plate and indicator mount. They look like M6 threads but M6 bolts won't go in. So they are drilled and fitted with M6 nuts and bolts. I make a small metal plate with holes and mount it. This, to Her Majesty, is acceptably small enough to remain permanently in place. I now have my permanent anchor point. This is big progress.
Threaded bar is cut. Wood is drilled. Lengths of nylon strap are cut. More testing, more head scratching and more thinking until we reach THIS!!

Version 2.6!
This is working and working quite well. The threaded bar and nuts are used to draw Tour-A-Plank down firmly onto the seat. Unlike the straps the bar also has rigidity in both tension and compression giving a much more stable platform. This tension greatly reduces the rotation of the plank but doesn't eliminate it entirely. Presently this is practically eliminated with the addition of 1 easy to apply strap but further work may be undertaken.
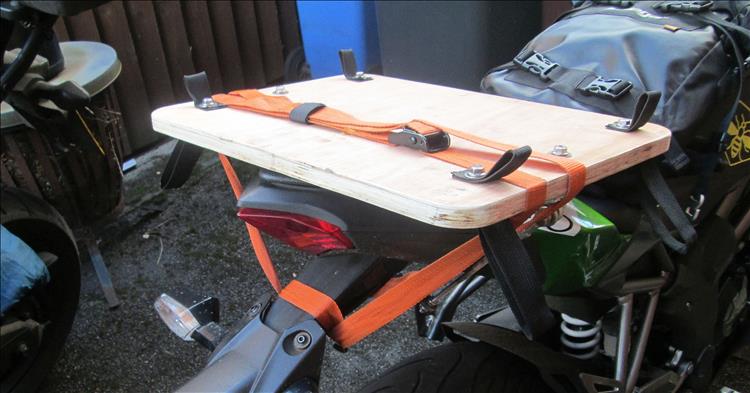
Quick and easy, we may look into further developments though.
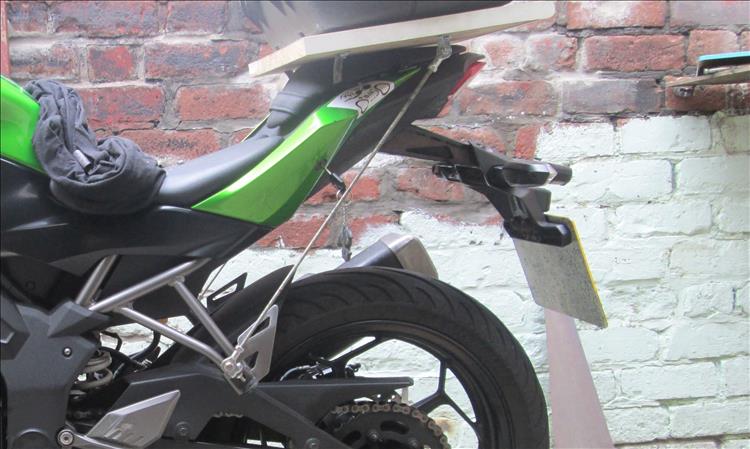
The now permanent mount point under the numberplate holder requires an angle to meet with the angled threaded bars. Rather than recreating the mount point I bent 2 short bars with holes as below. The advantage with this is these can be removed leaving just the small permanent mount. It also allows me to play with the angles easily.
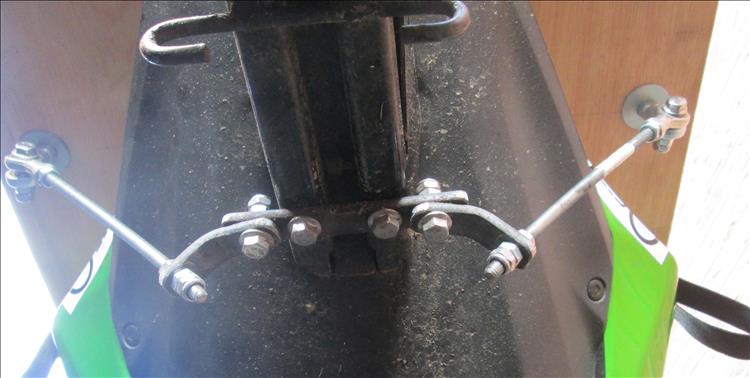
The central part is permanent. The rest can be removed.
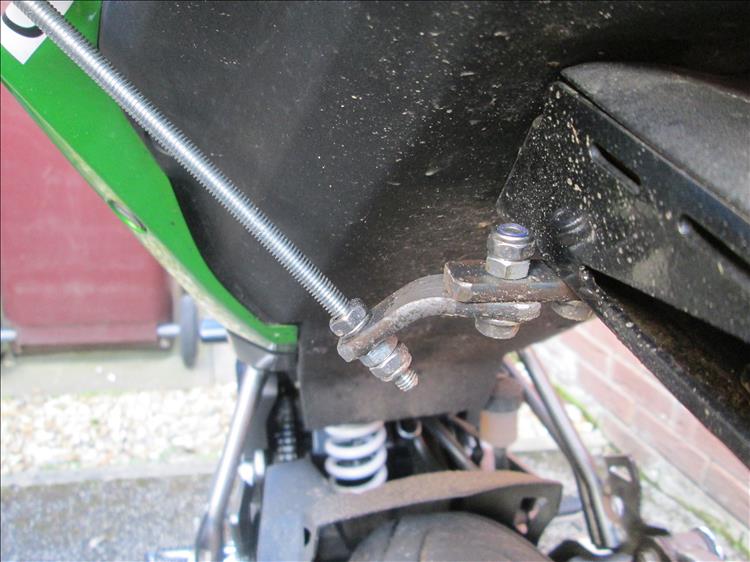
The threaded bar is pulled taut by the nuts. Additional NyLoc nuts to stop things rattling loose.
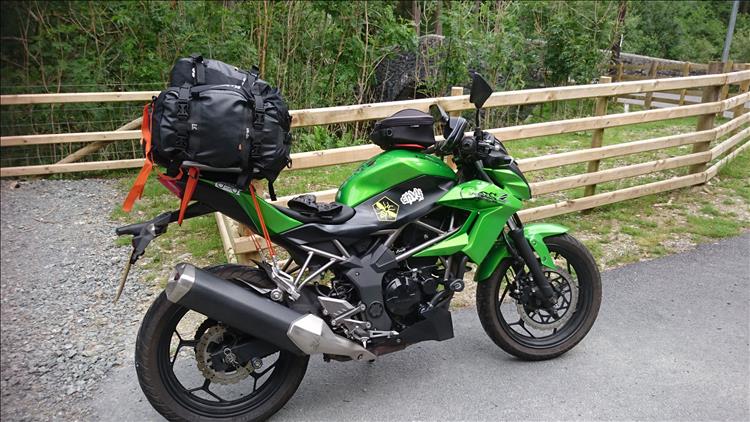
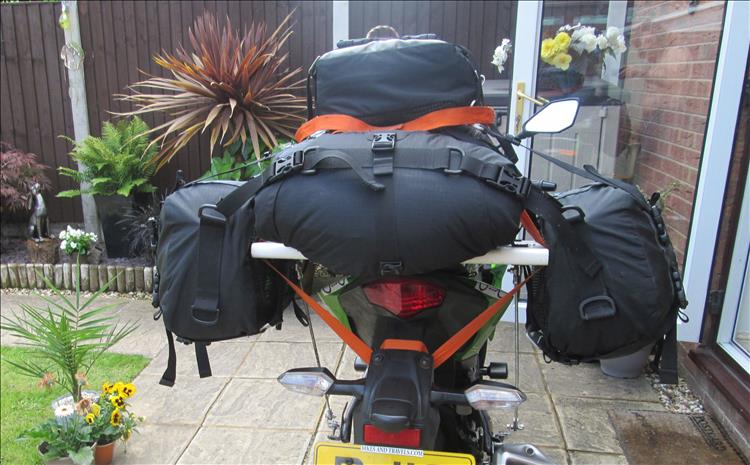
We now appear to have a stable platform. The original Tour-A-Plank V1 was wide enough to take all 3 primary bags side by side. The downside of this is the load is kept very high. V2 is just a little wider than the plastic panels of the rear. The idea is that the side bags will hang down in the hope of lowering the centre of gravity a little. An additional benefit is Sharon can also see behind her using the mirrors! I've advised these side bags should be loaded with "soft" items to cushion any mishaps, I apply the same rule for my own saddle bags.
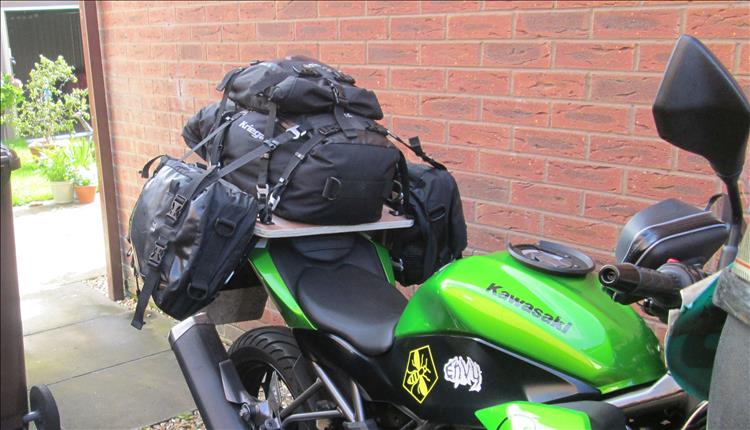
Lower load, better visibility and perhaps a little padding.
Sharon proceeded to create a test load. On previous loads we found that unless the luggage was perfectly balanced there would be slippage to the heavy side. While it is always good practice to have a balanced load we don't carry scales and things are seldom perfect. With this in mind Sharon deliberately set the test load to be quite seriously off balance with the aid of stones and the like.
Wet set out on our test ride. Motorways at and perhaps a tad over the speed limit? All good. Bumpy roads to jiggle everything around? All good. Busy bustling town work? All good. Country lanes both slow and fast? All good.
This is something of a revelation and a relief. The intentionally off balance heavy bag has not pulled Tour-A-Plank V2.6 off centre at all, merely pulling the bags a half-inch to the heavy side but with no danger of slipping off.
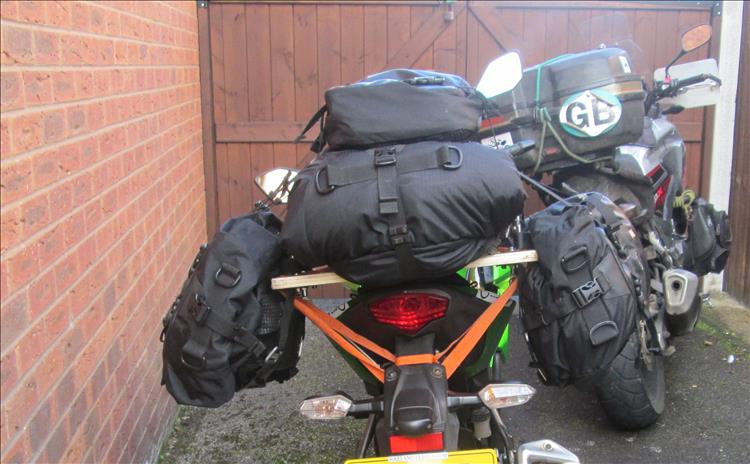
The heavy bag on the right has pulled the bags just a tad.
Is this finished? No. It is good, it is more than good enough. There are still a few improvements I wish to make as and when. The rose joints work well but are being pulled in ways they weren't designed to be pulled. Better more appropriate brackets are the right solution. The additional strap works fine and is easy to apply but I shall one day investigate a more solid solution.
At present though the last task is for Sharon to apply some paint to Tour-A-Plank V2.6. I did suggest Kawasaki Green but she thinks a simple black is the correct choice. All we need now is for the gosh-darn-it Covid bug to sod off so we can load up and go places.
If you'd like Bikes And Travels to test your kit here on the blog contact ren@bikesandtravels.com
Reader's Comments
Bogger said :-
OMG Sharon let you knowingly fit that contraption to HER bike. And you're still alive?
Bogger
07/09/2020 12:52:17 UTC
Snod said :-
What if you got a spare seat and butchered/improved it by adding plank fastenings?
Also I think I would have both the footrest mounts and the numberplate hanger mounts at the same time..
07/09/2020 13:33:52 UTC
Upt'North said :-
Rose Joints? NyLoc Nuts? What's happened to bodger?
Have I woke up in a parallel universe?
I think it looks pretty good, my only thought (other than will life ever be the same again) is will the panniers flap around at speed, what about a nice black strap from the bottom of each bag to attach them to the mounting point or each other. This could have quick release fasteners so as not to slow the loading process.
I bet Madame Moisture was impressed.
Upt'North.
07/09/2020 13:37:16 UTC
Upt'North said :-
Snod's suggestion seems a great one. But are they available cheaply. There must be some crashed ones out there.
Upt'North.
07/09/2020 13:39:11 UTC
Ren - The Ed¹ said :-
Even worse Bogger, Sharon was involved with the creation of said contraption. That is likely why I am still alive.
Snod and Upt' - Upt' is quite right, spare seats are presently few and far between at reasonable prices. The Z250SL was a poor seller hence no luggage on the market and few crashed spares. This has been looked into. The Z125 and Ninja 125 share the same seat (and many other parts luckily as you'll find out soon) which means there will likely be cheap rear seats on the market sooner or later. The seat itself while a good fit like any seat has some movement on it's mount so doesn't provide a rock solid foundation. What would work is a seat we can drill through to the frame underneath.
I did consider adding additional struts to the footrests but at present until proven otherwise this seems excessive.
Upt' - re the bags flapping around. This too was considered and upon recent testing currently seems unnecessary. There is the risk of high side winds lifting the side bags so we have an eye on that. I always have a spare bungee or two. I would say Madame Moisture (that makes me chuckle) is not quite so much "impressed", more rather simply "happily accepting" of this creation. I doubt she sees it in the same light as her Garden of Wonder but it serves a purpose without being ruinous.
07/09/2020 16:59:19 UTC
Bob said :-
Ingenious! I'm partial to a custom luggage solution myself.....
The attachment looks very similar to what I ended up with on my trolley / backrest.
Just a note of caution - does it actually rest on the seat pad? Grit and dirt will get in there and vibration could wear the seat material away in a surprisingly short length of time.
In the days when I went to bike rallies, it was quite common to see a sportsbike jerry-rigged with a "rally plank" on the back.
08/09/2020 18:26:30 UTC
Upt'North said :-
Don't encourage him Bob, we'll all have to put up with his Triumphalism.
It'll be hell.
Upt'North.
08/09/2020 19:04:48 UTC
Ren - The Ed¹ said :-
It's your custom luggage Bob that motivates me. So either you are my inspiration, or you are to blame.
Good point re dirt and much causing what could essentially be grinding paste. We'll have to keep an eye on that. If it's a problem we can start with a spare rag then have a think about a better solution.
Upt', Triumphalism? Me? Modest, quiet, shy retiring me? It's not my fault you can't handle my superior engineering, intellect, wisdom and experience. Speaking of hell, you wanna watch out boy, Northumbria is on my list as/when/IF Bolton folks are ever allowed to play out.
08/09/2020 19:47:26 UTC
nab301 said :-
Would it not be easier to send the butler ahead with the luggage in the car, allowing you to actually enjoy the biking experience...or maybe start a crowd funding page to purchase some real luggage ...
Nigel
15/09/2020 20:52:56 UTC
Bogger said :-
Go on Nige. Kick him in the goolies again why don't you.
Bogger
16/09/2020 10:23:45 UTC
Bogger said :-
By the way Ren, I've been looking for a wide load sticker for the back of Sharons bike. Outrigger wheels on the panniers may not go amis either.
Bogger
16/09/2020 10:26:04 UTC
nab301 said :-
This sort of thing available in different brands , yes , I know it costs but I'm sure they can be got second hand ....
Nigel
https://sw-motech.com/en/bike/KAWASAKI/Z125/2018/BR125K/products/luggage/tail+ba...
16/09/2020 10:54:19 UTC
Ross said :-
No comment, just putting it out there... :)
 16/09/2020 11:39:59 UTC
Ren - The Ed¹ said :-
nab301 the problem is no-one makes a bespoke rack or luggage system for the Z250SL. As for sending the butler ahead, I am the butler. This butler's already overladen.
Bogger, I did suggest a wide load sticker to Sharon. I'm told I should make a full recovery in time.
16/09/2020 11:56:54 UTC
Sharon said :-
I know it seems strange that I finally let Ren bodge me a solution for my luggage problem. I think with all the trouble I have had with the ill health of my daughters and now my own self deciding to give me trouble it has put certain things into perspective. Looking good was finally not more important than the safety and practical pleasure of touring.
So although I still did not want a complete hideous monstrosity on my bike, neither was I so fussy as before. Beside I did slide the Kwak done the road so she is no longer pristine anyhow.
I am perfectly happy with touraplank. It has proven to do the job it was designed for perfectly. No doubt we may do a few more tweaks as other ideas come to mind but so far I am very pleased with it. It is not slimline and sleek like the c-bows I originally wanted. But they never existed and touraplank is a real as a plank of wood can be.
23/09/2020 18:58:40 UTC
nab301 said :-
Glad it all worked out in the end , although it reminds me ( what not to do) of a fellow Em Zedder back in the 80's who fitted a universal luggage rack to his MZ with the obligatory craven panniers hard luggage set but couldn't understand why the handling of his beloved MZ had gone to pot... until it was pointed out to him that he had bolted the luggage stays to the pillion foot peg mounts which were fitted to the swingarm....
Nigel
570792...
31/10/2020 14:23:55 UTC
Ren - The Ed¹ said :-
DOH!!!
02/11/2020 09:00:41 UTC
Name
Comment
Add a RELEVANT link (not required)
Upload an image (not required) -
Uploading...
Home
Repair And Restoration