Home
Repair And Restoration
Functional DIY Bead Breaker
Blog Date - 12 May 2020
Sometimes you just got to have the right tool for the job, and I am told I am a right tool - often.
There are ways to break the bead on a tyre without a proper bead breaker. Apparently. I tried the one where you lean the bike over then use the side or centre stand and the weight of the bike to push the bead off. I dropped the bike (without any effect on the bead). I've had some success with a G-clamp and a plank of wood but it's a right pain in the ass (and fingers (trapped)).
Neither of these methods are safe to use on Sharon's bikes as there's a good chance I'll scratch the rim. This would lead to considerable amounts of blood loss and bruising (for me).
Is there anything more lethal than a half-wit with time on his hands (LockDown), some random bits of metal, off cuts of wood and a drill? Normally no, this would be a recipe for disaster (see handguards and tour-a-plank), but alas I feel I have excelled myself. I am sorry to report that while not pretty, this new tool actually works. Sorry.

Engineering level = minus 3
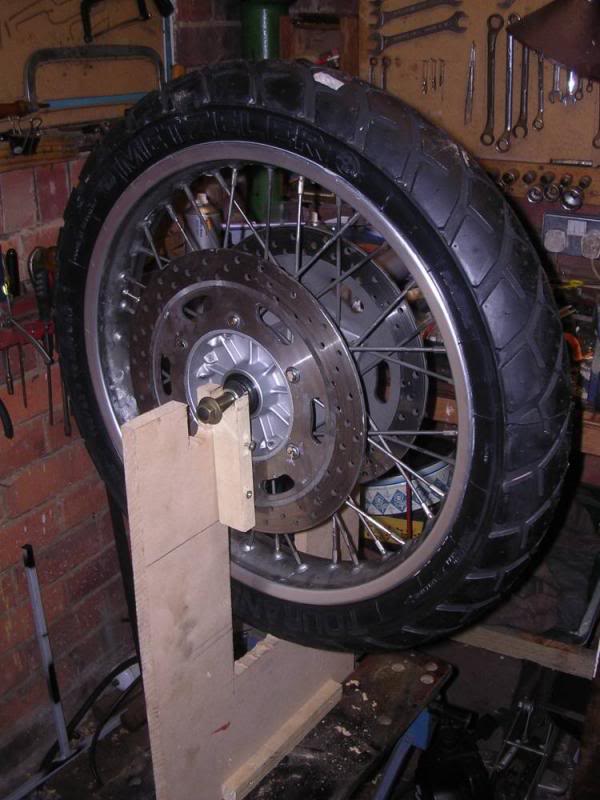
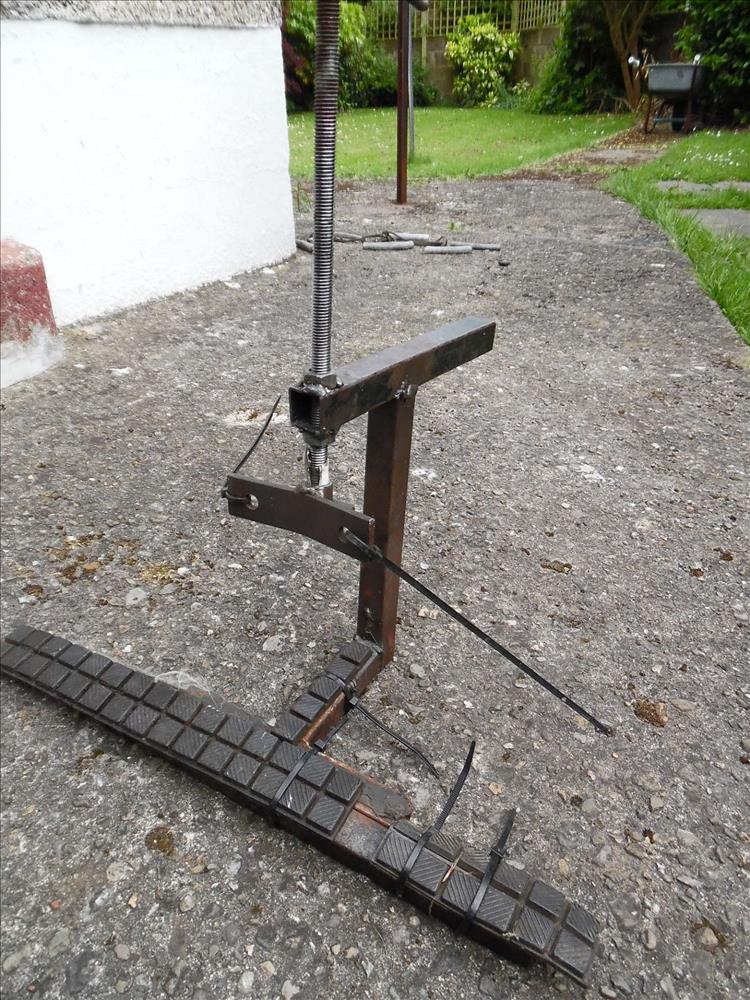
In case you can't work it out there's 2 strips of slotted angle iron from B&Q screwed to the wall, a long rusty solid metal bar that came free with the house when I bought it 19 years ago, holes drilled through the solid steel bar and a block of wood supported by 2 random metal strips. Throw in some M6 bolts and spare nuts and LO!
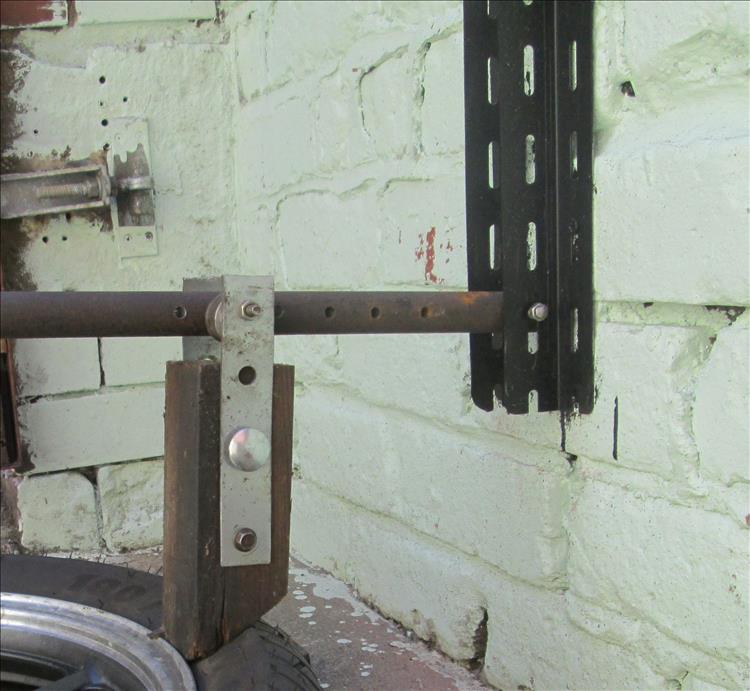
FULLY adjustable for any size wheel.
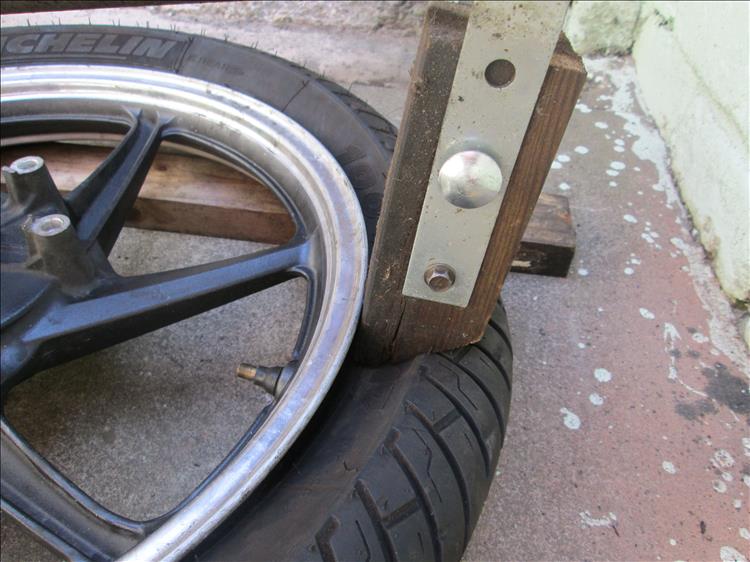
Supporting the wheel on 2 lengths of wood allows me to keep the brake disc off the floor and the wood should prevent (reduce) the risk of scratches. The wood on the pushing/pressing bit is wooden for the same reason. The slotted angle iron also allows me to accommodate various wheel widths.
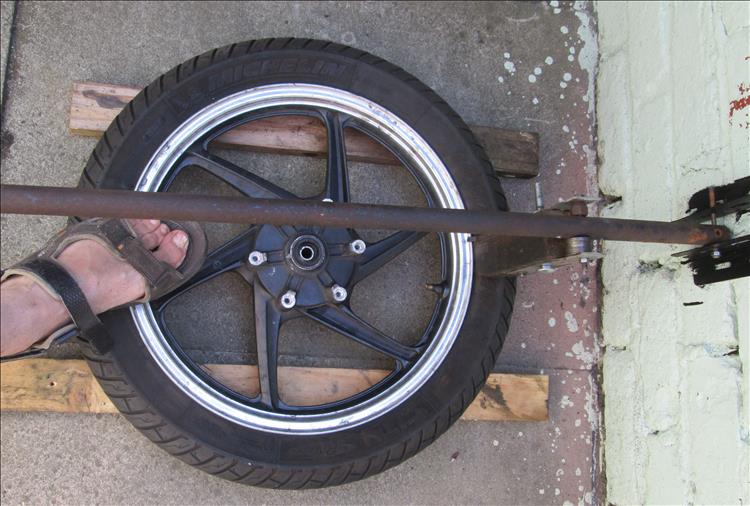
And press down.
Now I can break the bead effectively. Experimenting with my spare CBF125 wheel and tyre I also find this to be very effective at pressing the tyre back onto the rim. So now I can unbead the tyre and refit the tyre effectively. There's one final task to work out - getting the unbeaded tyre off the rim.
The act of removing the tyre is actually very simple - IF if if you are not too concerned about scratching the rim. I have created my own "peeler". Peeler? Watch the YouTube video below for 5 seconds, it's the tool used to peel the tyre off the rim.
It works well BUT the peeler drags across the rim firmly between the rim and tyre. I've padded the metal with some hosepipe yet I fear with a random bit of grit I could find myself at great personal risk.
Did I hear you say tyre levers? TYRE LEVERS! I guess you don't like me very much then huh?
IT WORKS!!
If you want to advertise on BAT contact ren@bikesandtravels.com
Reader's Comments
ROD said :-
Well done Ren, that looks like a very useful tool to have in the shed.
I found that one of those 4 wheel contraptions which my wife owns does a good job of breaking the bead. Jack up the car, place the bike wheel on a piece of wood under the car tyre, lower the car onto the bike tyre and the bead is broken.
I still use tyre levers to remove and fit the tyre with pieces of leather to protect the rim, but I have still on occasions scratched the wheel.
14/05/2020 08:58:30 UTC
Ren - The Ed¹ said :-
I do own one of them thar 4 wheeled motorcycles with a roof and a storage space in the back. Alas I am very very poor and live in a house that shares walls with other houses which means I don't have my own driveway (or gardens or garages or workshops or scenery like you well off folks). It's something of a faff standing in the middle of the road jacking the car up while hauling around motorcycle wheels. But yes, I believe it can be done as you say.
I have made some plastic rim protectors out of a used oil tub, but they have a nasty habit of sliding away. I shall seek out some sturdy leather and give that a try, good thinking that man.
14/05/2020 09:55:00 UTC
Ian Soady said :-
Not bad at all Ren. I think I would have attached the vertical bit of wood rigidly to the horizontal bar (and why have you gone to all the effort of drilling all those holes?). It looks as though it may wobble a bit as you have it. And remove a couple of toes from that rather risky looking sandal-shod foot.
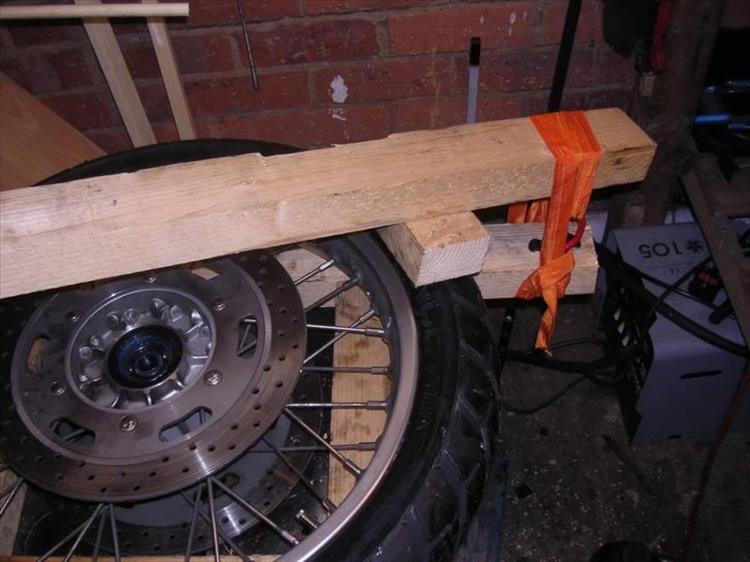
My version of a beadbreaker (maybe even more agricultural than yours) appears below. And in the next post you will see my wheel truing / balancing rig made of MDF.
 14/05/2020 11:09:16 UTC
Ian Soady said :-
wheelbuilding rig
 14/05/2020 11:10:16 UTC
Ren - The Ed¹ said :-
Several of the multiple holes are from a previous use for the bar. They and the new holes are there to allow options as to where I place the pushing bit of wood. Different tyres and rims, so I have options.
No it is essential the vertical bit of wood that pushes the tyre DOES pivot to the bar. As the bar is pressed if it were rigid it would rotate with the bar causing the pushing wood to push into then pull away from the rim. With the pivot it can remain in the selected plain. In spite of the extreme tolerances the rig is stable.
Admittedly, and much to my surprise, it seems far more stable and less janky than your own bead breaker. What is the world coming to?
14/05/2020 11:29:55 UTC
Upt'North said :-
Ed, I always knew you were smarter than you let on.
I'm impressed young man.
Upt'North.
14/05/2020 12:59:05 UTC
Borsuk said :-
Ren, I Have to ask. What does your tyre peeler look like?
14/05/2020 14:40:17 UTC
Ren - The Ed¹ said :-
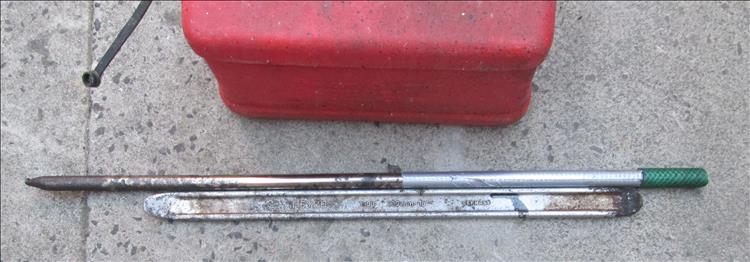
My peeler Borsuk is another random solid metal bar I had lying around. This is why I hate throwing things away and I could very easily become one of them hoarders you see on the telly.
The tyre lever and 5litre fuel can are there for a size guide
 14/05/2020 17:16:17 UTC
Ren - The Ed¹ said :-
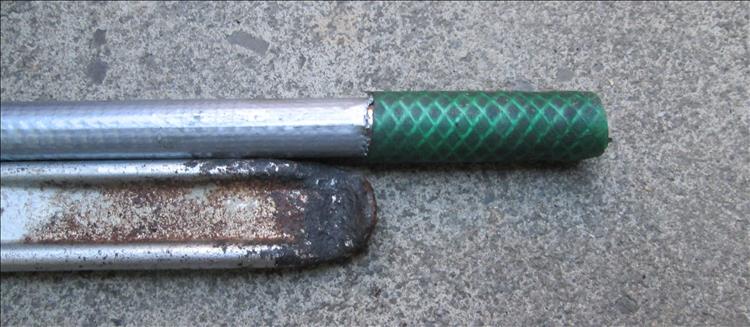
The green bit is merely a piece of comparatively narrow hosepipe to protect the paint from the hard metal bar. If you look close you can just about see I ground a groove in the toward the end of th bar to assist with gripping the bead.
 14/05/2020 17:19:14 UTC
Ren - The Ed¹ said :-
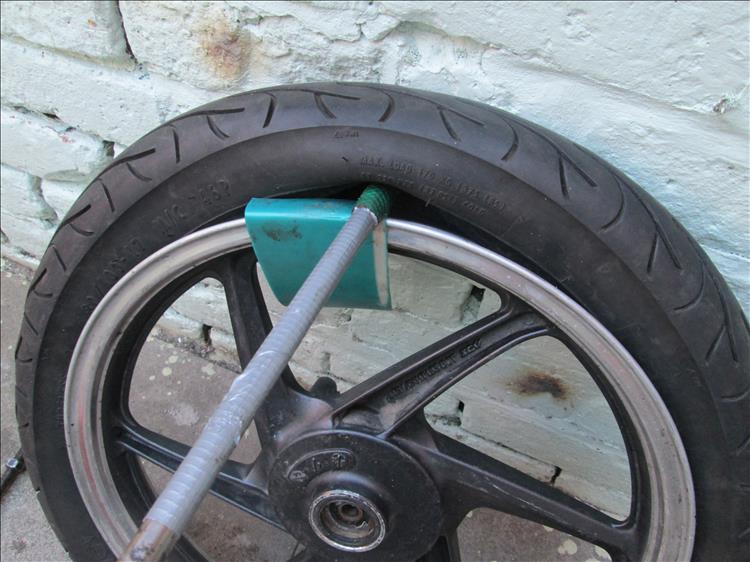
Get the peeler under the bead and lift up, ensuring the rest of the bead drops into the well, the dip in the middle of the rim
 14/05/2020 17:25:20 UTC
Ren - The Ed¹ said :-
I don't have a fancy mount. A sturdy bolt through the bearings is enough to pivot the peeler around as ver the video. Do this with the tyre stood up.
 14/05/2020 17:27:14 UTC
Ian Soady said :-
Interesting idea.
I have to say that ordinary tyre levers have always worked for me even on the mega tyres fitted to the Tiger. What is key though is getting the bead on the opposite side right down into the well. People often struggle with this. Another thing is to support the wheel rim allowing the disc / drum / whatever room underneath as Ren shows in his third photo. My version is a square of 4x4 as can be seen under the wheel in my first pic.
Finally tyre soap makes a huge difference. I scrounged a half full tub from my local tyre shop years ago and it'll see me out - in fact it's in my will to be passed on to my brother.....
15/05/2020 10:19:12 UTC
nab301 said :-
Ren , I might borrow your idea if that's ok, I made a screw type bead breaker years ago although the threads on the threaded bar are getting a little worn now and it takes time and a lot of winding of the handle to break the bead , your version may be a lot quicker.
 20/05/2020 13:52:05 UTC
Ren - The Ed¹ said :-
I was very close to building a bead breaker just like the yours in the picture - then I remembered my welding skills are, erm, "poor". My design wasn't borne from the need for speed, rather it was due to using the limited skills available to me. The fact it works is more down to luck than ability.
Obviously I have fully patented my design. You can use it but you'll have to pay the patent fee. This consists of posting some piccies of the finished item on here. Please be sure to not make it TOO well and/or TOO smart otherwise it gets (even more) embarrassing.
As for tyre soap Ian. I have a tub of the white stuff that you see used in real tyre shops. When I've used it I tend to use it "liberally" and this particular brand at least when it dries up it forms into 5 or 10 tiny small balls inside the tyre. I could hear them rolling around when pushing the bike about. I now use Wondolene or whatever poundland window cleaner is in at the time. Works as well but does dry out faster.
20/05/2020 17:32:37 UTC
Bob said :-
I bought one of those motorcross tyre changer frames, that's basically two loops of tube and bead breaker. I was doubtfull but it was only £5 (at the autojumble). I have to say it made all the difference. Not having to worry about protecting the brake disc is a big bonus.
The key to it for me though is owning three "Michelin" style tyre levers. The normal tyre levers you see are all but useless IMHO.
On long runs I now carry a puncture kit comprising CO2 inflator, tubes (both), the aforementioned tyre levers, small can of WD40 and a collapsible stand-stick I made on the lathe (so I can get either wheel out).
21/05/2020 11:40:31 UTC
nab301 said :-
Bob , any chance of a photo of a Michelin style tyre lever please?
21/05/2020 21:14:00 UTC
Ren - The Ed¹ said :-
I've seen those hoop things advertised Bob and for a wire wheel I'm sure it's fine but with a mag wheel I'd expect the hoop to scratch the paint of the spokes? Correct me if I'm wrong. As nab301 says, what do you mean "Michelin" style tyre levers?
22/05/2020 08:51:56 UTC
Bob said :-
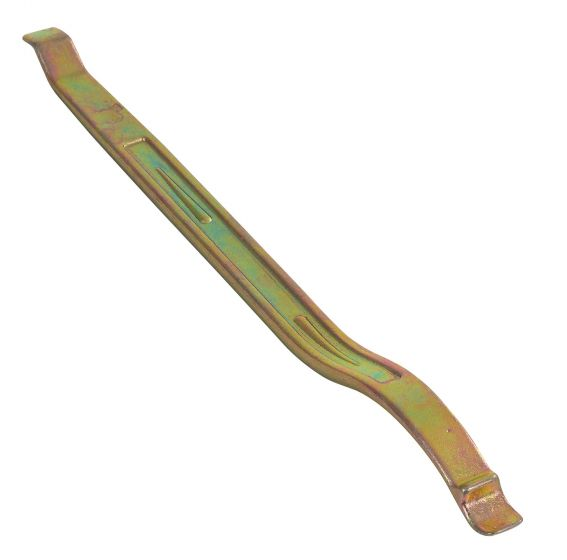
Like this.
The curve is key to it, it enables you to push the lever up an under the tyre.
Also the jaw-like tip grips the rim.
On the hoop tyre changer - it came with hard plastic tube sections fitted over the metal hoop, to protect cast wheels. I think they're supposed to have a central shaft that passes through the bearings, mine doesn't but it works just fine.
 28/05/2020 09:23:29 UTC
Ren - The Ed¹ said :-
Aaah so the hoop has plasticy bits to protect mag wheels. That's good. I might see if I can get me a couple of them thar levers too
28/05/2020 10:14:16 UTC
Name
Comment
Add a RELEVANT link (not required)
Upload an image (not required) -
Uploading...
Home
Repair And Restoration