Home
Repair And Restoration
DIY Wheel Balancer and Balancing
Car tyre shops and some motorcycle tyre shops have fancy electronic wheel balancers. Your wheel is fixed to the machine, the computer spins it, does some mathematics and tells the operator where to put what weights. Unless you have space in the garage and a spare few thousand quid...I doubt that's going to happen at home. However, there's no reason you can't do a static balance at home, with a little DIY.
If your wheel was on your bike AND the brakes were removed AND you had the loosest, slackest bearings possible, the heaviest part of the wheel would naturally fall to the bottom. But any bearing that is in good order will have some friction due to the grease it's packed with, the seals that protect the grease and the seals that protect the seals that protect the grease that protects the bearing. What you need are some unprotected, really slack bearings.
Like these...
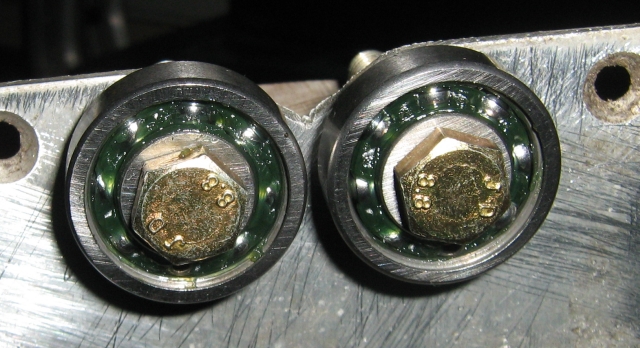
Ordinary off the shelf bearings mounted with ordinary off the shelf bolts to a piece of metal I had lying around...
These bearing are one pair of two pairs. Notice how they're mounted close together, but not touching. Notice the mount plate has a notch filed into it. Notice the bearings are shiny and new but have had the seals removed. You would not want to use these bearing without seals on your bike, they'd wear out and collapse in no time, but for our purpose they're not going to receive any stress or abuse. So I've bolted the bearings to a plate...now I mount the plate onto a DIY wooden stand.

The plate is mounted onto a wooden stand.
Notice how I've mounted the bearings and plate on a nice fat piece of wood, and that wood is on a triangular base. Why a triangle? Four (or more) corners can wobble, 3 can't, much more stable. To further reduce wobble I've passed 3 short screws through the wooden base to act as pointy feet, makes it even more stable you see...
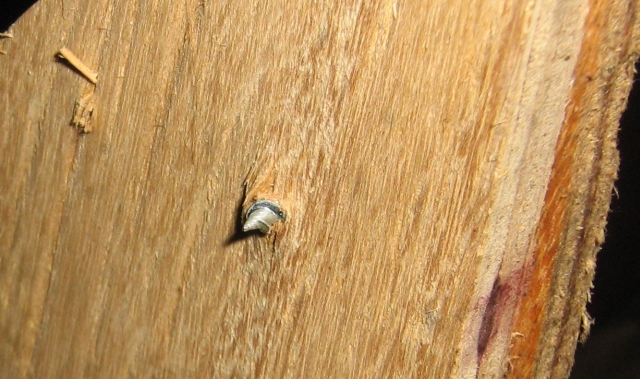
The screw goes right through the wooden base and pokes out. There's three of these, one in each angle of the triangular base and this makes it stable.
So that's one stand made, repeat this process keeping the dimensions exactly the same until you have a mtaching pair! Well...not QUITE the same, fit the triangular bases as below...
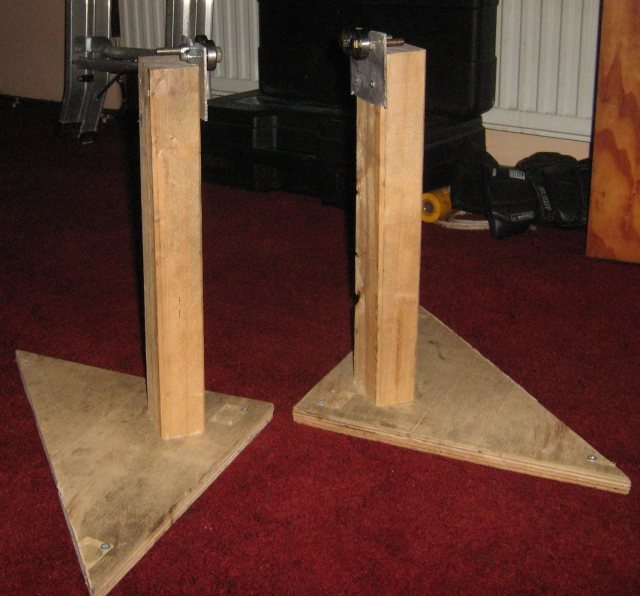
If you make 2 the same, you will have a PAIR!!!. It's not rocket science.
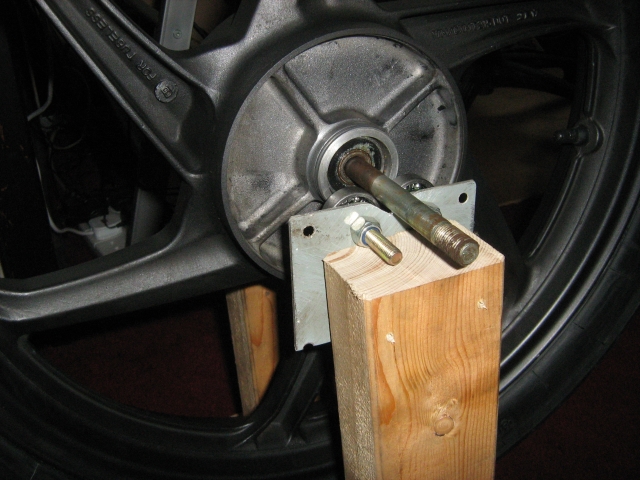
So, there we are, my DIY Static wheel balancer equipment. Those of you who've seen similar professional equipment will now be wondering how I'm going to make the cones and the bar that is slotted through the wheel. DON'T BE SILLY! You've already got a purpose made bar that's specifically the right size for the wheel you're trying to balance, it's called the wheel spindle. What if my wheel is wide...DURGH...move the stands apart...and if your wheel is narrow...move them closer together!!

So...using the wheel spindle for the wheel, move the stands until you find the perfect gap for the wheel and sindle to rest squarely on the bearings.
So there you are, the wheel is resting on it's own spindle that fits perfectly and the spindle is resting squarely on the bearings, the loose easy spinning bearings. Everything should be loose and free. If it is, the heaviest part of the wheel will fall to the bottom. Give it time to settle down, it may rock, the looser and better the balancer, the longer it will rock. If it swings to and fro for many minutes, you got a good balancer going.
The heaviest bit comes to a rest at the bottom...so the weights go at the top...
You can buy wheel weights from Fleabay. I'd recommend affixing weights first with masking tape because you have to "guess" how much weight is required. You will NEVER get it such that there's no "heaviest" part of the wheel, but you'll see that the wheel moves REALLY slow when you're close. When you're "near enough" clean the wheel and fix the weights with their own sticky pads.
Reader's Comments
John Almond said :-
You realy should get a little white dog and call it Gromit.
Great idea though.
01/01/2000 00:00:00 UTC
Tom McQ said :-
Ah well, it was a nice coffee table but you'll probably get more use out of it as a wheel balancer :-))
01/01/2000 00:00:00 UTC
Ren - The Ed said :-
Coffee table...cut in half diagonally...that would work!
What a great idea Tom.
As for you John...
01/01/2000 00:00:00 UTC
Name
Comment
Add a RELEVANT link (not required)
Upload an image (not required) -
Uploading...
Home
Repair And Restoration