Home
Repair And Restoration
CB500X Fairing Panel Removal
Blog Date - 25 October 2016
By Ren Withnell
The first time I did this it proved to be a bitch of a job. Now I understand how everything fits together it is a *little* bit easier. This is living proof motorcycle manufacturers make motorcycles to be built in factories and not fixed at home. I digress...
NB - this is the 2016 LED model. I believe earlier models are similar but if in doubt do double check.
1. Remove the seat
2. Remove the side panel - see CB500X Side Panel Removal
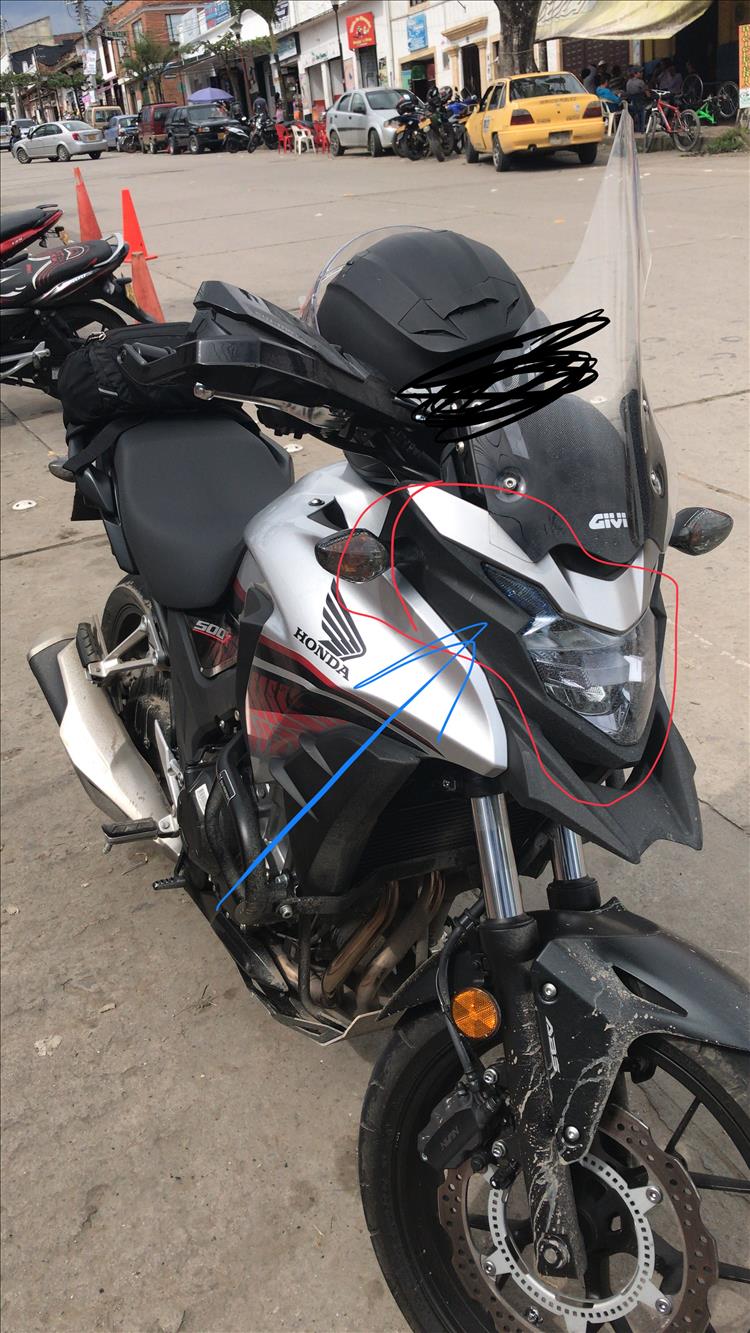
3. Remove the bolts from the fairing panel located near the top of the radiator.
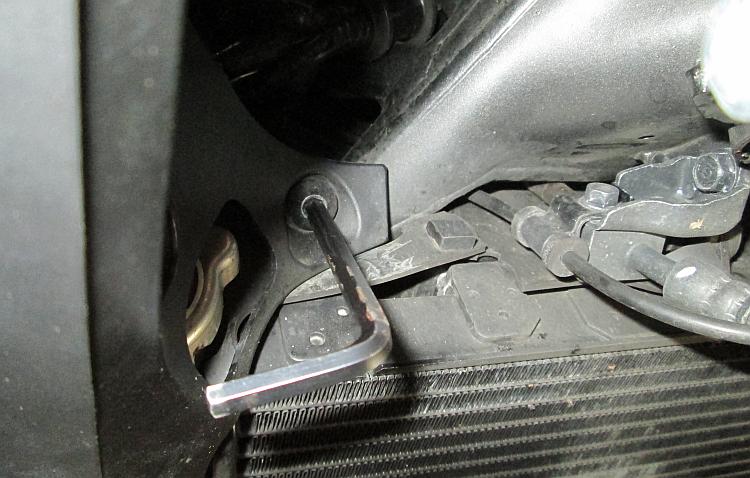

4. Remove the bolt just below the radiator.

5. Remove the bolt at the rear of the panel, this was hidden behind the side panel.

6. Remove the top allen bolt where the fairing meets the tank.

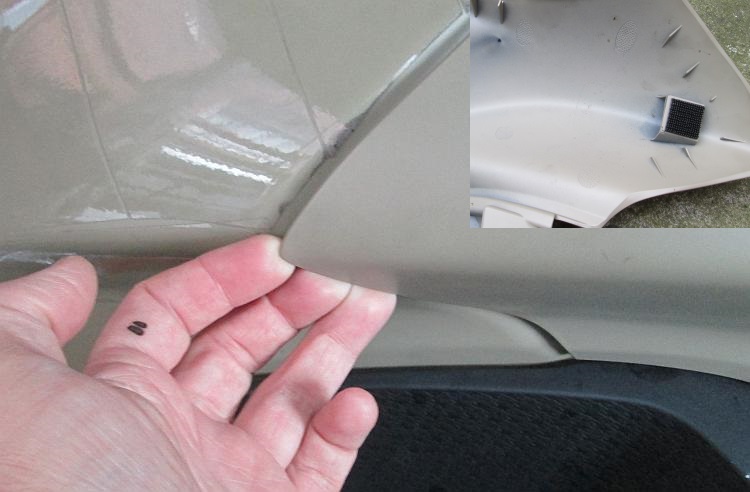
7. Remove the hidden plastic screw. This is located on the inside of the fairing and holds 2 black plastic trims together. It is made from squidgy nasty cheap plastic so you'll need a small sharp crosshead/philips screwdriver and a gentle touch. To be honest if you break it and have to rip it out a replacement won't be expensive and not having it there won't stop you riding the bike. Turn the screw out until it's around 5mm out, the retainer should then slide out.

8. Pull apart the velcro tab. This little devil catches a lot of people out, including myself. There's a small tab of very very effective velcro-type material attaching the rear of the panel to the tank. A firm tug ought to free it.
#############################################################
STOP!!! Take a breather. Make a cup of tea. Relax.
The next part is the hard part and the part you don't want to get wrong. If this is your first time be sure to read the additional tips at the end of the guide. The fairing is ready for removal now. In theory all you need to do is pull the panel upwards 5mm then forwards 10mm. Let show you why.
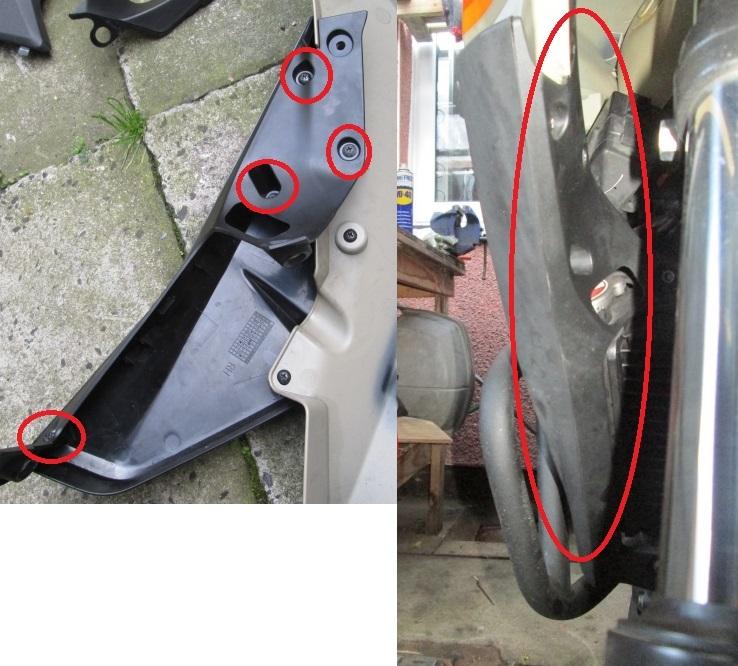
Behind the fairing panel here...

...are located 2 major fixing lugs here...

...these lugs locate into here on the side of the speedo/light cluster...
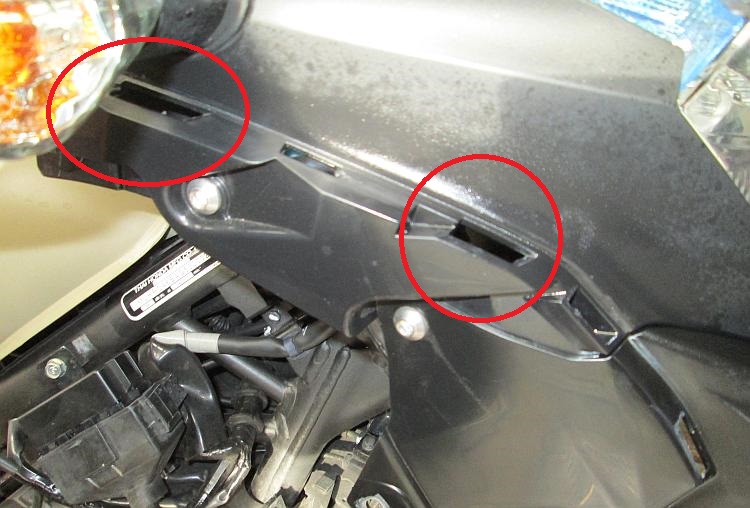
So as you can see from the lugs you need to lift the fairing a few millimetres then move it forwards and out. Sounds so easy! These lugs into these holes are a blooming tight fit. I had to wibble, wobble, jerk and shake until finally the panel came out. I know it's not just my bike as there are many many others out there who have BROKEN THE LUGS!
Additional Tips.
1. Squirt WD40 or similar thin lubricant into the lugs. This might help ease the panel off.
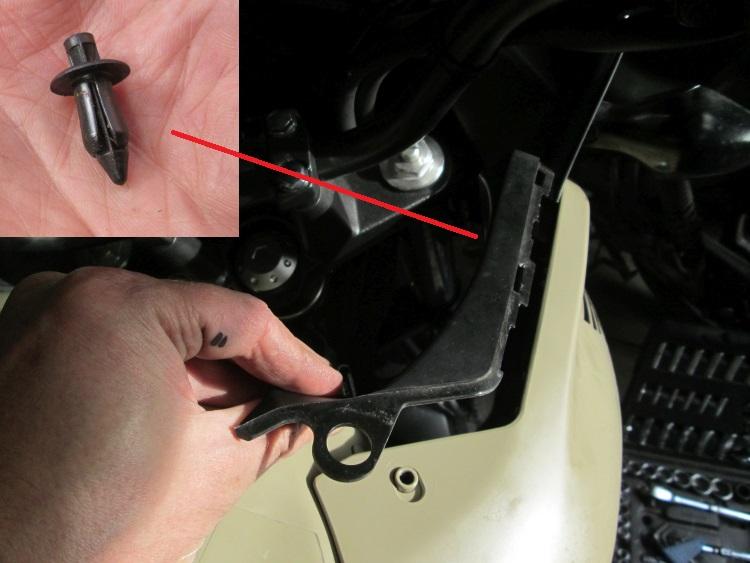
2. Remove the small trim between the panel and the tank. There's a small fixing where you push the centre of the fixing IN to get the fixing out. You don't need to remove this but it helps to understand what's going on and might ease the final shove.
3. I found it helped to remove the trim around the radiator too. There's 4 crosshead/philips screws.
4. DO NOT heave too hard on the fairing panel. Those lugs will break. You will need to apply pressure upwards but rather than pulling up as though you're lifting the bike, pull up and jiggle and jerk and rattle and shake.
5. Because my panel was so tight I have GENTLY filed the holes where the lugs fit into a very small amount. I hope this will make future removal a lot easier.
Below is a video that may also guide you.
We're always looking for your handy bike tips, motorcycling tales, mechanical insights and reviews. Please Click Here for more details.
Reader's Comments
Latchy said :-
Perhaps Honda did not want them lugs to rattle, torturing the rider with every ride
29/10/2016 12:17:10 UTC
Ren - The Ed said :-
I'm quite sure Honda didn't want the panels to rattle. Being pragmatic rather than aesthetic though I would have used a couple of screws or domed allen bolts. If I break the lugs (quite likely) I shall reconfigure the fixings using something like that.
29/10/2016 12:20:15 UTC
Ian Soady said :-
I hate those little hidden clips. My Tiger had a couple on the tank-side trim panels - you took all the visible fixings off then (in theory) slid the panel backwards. Of course nobody ever tells you this (and the official Triumph workshop manual was singularly unhelpful) so everybody snaps them off. Triumph also used a bewildering array of Torx and Allen screws meaning the simplest job needed a handful of tools. The fixings themselves were also a strange assortment and it was very easy to mix them up.
I wonder when manufacturers started using grommets and clips. My 1999 SLR650 had them (but they were relatively obvious and unproblematic); the 1993 CB400 seems to use conventional (to me) fixings throughout although the lugs they go through are a bit minimal in places. The Suzuki V-Strom I had for a couple of years had those funny rivet fastenings with a centre pin that expanded the outer. They were good when you'd fathomed out how they worked. And of course realised there was always one more than you thought.
The Sunbeam is of course a delight in comparison being capable of being reduced to its constituent parts with a couple of open-enders and a flat bladed screwdriver. It does however have an occasional desire to dismantle itself.....
29/10/2016 12:44:01 UTC
Ren - The Ed said :-
I suspect these new fangled lugs, clips, pins and fixings are here for 2 reasons.
Firstly price. As the accountants rule the world now every 0.001 pence saved is important to "margins" and "bottom lines". If a lug can be moulded that's another ha'penny screw saved.
Secondly looks. Apparently our modern prissy and delicate aesthetic would be mortally offended by the sight of a 10mm bolt head and we might bring a lawsuit to compensate for visually traumatic experience. The big marques don't need the bad press of having a crosshead screw on show.
Yes old brit bikes I am told could be unreliable but fear not, with all that vibration they would self disassemble to aid repair. What we need is old brit bike fixability with modern reliability.
31/10/2016 07:48:54 UTC
Pocketpete said :-
God it looks a nightmare.
Got a strange noise coming from my clutch at the moment. Its not all thectime just every now and then its almist like a complete clutch slip.
I pull the handle in and it clicks and stops. It make be a week before it does it again. Then it might be twice in a day or none for 2 weeks.
Very odd seem totally random only happens when i stop and then set off again.
Took it in the garage and no fault found. Typical random fault he thinks a bolt might be loose which he only had reported on older models. Honda had done a mod to the gearbox. I will see how it develops
06/11/2016 11:51:27 UTC
Ren - The Ed said :-
It is certainly not a simple task Pocket.
As for the clutch? I have noted on my CB500X that it will very occasionally select a gear but then when I release the clutch I feel a minor thud from the motor. I suspect the gears don't always totally mesh until the drive comes back through.
To be honest I've noticed Honda gearboxes are always functional and strong but never as slick as Suzuki's. I'd hope Honda know what they're doing and have a reason for this. Perhaps they are more agricultural and last longer in exchange for delicate but slick. I don't know.
07/11/2016 16:44:28 UTC
Gizmodu74 said :-
Hi Ren,
Great job !!!
Without your help I was stopped at the step 8 and close to the suicide ;-)
After a cup of tea, your main main trick : "you need to do is pull the panel upwards 5mm then forwards 10mm..." + your pictures were really helpfull for me, you saved my life :-)
Because I have GIVI engine bars protection, the tips N° 3 if fully obliged too for me.
Many thanks from France and take care
Bruno alais Gizmo.
21/12/2016 15:50:26 UTC
Ren - The Ed said :-
Hello Gizmodu74
I'm glad it's helped! Yeah, yes I was pretty close to suicide too. Either that or the new bike was going to become an unfaired "street fighter" style machine. I had my hammer in my hand and was ready to break things.
I had to rotate my Puig engine bar to get the fairing panel fully off.
I hope all is well in France and you have a joyeux noel.
21/12/2016 16:14:59 UTC
Don said :-
Yes, I broke that one lug.
If only I have read this earlier, then that lug on my 2 weeks old X wouldn't have broke yesterday.
Have read about pushing/pulling forward in other sites, but there was no mention of your "5mm upwards and wiggle it" tips. That, & the velcro are the key points to removing the panels.
Well, lesson learned.
Was also trying to access the Option Plug behind the headlights, but gave up after multiple failed attempts to remove the plastics beside the light. Once broken, twice shy...
Any idea what needs to be removed for full access to the OP?
15/01/2017 16:20:54 UTC
Ren - The Ed said :-
Not yet Don. I'm planning to do a tear down to check the tappets in a while and I too want to find the power take off. If and when I get there I'll be sure to let you know.
Bummer breaking the lug, luckily it's not a major disaster just damned annoying.
15/01/2017 18:49:29 UTC
Ian Soady said :-
I had some success fixing the broken lug on my Tiger with superglue and baking soda believe it or not.
I first came across this trick for filling oversize string slots in guitar bridges but it does work for the kind of plastics used on bikes.
The link is an academic analysis but if you look on youtube you'll find loads of videos on how to do it.
blogs.sccs.swarthmore.edu/julianleland/engineering/academic-projects/baking-soda...
16/01/2017 16:10:43 UTC
Ren - The Ed said :-
Ian you are a mine of information! The notion of a superglue and baking soda composite boggles the mind.
I reckon Latchy will be playing with that sometime soon.
16/01/2017 16:16:36 UTC
said :-
On the 2016 bike the options plug should be easily seen hiding between two black plastic trim panels after you have removed the side and fairing panels. It's tucked up inside a translucent plastic cover.
Hope that helps everyone.
17/02/2017 20:02:57 UTC
Archie said :-
On the 2016 bike the options plug should be easily seen hiding between two black plastic trim panels after you have removed the side and fairing panels. It's tucked up inside a translucent plastic cover.
Hope that helps everyone.
Apologies if this is duplicated, I forgot to add my name.
17/02/2017 20:05:04 UTC
Ren - The Ed said :-
You're spot on Archie. I'm planning on doing a short item on locating the OP (Options Plug - silly name) on the 500 soon.
I have figured out why Honda has fitted the front option plug with 3 wires. Dip, Main and Earth. This is because the LED version headlights are awful, Honda must know this and have made provisions to upgrade the substandard illumination. Sinful
18/02/2017 10:25:55 UTC
pocketpete said :-
I thought about getting some extra lights such as leds I presume these will plug into the option plug and work off the lights circuit in some way also thought about adding a USB port maybe its a simple process as electrics are almost as bad as using a spanner.
18/02/2017 14:42:38 UTC
Ian Soady said :-
Am I the only one who doesn't know what an "option plug" is?
18/02/2017 15:21:17 UTC
Borsuk said :-
I'm guessing it is a factory fitted standard plug in the wiring system for optional extras like driving lights. They prewire the addons as it is easier and cheaper than going back into the wiring harness later down the production line. Bit like eighties scientific calculators, the whole range of casio's for example had the same chip and software. The only difference is the cheapo's didn't have the button installed to let you have the extra functions.
18/02/2017 17:20:38 UTC
Ren - The Ed said :-
Ian - an "Option Plug" is a marketing nonsense term for - ahem - a plug on the bike where you can access some electricity from the wiring. In the case of the CB500X there is one under the seat with 2 wires, positive and negative, and one tucked up under the fairings beside the headlight with 2 wires, negative, positive and "main".
I'm sure you've worked this out but for anyone reading who hasn't... The plug under the seat could be used for additional rear lights or a USB charger or even a mini fridge in the top box if you should so desire. The front one could also be used for similar purposes with the additional "main" wire coming live when the light switch is in the "main" position as opposed to "dip". This "main" wire would be used to spotlights and the like.
Both plugs only come live when the bike is turned on at the key.
So Borsuk you are quite correct. Pocketpete - yes it's a simple process as long as you know what you're doing.
18/02/2017 18:15:30 UTC
pocketpete said :-
So when you buy for example a set of fog lights do you order these with a Honda Option Plug or is the plug a standard fitting across a range of motrbikes makes.
When you order accessories do you have to specify the type of fiting ie like a travel adapter when you go on holiday.
I always thought motorbikes should have a simple fuse block arrangement where you can simply add a device.
19/02/2017 08:46:21 UTC
Ren - The Ed said :-
Most bike lights just come with bare wires! The Honda option plugs are not a format I recognise although the forums suggest the corresponding plug can be purchased from eBay.
Getting aftermarket lights and fitting them is not a "plug and play" affair. I'd expect some spannering, soldering and wiring would be necessary.
19/02/2017 09:44:31 UTC
Ian Soady said :-
I knew what it was all along but had never heard the term....
As Borsuk says, the harness is probably common across all variants of the same bike so you get weird little connectors that make no sense.
Some accountant will have worked out that it's cheaper to do it like that.
When I designed computer systems for Rover, I was fascinated that they deleted a little light that illuminated the ignition lock so you could see where to put the key. The managers told me that it saved something like 45p per car, which admittedly did add up to quite a lot over the year. But it was a nice "luxury" feature that may well have swung some people to buy that model.
Penny wise pound foolish.
Pocketpete - I usually add such a fuse block myself and include a flying lead for a charger etc. As Ren says, it would rarely be a simple plug and play anyway.
19/02/2017 10:53:04 UTC
Julio Zipa said :-
Hi friend, I need change the fairing panel display and the fornt light, how start after that I have retired the fairig panel side?.
 22/05/2018 13:08:30 UTC
Ren - The Ed said :-
Hi Julio Zipa. I'm afraid I haven't got to taking apart the light or the digital display yet.
22/05/2018 15:07:13 UTC
Bill D said :-
Great post, the vids really explain very well (lol re remove the seat bit) and enabled me to fit front and rear aux lighting with a nice neat routing. Just a word of caution re the front op plug on LED models. Do not wire your aux lights into the main beam feed. It is fed by an LED regulator that WILL fry with extra load, a very expensive non consumer replacement. However, you can use this to operate a relay, fused if sensible, feed from the battery. Thus switch on main, get aux lights working.
To be fair, all my aux equipment is fed by relays. The op plug, either front of rear, will operate the relay, power drawn via relay to aux item. If anything goes wrong, simple to isolate all / any aux equipment and return bike to factory condition.
Relays so stupidly cheap on Amazon, almost stupid not to.....!
26/10/2018 19:20:53 UTC
Ren - The Ed said :-
Oh my! THAT is very useful information Bill D. I would have assumed the Hi-Beam/Main Beam wire would just be a direct feed from the 'bars switch and not through any electronics beforehand. I'm glad you shared that because I have considered fitting additional Hi-Beam as the LED one is, frankly, poop.
So relays is the way to go, lighten the load on the circuits? Makes sense to me and as you say they're cheap enough. Good call, thanks.
27/10/2018 06:30:19 UTC
Ian Soady said :-
I agree, always use relays when connecting any additional devices - with a fused feed from the battery of course. Sometimes existing wiring is just too feeble to support any extra load.
27/10/2018 09:15:24 UTC
Ren - The Ed said :-
The thing with the CB500X Ian is that tucked behind the headlight is a socket with 3 wires. One being neutral/earth, one being a live positive feed that is switched with the ignition and a the third wire comes live with the main beam.
Essentially it "feels" like the 3 wires you'd find going to the main headlight bulb on a bike - negative, dip, main beam. As it "feels" like these 3 wires I can easily understand why someone might easily use these to wire in some additional lighting. It would be all to easy to add on 2 halogens and as Bill D said fry the LED regulator.
Fused relay certainly seems the best way to go.
29/10/2018 10:08:43 UTC
Name
Comment
Add a RELEVANT link (not required)
Upload an image (not required) -
Uploading...
Home
Repair And Restoration