Home
Repair And Restoration
CB500X Adjusting The Tappets
Guide Date - 06 March 2017
By Ren Withnell
So - you've removed the side panels (CB500X Side Panel Removal). That was easy.
So - you've removed the fairing panels (CB500X Fairing Panel Removal). Nightmare the first time but easier when you know how they actually come off.
So - you've removed the petrol tank (CB500X Tank Removal). Not too bad when someone actailly explains how to disconnect the fuel pipe properly. (Honda High Pressure Fuel Connector)
So - you've finally stripped away all the chaos beneath the tank (CB500X Getting To The Tappets). Absolute hellish job even if you're a dab hand.
And now...NOW is the time to actually check and adjust the tappets. Well done. You've done the hard part, this bit should be easy as long as you are delicate and careful.
The next task is to remove the rocker cover. There are but 4 humble bolts holding this in place. Now lift the cover off. What, it's stuck you say? Yes me too. I do not know the recommended method to loosen this up but don't use a rubber mallet, you could damage the soft alloy of the cover. Don't ask how I know this. My unrecommended method was to tap a fat flat scredriver against the rubber of the gasket just enough to lift it but not pierce it. I could have easily damaged the gasket.
The cover will, with some angles and turning, eventually come away from the bike. You will now see this.
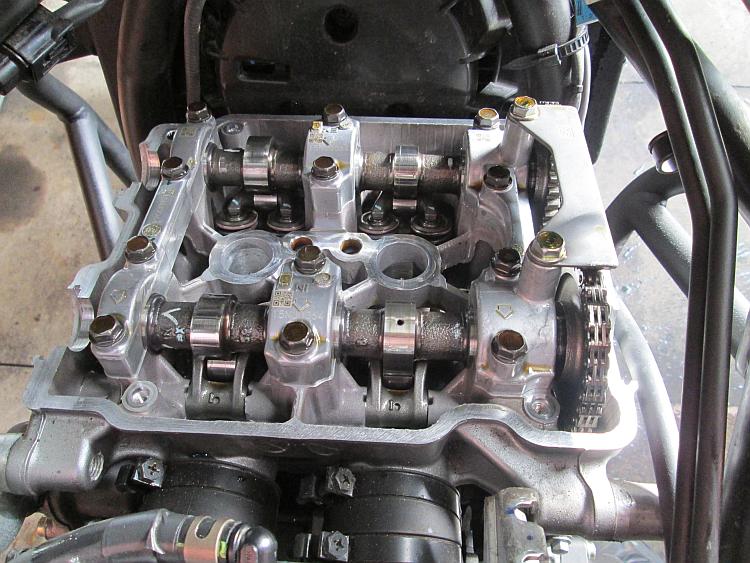
Aaaaah at last we meet after all this time.
The next item to remove is the crankcase access cover.
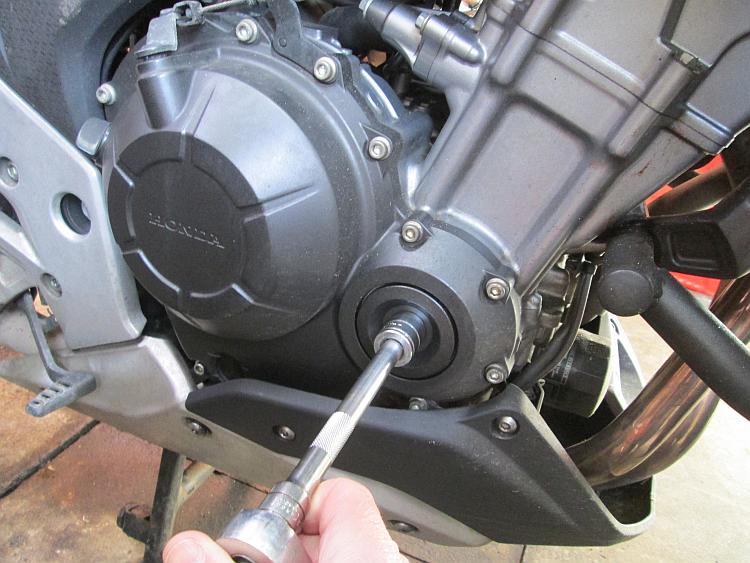
17mm Socket.
Behind the cover is a 14mm nut that will allow you to turn the crank. Always rotate the crank in a clockwise direction. Using this we can rotate the crank to align up the camshafts for checking the tappets. Rotate the crank clockwise until the "IN" and "EX" marks on the camshaft sprockets are reading the right way up and aligned with the top of the cylinder head like this.
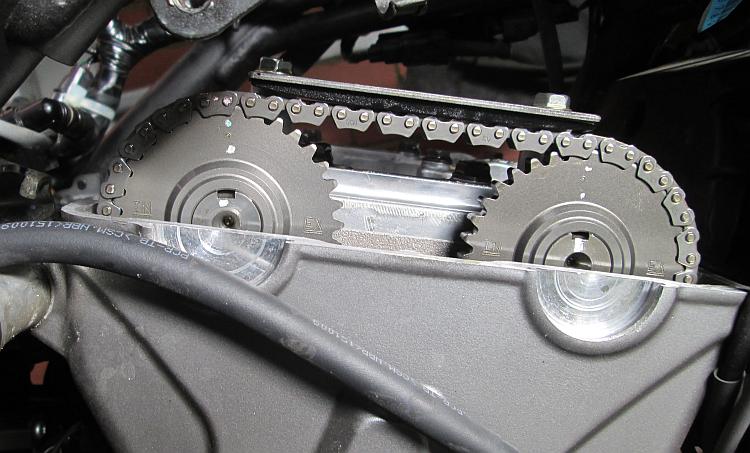
This is the state you wish to achieve.
Look at the crank, there are markings for Top Dead Centre, these should be quite close to being aligned now too. At this point you are ready to check the EXHAUST tappets only. Remember this is a 180 degree crank so checking the tappets is not quite as you may be used to.
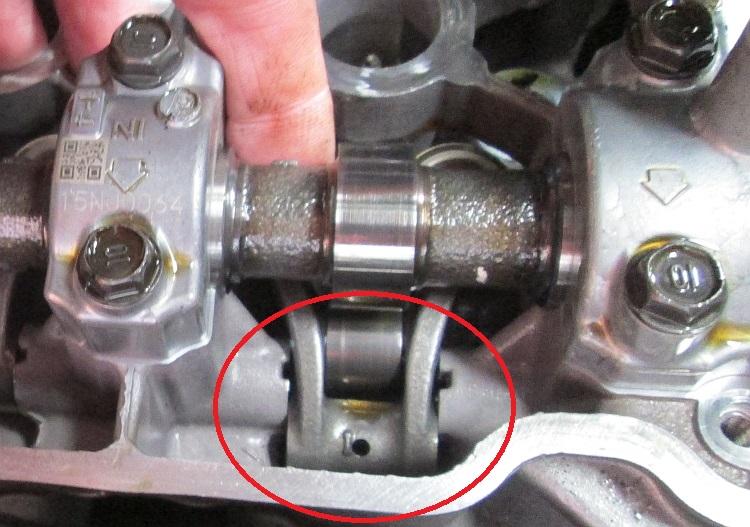
The feeler guages go between the short little followers and the top of the valve as marked here.
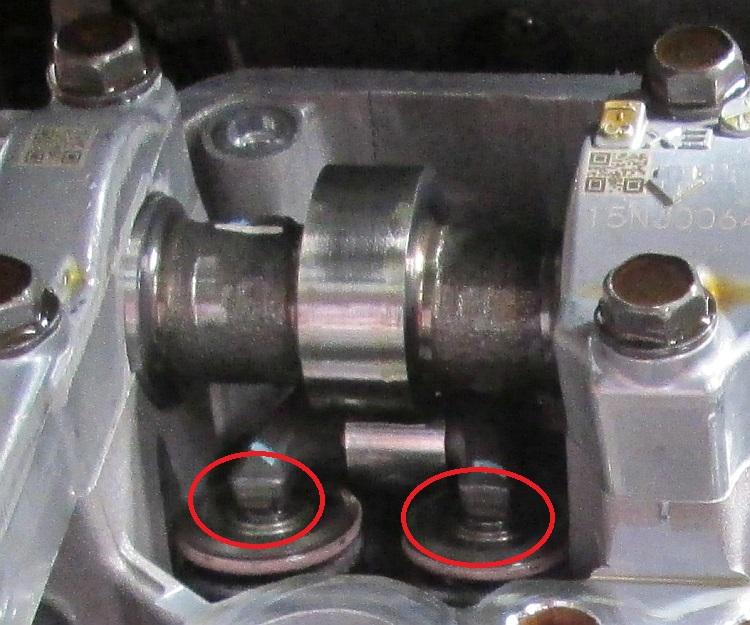
Stick the old feelers in the bits circled.
The gap for the exhausts should be 0.27mm +/- 0.03mm. Make clear and precise notes of each valve's gap once measured accurately. Next we need to check the inlet valves. For this we rotate the crank one-half turn clockwise causing the camshafts to rotate one-quarter turn clockwise. This will place the "IN" and "EX" markings vertically and in the case of my bike will align some dots of paint with the top of the head.
Again measure the inlet valve gaps with the feeler guages then make clear and precise notes of each valve's gap. This time the gap ought to be 0.16mm +/- 0.03mm
NOTE
The method of positioning the crank and camshafts for measuring is that stated by Honda in the manuals I have seen. Personally I found it considerably easier to simply rotate the crank and hence the cams until the lobe or "lump" of the cam was opposite the contact point of the associated follower/tappet. This is my choice, my opinion as to the best method. It's up to you to decide.
If your gaps are all within tolerance - job done, put the cover back on and put the bike back together. If not you will need to replace the existing shims with the correct shim to bring the gap into tolerance. Typically this would involve taking the camshafts out, swapping shims and replacing the cams once more. Not so on this engine.
To the left side of the cylinder head (opposite to the cam sprockets) are Allen / hex socket bolts. These can be removed. once removed a standard M6 threaded long bolt can be put into the hole and threaded into the actual pin upon which the followers/tappets pivot. It takes a simple pull on the bolt to draw out this pin which in turn allows the followers/tappet arms to be moved out the way.
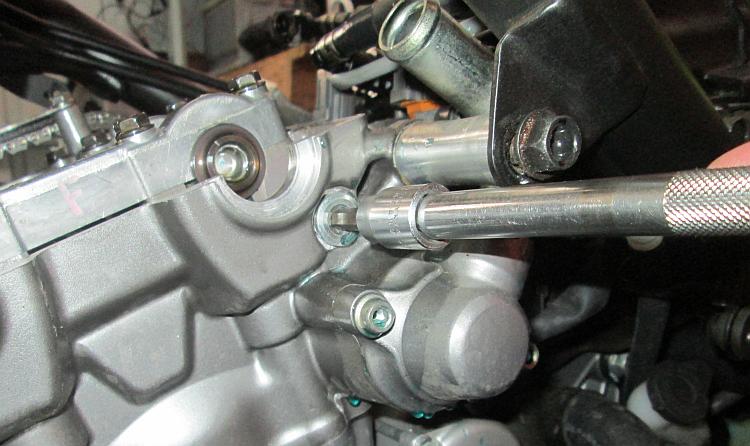
Undo this bolt to allow access.
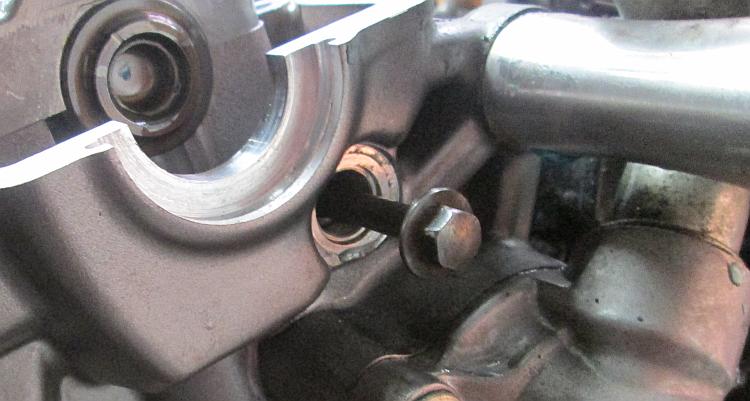
Inerting a bolt a few threads will allow the follower pin to be drawn out.
NOTE!!
At this point the cam followers/tappets are loose. The shims are also loose. You need to be really careful now to NOT lose any of the shims into the belly of the motor. Consider putting clean rags into the camchain tunnel to prevent this. Be sure to use magnets to remove the shims. Just be blooming careful. You simply must not leave a shim or anything else floating around inside the motor.
With the follower loose it can be pushed back to access the shims. Using a manget on a stick or whatever the old shims can be removed and the new ones inserted. Once this is done the followers can be lifted back into positions and the follwer pin that was drawn out can be replaced.
Push the follower back to access the shims.
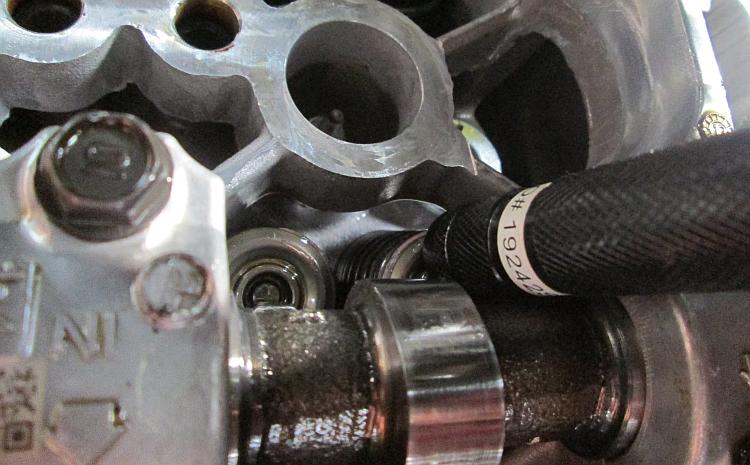
My torch has a magnet to pull out the shims safely.
Again be careful, when pushing the follower back into position I knocked out one of the shims and *almost* lost it. Tread carefully. Consider pouring just a little clean engine oil over the followers to give everything a good start too. Ensure any rags are removed and replace the hex bolts that cover and retain the follower pins.
Double check the gaps once more to ensure everything is within tolerances and then...put it ALL back together.
Do you sell and natty little tool that would make this job easier? If you'd like to advertise on this page or elsewhere on the site then Click Here.
Reader's Comments
125Tony said :-
So when do the shims need looking at again? Generally there is a higher mileage between shims than screw and lock nut tappets. I imagine that would be an expensive service.
07/03/2017 16:20:48 UTC
pocketpete said :-
When mine needs doing I will be round your place like a shot. How the hell did you learn all this stuff. I've just about cracked changing the oil and adjusting my chain.
I know this may sound strange what does a shim actually do and what is a follower. I get the idea of a cam shaft and the way valves lift but thats where my knowledge terminates.
Why is there a gap or clearance between the shim and the cam.
07/03/2017 18:12:50 UTC
Ren - The Ed said :-
125Tony - The shims aren't actually due to be checked until 16,000 miles then every 16,000 miles thereafter. I chose to do my shims early because of my experience with the CBF250 and the CBF125. This was done at 8,500 miles as a precaution. 2 of the valves were a *leeeetle* bit tight so I have re-shimmed them. I doubt it would have caused any issues if I hadn't.
Pocketpete - I leaned this from years of experience with cars AND a mahoosive thank you to "Gills" from the CB500X.com forum who did a shorter but still very concise and good "how to" on the forum.
In the case of the valves a shim is a small round disc of metal with a VERY specific thickness. For example one of my shims was 7.5mm in diameter and precisely 2.02mm thick.
On some motorcycles the lump (lobe) of the camshaft presses almost directly onto the top of the valve. When the lump is not pressing on the valve there needs to be a very very small gap, perhaps 0.15mm for example. This gap, measured when cold, allows the metal to expand when it warms up and still ensure the valve is not being pressed by the cam until required.
To adjust this teeny little gap between the cam and the valve is a shim, the round disc of metal. If the gap is too big you put a fatter disc in. In the gap is too small you put a thinner disc in.
In the case of the 500X rather than the cam pressing directly onto the valve the cam presses onto a lever that then presses onto the valve. Why? ...er...I'm sure there's a good reason. The lever is called the follower.
07/03/2017 18:25:51 UTC
Bob said :-
They've used followers so that the small shims can be used. To have the cam bearing directly onto the shim requires large shims and large diameter buckets, which in turn require very precisely machined bucket wells in which to slide up and down. Basically it's due to cost (the cast followers are cheap and don't need much precision machining) and space in the head.
Ahh, the simplicity of a screw-off tappet inspection cover and a screw and locknut tappet (Vigors rule!).
07/03/2017 18:59:46 UTC
125Tony said :-
You also operate 2 valves from 1 cam lube.
08/03/2017 10:04:39 UTC
Ian Soady said :-
"They've used followers so that the small shims can be used. "
True. They can also be used to change the leverage on the valve so that its travel is more / less than that provided by the cam, and also (by having different radii on the follower on the cam) to change the effective cam profile.
But these are usually found on older pushrod engines.
Although screw / locknut systems are indeed easier to deal with they are by their nature less precise (but does that matter for a Vigor?(!)) and also tend to wear more quickly thus requiring more frequent adjustment.
08/03/2017 10:21:30 UTC
Ren - The Ed said :-
I'm afraid I can't quite agree that followers are used to allow for smaller shims. The CBF250 and Latchy's ZZR600 both have bucket over shim setups and both use the same 7.5mm diameter shims as the CB500X.
I suspect price comes into play. While a bucket over shim setup has fewer parts I can understand those parts are cheap to make. I'm sure there are sound engineering reasons too but these are far beyond my knowledge of valve timing.
I do agree screw and locknut, while requiring more maintenance, is a much much MUCH more home mechanic friendly experience. I chose the CB500X over the NC750X because it is lighter. However the NC750X has screw and locknut tappets and gaining access to those tappets is considerably less complex. Only the radiator needs to be removed and having seen a youtube video it's only a 20 minute task at most.
To make shims even more frustrating once you have your measured gaps, once you have the old shims out and once you've calculated the size of shims you need to put in...you have to then WAIT for the blasted things to be delivered! Screw and locknut you just finish the task there and then. Grrrrr!
08/03/2017 10:42:13 UTC
Ren - The Ed said :-
125Tony - you're quite right one lobe (or lube hehe) operates 2 valves. That'll make the camshafts cheaper to manufacture won't it.
08/03/2017 11:00:43 UTC
Snod said :-
I'd also like to point out that using a rocker has allowed them to use a roller surface too, which is better suited to modern oils than the old lobe-scraping-on-a-surface method.
Mad props to Honda for actually making this a bit easier than it normally is by allowing the rockers to be moved out the way. Shame the rest of the bike is so complicated!
So.. Installation is the reverse of removal, right? Simple..
08/03/2017 12:16:21 UTC
Ren - The Ed said :-
Deffo well done to Honda for making the task of changing shims easier. So...they design a motor such that changing shims is relatively simple (subject to throwing shims down into the engine). They then proceed to make access to the easy-to-change shims as hard as humanly possible. Go figure.
I suspect the motor design has far more to do with production costs rather than ease of maintenance. I suspect the difficult access to the easy shims is also down to production costs rather than cruelty to home mechanics.
When the bike is out of warranty I am considering how to make access to the rocker cover and thence the shims easier. It's all down to that plastic tray that holds the coils, ECU, PAIR valve and indicator relay. When this is being assembled at the factory I bet it's the fastest most efficient way to put the parts together quickly. Of course this is not the case outside the factory. There will be a way.
08/03/2017 13:44:55 UTC
Ian Soady said :-
It's always been the case that vehicles are designed for easy assembly rather than easy maintenance. For example, one reason for moving to front wheel drive cars was the fact that the entire power train can be assembled on a subframe before fitting (what was charmingly known as "engine stuff up") rather than having people crawling around fitting propshafts, differentials etc.
The manufacturer has to pay for assembling the vehicle so makes it as cheap as possible - it's the owner who has to cough up for servicing.
08/03/2017 15:40:10 UTC
Ren - The Ed said :-
I am reliably informed that the poor long suffering dealers barely make a penny on each vehicle they sell, most of their meagre income comes from servicing rather than sales - allegedly. Therefore having difficult to service vehicles also benefits the dealers, although again this is probably coincidental.
As I see dealership owners driving around in their flashy cars and living in large houses in the countryside my poor heart bleeds for their woeful plight.
08/03/2017 17:30:49 UTC
Henrik said :-
Haha, exactly the same song from dealers in DK, pure BS,...
Last service, (24 mounth),I had on the Corsa they did try to charged me 664 GBP for the service, and the "work" was not even finished at the time they promised
(in essense just oil-change, and filters changed)
Now I do it myself for around 10 pct of their cost, in maximum one hour,...
Still they cry, maybe we should go from door to door also, just to collect some more money, for them and their starving familys
The feeling of shame is totally unknown for these people
08/03/2017 20:07:09 UTC
Ren - The Ed said :-
£664 for a SERVICE!!! I've bought cars for less than that. I'd estimate a full dealer service on a Corsa in the UK would be around £200-£300. Is Denmark an expensive country?
09/03/2017 17:15:04 UTC
Henrik said :-
Hi, some things is expensive in DK, some not, car-service is expensive, the £664 was in the high end, they was trying to test me, or maybe I looked like some-one stupid enough to pay that price. Never trusted them in the first place so I had a written down deal/offer in a mail before I booked the service, here I was promised 504 GB, and this is not unusual for service on a middle-class car in Copenhagen. In the province it could be 10-25 pct less.
In my opinion even 504 GBP was terrible, but I still had varenty to keep,..
I refused to pay the £664 bill, was getting upset and angry in the shop, (in front of some other customers), showed them the email-offer, and ended up paying £504 like promised, but I then knew that they were in fact the azz-holes that I suspected them maybe to be from the start
This, and a few other things, made them loose me as customer for ever,..
Also based on my general life-long experience, I generally don't trust dealers, in this case I gave them a chance anyway, but ended up regret it
Btw. just got a Skoda Fabia Combi from 2013, with only 30.000 Km on the counter, but keep the Corsa still
lydmaskinen.dk/download/file.php?id=19676...
12/03/2017 00:17:24 UTC
jsonder said :-
I simply want to thank you for the valve adjustment write up with great pictures. I'm ready to remove the rubber covering over the cam cover, so there is much more to do.
Do these shims not have their thickness marked on them? The last bike I did was an '89 NX250, and the installed shims all had their thicknesses marked on the shims (that was a shim under bucket thumper), as did the replacement shims from Honda. Of course, that was few years ago, with a used bike that developed a tight valve that needed attention at 14K miles. I adjusted all 4 valves to the loose end of the specs (one shim size for all but the tight valve which went two shim sizes smaller), and they were still mid-range when I sold the bike with 36K miles on it.
20/04/2017 17:13:46 UTC
Ren - The Ed said :-
Hi jsonder. Thanks, I'm glad it's been of help to you.
Yes the shims had their size upon them but the markings on mine were very faint. I'm fortunate to have a micrometer so I didn't need to know the correct shim size. Even if the shims are marked it's always worth checking them - just - because really.
You've done the hard work. Changing the shims is quite easy although I'll repeat my advice, be very careful not to loose a shim down into the motor. Surround and cover everything with clean rags if you can.
20/04/2017 17:46:49 UTC
Ian Soady said :-
Worth checking the shims especially if it's an older bike as people have been known to grind them down.
I find a simple digital caliper as found in Maplins etc for a tenner or so entirely adequate for this sort of thing. In fact mine gives identical readings to my Moore & Wright micrometer which now sadly gathers dust.
21/04/2017 09:13:28 UTC
jsonder said :-
It appears that my micrometer went to Montana with the rifles and reloading equipment, so I am waiting till next week when a new one will be delivered. Two of the shims were illegible, and this is with only 14,924 miles on the little beastie. They were all at or slightly under the minimum clearance, so they will all be decreased two sizes (0.05 mm). With only one shim that can be used elsewhere, I'm going to order all 8 from Honda or my stealership, in hopes that the made in Japan shims will hold their size info better by wearing less.
That is assuming that the original shims were sourced in Thailand. Maybe not.
21/04/2017 22:50:52 UTC
Ren - The Ed said :-
Yeah I guess with the best will in the world those markings are in a harsh place under a lot of duress. They're going to wear off.
Montana huh? Why did your micrometer and other gear go to Montana? Is there a place where tools and guns go for a holiday there? Montana sounds wild and full of cowboys and Indians to me and my vivid imagination.
22/04/2017 06:18:52 UTC
Skylar said :-
Hi there everyone! Just sharing my opinion on the cb 500 twin engine honda made. Out of many twin engines out there, honda made two engines that caught my attention that were the NC 750's and the cb500's. Why?. For me, practicalities are a big factor also fuel efficiency and quality thought full Engineering because it's a motorcycle! I come from a background of riding scooters and the need for robust maintenance solutions always on my mind(because scooters are service critical machines). Honda always brings well thought out bikes. there are many other manufacturers (European brands too) that cut costs of Their products but not honda. this cb500 engine is well engineered to ease the service process,and that directly effects longevity of an engine. something you expect from honda .like I said,well thought out. /There's a dude that said many cars are made front drive engine style because of ease assembly at the factory. The truth is its a combination of clever packaging that gives more cabin space,better means when servicing and costs effectiveness in manufacturing. This never came over night so ignorant people that are quick to comment than think about the time and know how involved, please be Quiet.
16/02/2018 04:24:23 UTC
RoryD said :-
Many thanks to Ren for this blog as I think I may have successfully undertaken my delayed valve clearance service (c.20k mls vs 16k) thanks to the clear instructions here - and on the CB500X forum. All 4 exhaust valves were tight (.20 to.22) altho' inlets were all within tolerance. Micrometers and shims were all new to me, and the dis-assembly required was mind-boggling in comparison to my last bike - but at least it's only every 16k miles (4 years for me), and not every 3k as it was for the Inazuma.
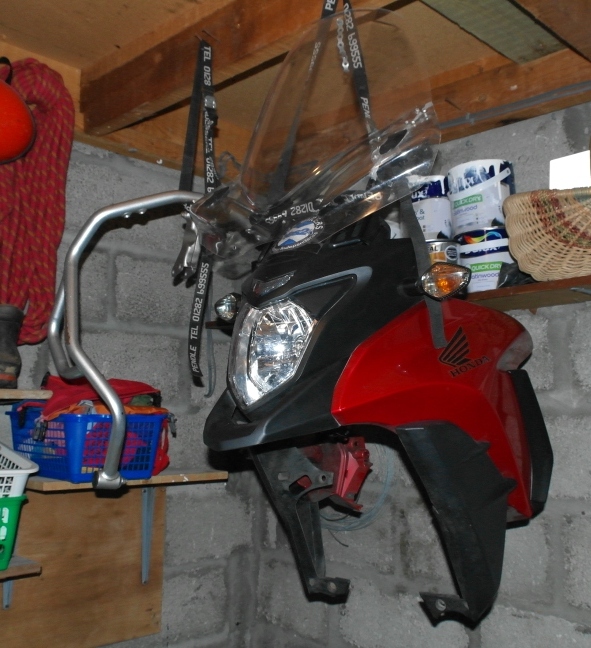
Took the shortcut someone on the CB500X forum suggested for removing the fairings by simply undoing 8 screws & 2 bolts, disconnecting a couple of plugs and easing the whole thing (incl. headlamp & instrument panel) away forwards. Image of the whole fairing hanging up next to the crash bars, from where it surveyed me as I nervously followed Ren's instructions for the rest of the process. Ren's advice re removing the top coolant pipe was good - esp as I was replacing the coolant - and I left the pair valve attached to the tray rather than detaching it.
- RoryD
 19/03/2019 23:40:51 UTC
Ren - The Ed said :-
Cor! Well done Rory.
I really must work out how to do the "whole fairing" thing as in some ways it could be a lot easier. And yeah, I used CB500X.com to glean the information and get me going, damn useful it all was too. You got any details regarding removing the fairing as you did?
20/03/2019 08:39:09 UTC
RoryD said :-
Re the "whole fairing" business, Ren, I found it almost unbelievably straight forward. After taking off the side panels you remove the 4x black bolts attaching the black plastic cowling to the radiator, the 2x chrome bolts attaching the fairing to the top of tank and the 2 at the rear of the fairing that that face backwards. The whole thing is then only held in place by 2 substantial bolts up under the headlight that attach to the lug on the front of the frame. So you simply have to disconnect two electrical connections behind the left side of the fairing and remove these two bolts - and the whole unit can be eased away forwards surprisingly easily.
Took the bike south over the Dava Moor this morning to Aviemore to catch the train to Edinburgh for work meetings - and amazingly it still seems to be running well, so I couldn't have forgotten to reconnect anything major! Back tomorrow and then off to a "Yes Bikers for Scottish Independence" rally in Inverness on Saturday ..... therapy that gives some of us a degree of hope in these desperate political times.
20/03/2019 21:06:34 UTC
Ren - The Ed said :-
Thanks RoryD. I'll try that sooner or later. Glad to hear the bike is fine. What I'm not so pleased about it you're getting a bit like Borsuk. "Oh just a casual run over Aviemore", yeah, great, thanks. Just mention the beautiful Scottish mountains while I'm sat in a scruffy terrace on the edge of a big city. Great. Pfffft.
21/03/2019 08:50:28 UTC
said :-
03/03/2020 19:09:21 UTC
joe said :-
I just completed my 16k service with the help of this blog and CB500X maintenance.
Your detailed description on faring removal was very helpful.
I also had to remove the top radiator hose and since mine had the charcoal canister and a couple other things in the way of the cam cover.
05/07/2021 22:59:40 UTC
Ren - The Ed¹ said :-
Cheers joe, I'm glad it has been of help to someone. My later model CB500X also has the "evap canister" which is just another blasted thing to remove and try to remember how it goes back together. It's not a major bind but the routing of the pipework has to be spot on. Keep an eye on your coolant level in the expansion tank behind the swingarm - it may drop over the next few weeks as the engine "burps" out any air pockets when being used.
06/07/2021 13:05:33 UTC
Name
Comment
Add a RELEVANT link (not required)
Upload an image (not required) -
Uploading...
Home
Repair And Restoration