Home
Repair And Restoration
Replacing The CBF125 Clutch
Job Date 10 November 2017
By Ren Withnell
So the CBF125 clutch is slipping huh? As previously stated (CBF 125 Worn Out Clutch) I still have the spare clutch from when I had to replace the original clutch basket. I am hoping...hoping that the spare is OK.
When I purchased the replacement clutch basket it came complete with the clutch plates. I cannot for the life of me recall whether I used my original plates in the replacement basket or used the whole lot. As such I have no idea what condition and mileage these "new" plates have.
Task 1 - Clean. The typical definition of cleaning the 125 is riding it through the rain. However as I will be opening the motor on one side I don't want dirt getting into the motor. I spend half an hour with some petrol a toothbrush and the hosepipe removing ground in crud. Only on the relevant side of the engine you understand.
Task 2 - Remove the crankcase. This has been off a couple of times before and I've copper-slipped the bolts. As such each bolt comes undone in a most satisfactory way and the gasket remains intact. Woohoo!
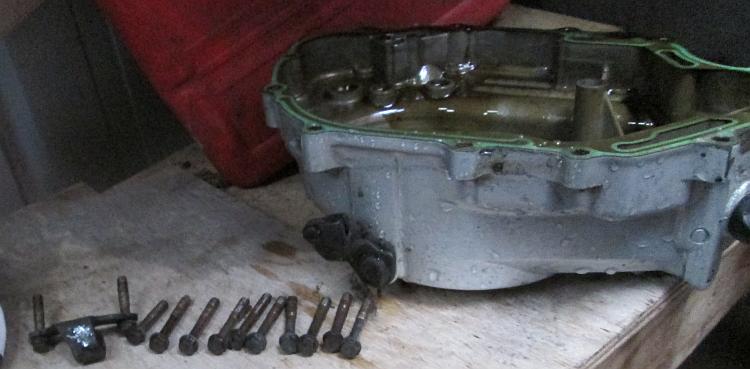
Nothing broken - so far so good.

Hello old friend. It's been a while.
Task 3 - Remove the centrifugal filter. As I undo the screws I think back to Bob's comment regarding the amount of crud in the filter. Well Bob you'll be pleased to hear there is only minimal crud in the filter once more after 18,500 miles. Luckily I have the special tool required to undo the peculiar nut in the centre of the filter. I use a 1p coin between the teeth of the cogs to stop them from turning. I doubt this is a Honda approved method.

Not too much muck in there thankfully.
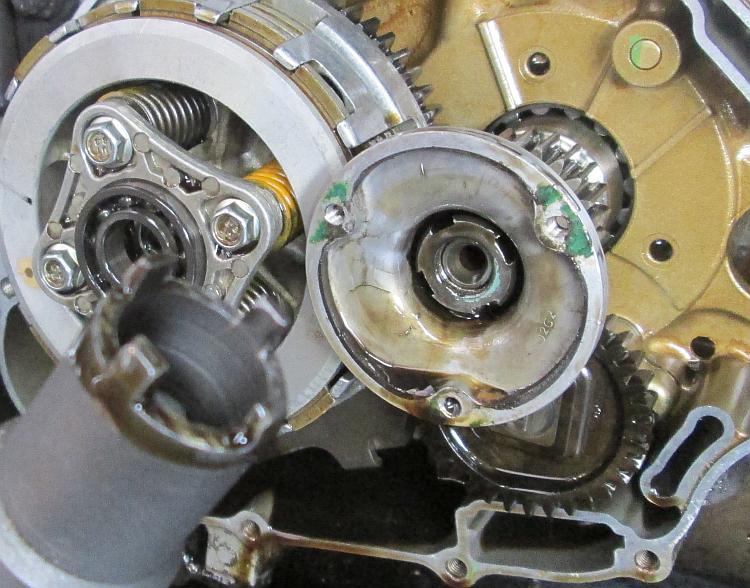
Why the strange nut affair? It's a conspiracy I tell you.
Task 4 - Undo the tight nut. Let me tell you a story. I remember when I first had to undo the nut at the centre of the clutch. This 17mm is TAF (Tight As ...). There is a special Honda tool that allows the basket to be safely secured while much heaving and hauling is carried out on the nut. The Haynes manual suggests making your own special tool.
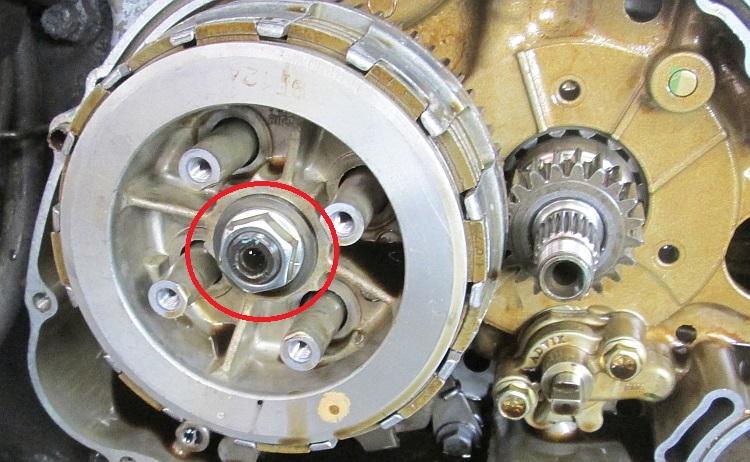
It's just a nut, a simple nut. A really really tight nut.
Not I. Rather than go to the effort of creating a tool I spent days with various tools, wedges, levers and hammers trying to undo this simple nut. In my desire to make less work for myself I oft times create far far far far far more work.
Eventually I borrowed a battery powered impact wrench from a friend. You know the thing, mechanics have a "gun" that goes "rat-rat-rat-rat-r-r-zzzzzzz!" usually air powered. This is a battery version. I didn't hold out much hope but I thought I'd give it a go.
"RAT-RAT-rat-r-r-rzzzzzzz". It took less than a second to release the tight bolt without using any wedges, clamps, grips or magic. I soon purchased a cheap Silverline mains powered version for about £40. A professional mechanic would scoff because under regular use its cheap construction would soon fail. I have only used it twice in 2 years, it is way more than adequate for my purposes.
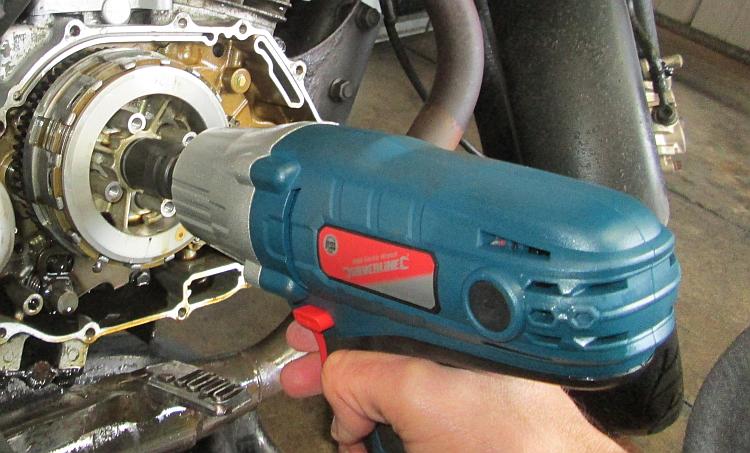
The Impact Wrench is easily tough enough for this tough nut.
Today it takes longer to plug in the impact wrench than it does to release the TAF 17mm nut. There is no substitute for having the right tool.
Task 5 - Inspection. My concern is having stripped the bike the "new" clutch is in the same or worse condition than the presently fitted but knackered one. After removing the 4 spring retaining bolts the clutch pack slips out easily. I spread the "old" and "new" plates out.
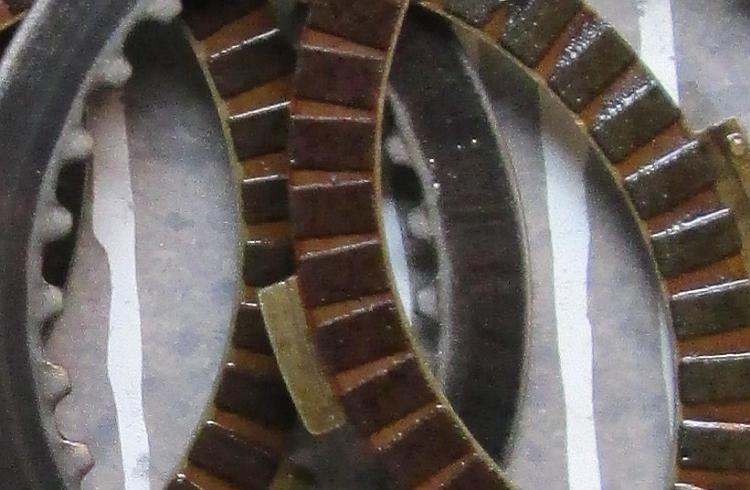
While the "old" plates certainly look much darker presumably due to staining from contaminants in the oil they are not visibly any thinner than the "new" plates. According to the Haynes manual they ought to be 2.92-3.08mm thick with a service limit of 2.80mm. These differences are not obvious to the human eye. I do notice one (one, why just one?) of the plates is visibly worn more than the others.
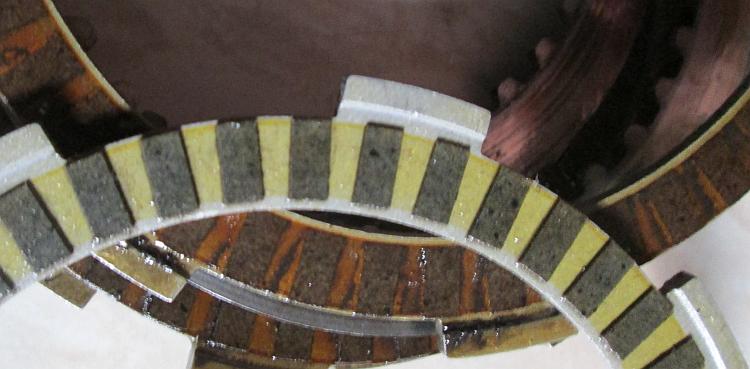
Aging is a terrible thing. "New" V "Old"
I will take a chance and fit the "new" plates.
Task 6 - Reassembly. Note for anyone doing the task themselves. There are 5 friction plates, the outer two are different. Not in thickness but in the shape of the friction surface. Note the rectangles on the plates. Also note the outermost plate is "offset" with it's own slot in the clutch basket.
The outer plates have *slightly* larger rectangles of friction material compared to the inner plates.
I don't know why - but that's how it should be.
I slot the "new" plates and rings into the basket. I remove them again because I forget the backplate (it's a Honda thing). I tighten the 17mm centre nut with the HAND HELD torque wrench. NEVER ever use an impact wrench to tighten things, it will strip threads in a matter of moments. I clean the centrifugal filter and tighten the weird nut to the correct torque. Replace the centrifugal filter cover, but not the crankcase cover - yet.
Task 7 - Clean the filter. Alongside the centrifugal filter there is a metal gauze filter at the bottom of the engine. I remove this is and see some crud and a sliver of metal. Hmmmmm. I wish that sliver of metal was not there, I have no idea where it has come from. What I am pleased about is that there is only one sliver of metal, no signs of any others. Not too shabby from 18,500 miles.
The gauze filter is located here.
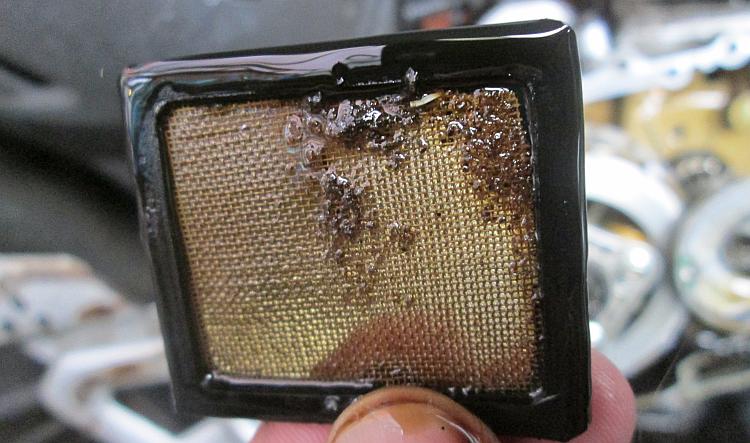
Not bad, but where did that sliver of metal come from?
The Result? Better. Much better. The clutch is sharp once again and has that very small but significant little twitch that indicates complete lock-up. When things wear slowly you don't notice. I hadn't noticed that tiny teeny little jerk you feel when the plates stop slipping and full engagement is achieved was missing from the "old" clutch. It's back now.
I've given the CBF125 a damn good thrashing up hill and down dale and along the motorway and all appears to be well. Remarkably I'm not even leaking from the crankcase.
Onwards and sideways dear reader.
We'd like to share your mechanical tips, tricks, stories, disasters and ideas here on Bikes And Travels. Contact ren@bikesandtravels.com
Reader's Comments
Pocketpete said :-
Well done looks pretty good. Is this clutch much different from the 500x.
I wear clutches out for some reason......
11/11/2017 20:56:20 UTC
Ren - The Ed said :-
The principal is the same but the details will be different. Theoretically it should be easier on the 500 as there's no no centrifugal filter but the TAF nut will be really tight.
11/11/2017 22:19:17 UTC
Ian Soady said :-
I've never needed an impact driver (usually my mature bikes have had most of their fastenings removed several times and some are wont to dismantle themselves whilst I'm riding along) but it certainly looks like a handy tool.
The problem is that I'm running out of space.....
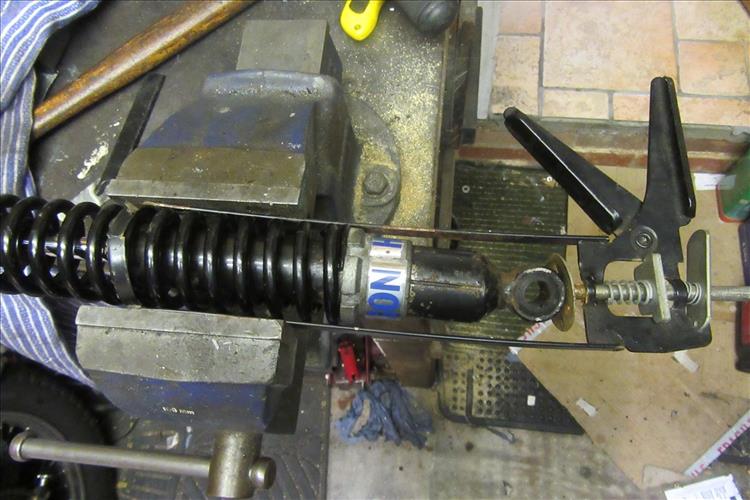
Just to amuse you while we're on the topic of tools, I've been changing the springs on the rear units of the Guzzi as the ones fitted were far too hard. As those of you who have tried changing springs will know, it's tricky to compress them enough.
A tip from another forum was to butcher a mastic gun by sawing the end retainer through. It's exactly the right diameter for Girling / Hagon type springs. You can then use the squeezing action to compress the spring and very carefully remove / replace the retaining collets.
*****SAFETY WARNING******
It's essential to make sure that the two halves of the sawn through section are securely clamped onto the spring so it doesn't all fall apart and shoot the spring into soft bits of your anatomy - you can see from the photo that I did this in the vice. And also, never get your fingers near the collets - hold them in pliers so if the worst happens you won't mash them.
 12/11/2017 10:34:00 UTC
Ren - The Ed said :-
HOLY COW! That...that looks bloody terrifying to me Ian. I think I'd be looking for something more substantial and secure than the friction mechanism of a mastic gun. I can just see fingers trapped in springs and high velocity metal fragments.
Nope, that's a nope from me.
13/11/2017 14:00:01 UTC
Ian Soady said :-
I did give a health warning, use the words "very carefully" and point out that fingers should get nowhere near.....
As it's held securely in the vice, there's nowhere really for it to go although releasing the tension is a little "interesting".
Come on, where's your sense of adventure?
13/11/2017 16:09:50 UTC
Ian Soady said :-
..... and of course you're only squeezing it by 10 - 15mm or so.
13/11/2017 16:10:34 UTC
Ren - The Ed said :-
Nowhere near to me would require being in a different room watching you through a plexiglass window.
My sense of adventure? I guess I must be really risk averse.
13/11/2017 16:12:40 UTC
Borsuk said :-
Ren Said: "My sense of adventure? I guess I must be really risk averse."
This from the man who aims his forks like a ballistic missile at his kitchen window when stripping them down.
Personally when stripping down high powered springs (I service my own air guns) I either use a sash clamp and velcro webbing to keep the lot aligned while I compress them. Or my home made spring compressor made out of a few bits of wood, velcro webbing, a couple of nuts and a long bolt.
13/11/2017 20:13:38 UTC
Ian Soady said :-
I did think of using a sash cramp to compress the spring off the unit then perhaps using strong cable ties to keep it compressed but decided that would be even more dangerous than my method.
I'd guess when you're several hundred miles offshore you need to be creative sometimes. Many years ago when I was an AA patrol, many of my colleagues were ex-REME and used to fixing tanks etc miles from anywhere. They too could be quite creative although this often involved the use of large hammers and Stillsons.
Coincidentally, I came across a blog where someone used a Spanish windlass affair to compress springs and that looks like another useful technique. I have to say I'm envious of the blogger's workshop which makes mine look very second-rate. And the bike is lovely.
cbsbritishbikebuild.blogspot.co.uk/2015/06/british-bike-special-build.html...
14/11/2017 10:30:52 UTC
Borsuk said :-
This is at home Ian.
For some strange reason they won't allow me to bring my guns offshore. I think they know me to well at work and are scared I use the paraffin budgies for target practice.
14/11/2017 11:29:07 UTC
Ren - The Ed said :-
Have I got the wrong end of the stick here. Ian - the website you linked to shows the chap compressing his springs with a piece of ratchet strap material and a screwdriver!
Now - when I had to replace a snapped spring on my little Ford Ka I borrowed some spring compressors. By the time I'd compressed the spring enough to fit it to the Macpherson strut there was enough tension in it to launch a small motorcycle into geo-stationary orbit.
I presumed this would be similar for a spring on a motorcycle shock. While I understand cars are heavier and bigger I still figured there'd be a fair amount of tension even for a diminutive motorcycle. If people are using blooming mastic guns and bits of old rope am I right to guess there ain't much preload?
14/11/2017 16:42:38 UTC
Ian Soady said :-
The spring rates are 110 lb/inch (sorry about Imperial units but they are old springs....) and they need to be compressed about 1/2" to get the collets in, which would be a force of say 60lb or 25 Kg.
To be honest, if there was a significant force required I wouldn't be able to squeeze the lever enough to exert it as there's no real mechanical advantage. It so happens that I know my grip strength is 35 Kg and I wasn't using all of that although it was hard work.
I don't think you can compare car springs as apart from needing a much higher rate they probably need a lot more preload.
Yes, I wondered about the ratchet strap especially as that bloke has such a well equipped workshop including milling machine, metal bender etc and so on. If you follow through his blog you'll see he's quite obsessive about getting things right. If I had his facilities I'd probably have made some "proper" compressors. But of course this sort of job is not done very often.
15/11/2017 10:43:04 UTC
David Williamson said :-
Can you change handle bar grips on a 16 plate Honda cbf 125cc?
06/04/2018 21:51:22 UTC
tahrey said :-
I've replaced the originals on my CG with a set of thirty quid generic hotgrips, so I don't see why not. They should be "slip-on" rubber items.
...bearing in mind that the concept of "slip" in this case is a very ... technical one. I found it was something of a game to first remove the originals, and then fit the replacements. Involving the application of quite a lot of heat with a hairdryer to loosen the originals and much wiggling with a flat-blade screwdriver and blunt knife, and then a heck of a job doing similar (but much more carefully so as not to ruin the wiring!) to get the new ones on. Especially as the general fitting instructions for such things include the interesting suggestion of coating the inside of the grips and the outside of the bar inserts with high-hold aerosol hairspray so they tack together nicely once in position and cooled down. Doesn't exactly make for them sliding straight into position. It'll take you some time and more than a little swearing.
(100% worth it, though. They're one of the best things I've ever done to my bike. No more massaging the engine at red lights to get feeling back in your fingers, in winter... Though I'm kind of dreading having to replace them, as I think one side may have gone duff, if it's not more simply a dodgy wire or moisture getting into the not exactly weatherproofed connectors)
07/11/2018 21:22:25 UTC
Martin from Poland said :-
This topic helped me a lot with changing CBF clutch basket! Basket sprocket cracked... Thanks!
01/08/2020 15:08:41 UTC
Ren - The Ed¹ said :-
Cheers Martin from Poland, glad it helped. I too had a cracked basket gear, it's not a common problem but there are several cases out there. Mine's been fine since, probably for over 60 or 70 thousand miles.
01/08/2020 21:20:36 UTC
Karl said :-
What was the torque setting for the clutch basket back nut ? . Thanks karl.
06/02/2021 17:09:53 UTC
Ren - The Ed¹ said :-
Are you talking of the main nut at the centre of the clutch Karl? The hefty one that I had to use the braaap gun to get off? If that's the one I'll check my haynes manual.
07/02/2021 16:23:34 UTC
iggy said :-
what are the torque spec for clutch hub nut, oil pump nut (the one that needs special tool) and 4 spring bolts?
27/08/2022 22:21:11 UTC
Glyn said :-
My CBF125 Manual says,
Clutch centre nut. 74 Nm
Clutch spring bolts 12Nm
Oil pump bolts 12Nm
This is good stuff, other people getting inside the engines.
29/08/2022 14:54:15 UTC
Ren - The Ed¹ said :-
Thanks Glyn. It's a bit chaotic at my end presently :)
30/08/2022 18:49:06 UTC
marius said :-
Hi , can anyone give me some advice please ?
I'm in the process of replacing my pressure plates but on reassembly i'm not sure how tight the spring bolts should be .
Thanks .
12/02/2023 16:25:43 UTC
said :-
 12/02/2023 16:27:59 UTC
Upt'North ¹ said :-
Found this in the manual, hope it helps, but please check yourself first. The service manual is online.
6.3.
Tightening torque requirements
Clutch Locking Nut: 45N.m
Crankshaft Locking Nut: 64N.m
Balanced gear locking nut: 45N.m
Five-star plate fastening bolts: 12N.M
Positioning plate fastening Bolts: 12N.M
Clutch lid fastening Bolts: 12N.m
12/02/2023 16:37:26 UTC
Upt'North ¹ said :-
Please check to ensure it is the same model etc.
12/02/2023 16:38:05 UTC
Upt'North ¹ said :-
https://www.manualslib.com/manual/2083988/Um-Cbf-125.html?page=56...
12/02/2023 16:39:34 UTC
marius said :-
Thank you , need a Torque wrench for that me thinks :(
12/02/2023 23:20:25 UTC
Ren - The Ed¹ said :-
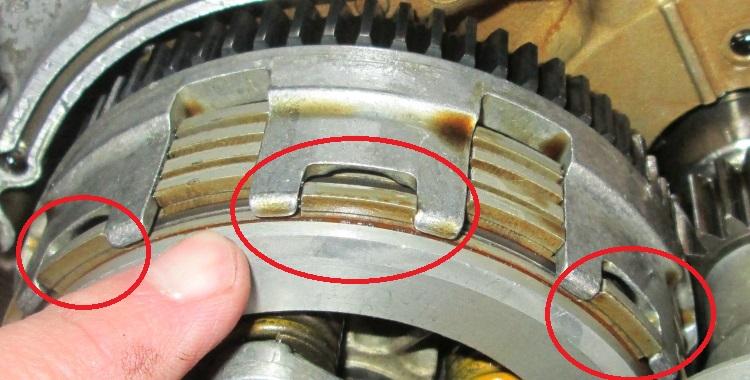
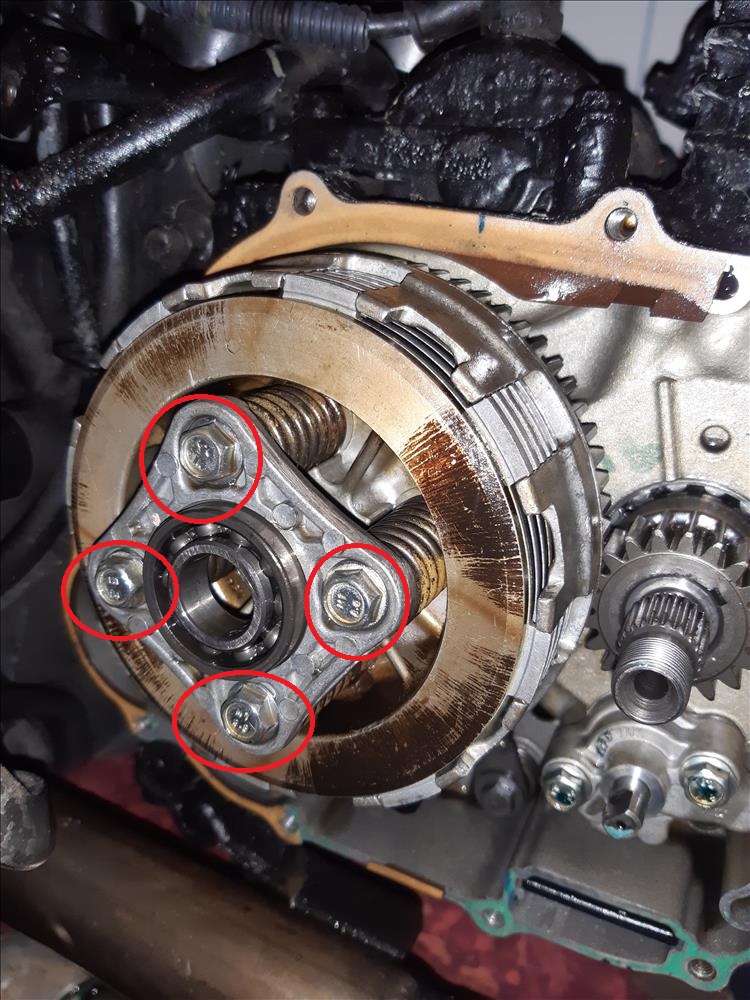
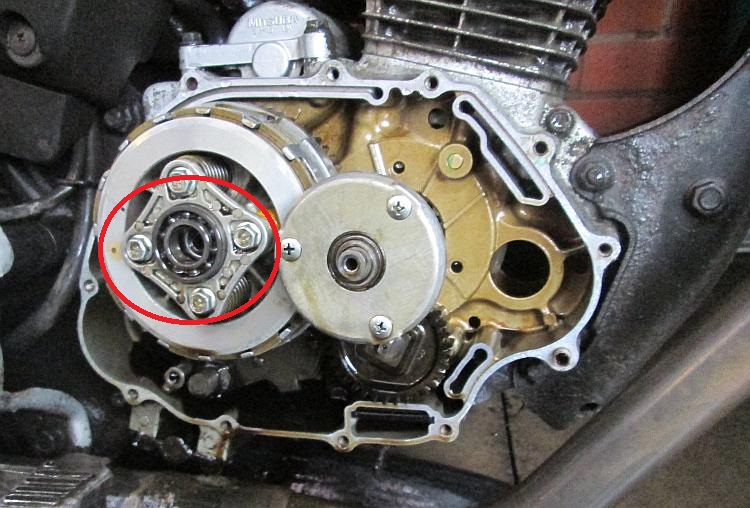
Good morning marius. First we need to be sure we are talking about the correct bolts here. I am assuming you are talking of the bolts with springs underneath them. I shall add an image with the bolts I hope we are both talking about. IF we are talking about the same bolts then the right and correct torque will be listed in my Haynes manual at home and I can get that later.
However when I fitted the clutch the bolts circled were tightened as tight as I'd tighten any other M6 thread 10mm head bolt. Firmly but definitely not heaving on the spanner like an angry gorilla.
I could be wrong but tell me - are you thinking you wish to know how much to compress the springs - as though this will effect the clutch? If this is the case then fear not - the length of the springs and the amount of compression on the springs is predetermined by the way the clutch is made. You do not "tighten the bolts until the spring is ?mm long" or "tighten the bolts until a pressure of ??nm is on the plates". You tighten the bolts to the point the solid metal components come together as you would tighten a bolt that holds the engine cases on.
Why did you need to replace the pressure plates marius?
 13/02/2023 09:22:41 UTC
marius said :-
Hi Ren ,
Yes , those are the ones .
My son fell with the bike after hitting a pothole at night on his second day of learning to ride , didn't want to take my advice not to ride at night until he gains more experience :(
He said there was some smoke coming from the bike , not a specific place .. i took it out for a ride and the bike won't go past 20 miles an hour no matter the revs or gear .. so after i checked the fuel lines , pump and other bits i come to the conclusion it is the clutch .
Got a chinese replacement off ebay , turned out that the steel plates were wrong so i'll just replace the pressure plates . In the process of putting it back together but wasn't sure on the spring bolts .
Thanks .
13/02/2023 17:05:27 UTC
Ren - The Ed¹ said :-
Oooooh ouch! The joys and pains of youth. Yes then you tighten the bolts the same as you would any other bolt. If the bike was old or had high mileage the springs themselves can become "short" which causes clutch slip. There's no adjustment to be had by tightening the bolts more.
You'd know if the clutch was slipping - the engine will be at high revs!
13/02/2023 18:54:24 UTC
marius said :-
Yep ,
Success !! , I was a bit apprehensive at first as couldn't really understand how the clutch works but just reassembled as best as i could , new chinese pressure plates and old steel plates and the bike came back to life .
Thanks :)
18/02/2023 17:51:23 UTC
Andy Gus said :-
Does the clutch have a release bearing anywhere ? Where is it? How hard is it to replace it? Pictures would be good as well please.
Thank you
17/12/2023 22:10:36 UTC
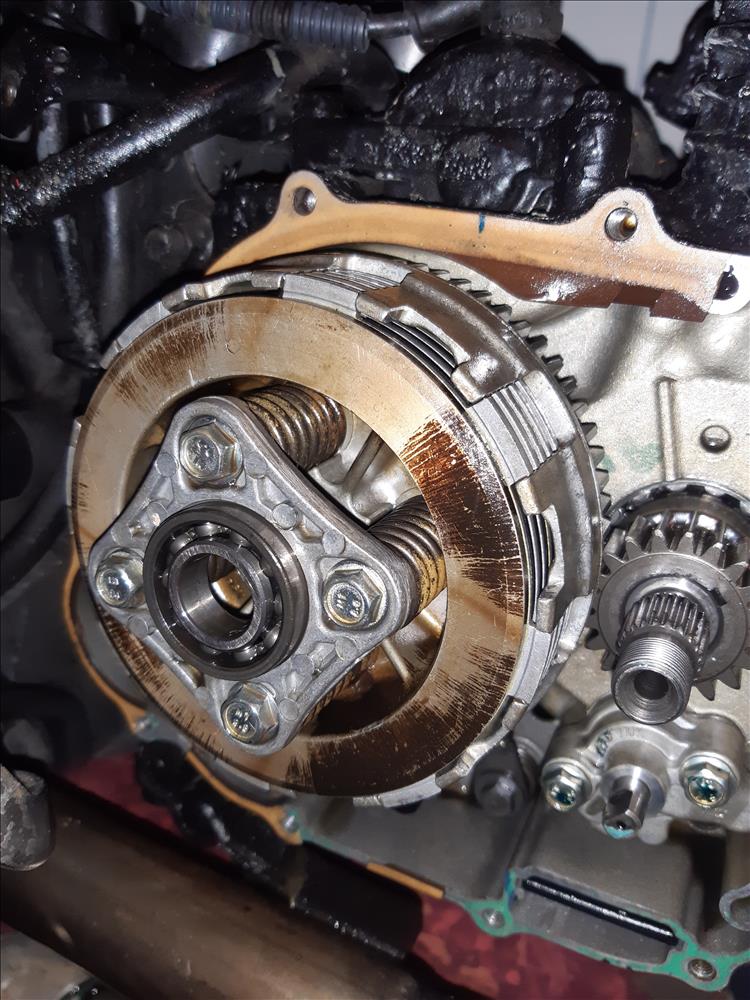
Ren - The Ed¹ said :-
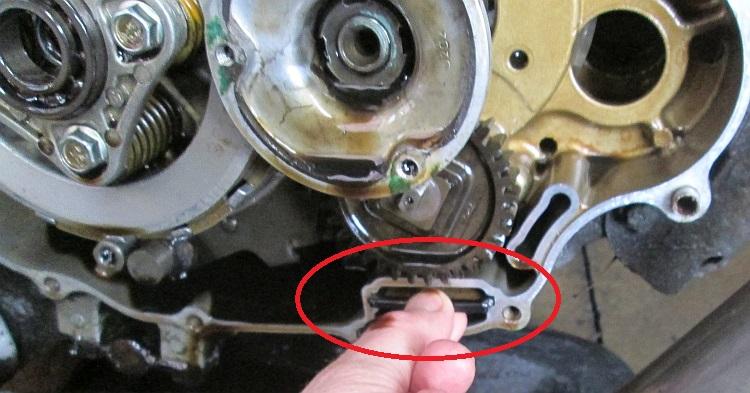
The clutch release bearing is circled in the image below. If my memory serves me correctly it's a push fit and barely a push fit, I recall it'll pretty much fall out of its own accord.
You'll need a new gasket for the joint between the engine cover and the crank case, and a LOT of patience to clean the old gasket off the faces. I can't recall the bearing number but it'll be as common as muck, you'll find one at most bearing suppliers.
 18/12/2023 07:55:08 UTC
ROD¹ said :-
I would also give the filters a good clean while you have the cover off.
18/12/2023 14:21:20 UTC
Name
Comment
Add a RELEVANT link (not required)
Upload an image (not required) -
Uploading...
Home
Repair And Restoration