Home
Repair And Restoration
DIY Tyre Change
Guide Date - 18 March 2017
By Ren Withnell With Stephen Latchford.
CrazyFrog asked for any hints and tips regarding changing tubeless tyres yourself. So here goes...
Firstly a disclaimer. Fitting your own tyres ain't easy. If you fit them wrong things can go terribly wrong. We are definitely not professionals so er...don't do this at home kids!
When Ste and I first attempted changing our own tyres we started out with big old tyre levers. Doing tubeless tyres like this is a goddam blasted pain in the backside. Think of mission impossible meets the krypton factor meets a scene from casualty meets the chuckle brothers... Farcical, painful and downright silly. We have improved. A bit.
The biggest steps we have made have been due to Ste getting the right tools for the task. Primarily these are genuine tyre fitting paste and a tyre fitting bar.
Tyre fitting paste is the white substance you'll see real tyre fitters spreading around the tyre. It's purpose is to lubricate the tyre and the rim to aid fitting. DO NOT use grease or oil or even ordinary soap! Tyre paste is slippery for a while then dries out, becoming non-lubricative. If we were to use grease or oil this would remain slippery indefinitely. Imagine then putting your brakes on, the tyre would slip and spin around the rim with disastrous results.
At around £10 for a large tub of paste that will probably outlast both Ste and I it is an affordable and worthwhile purchase. Ebay will sort you out.
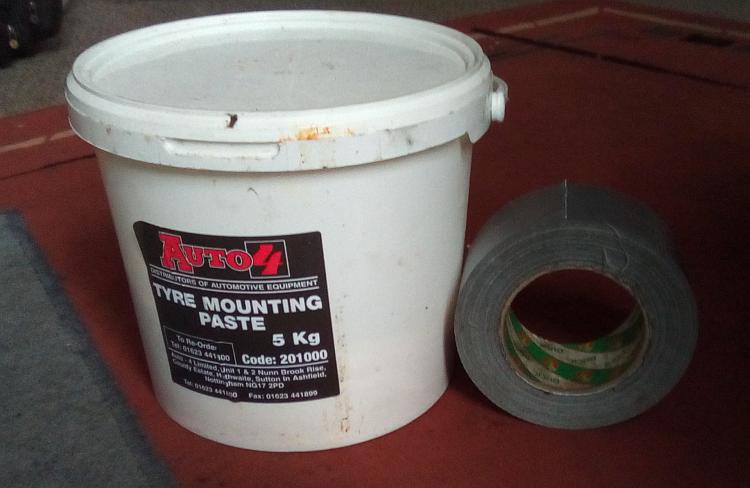 £10, should last a lifetime. Gaffer tape to give some idea of scale.
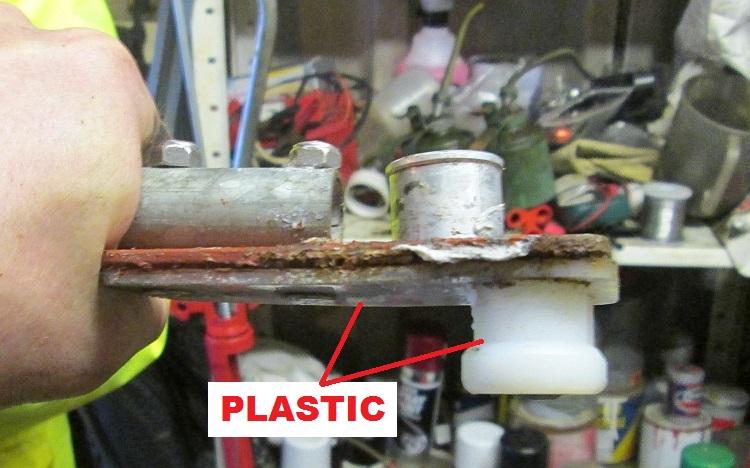
The next thing is the tyre fitting bar. You can again purchase one of these complete off Ebay for around the £80 mark, complete. Ste being annoyingly skilled purchased a kit designed to replace worn parts on the bar and made the metal bar himself.
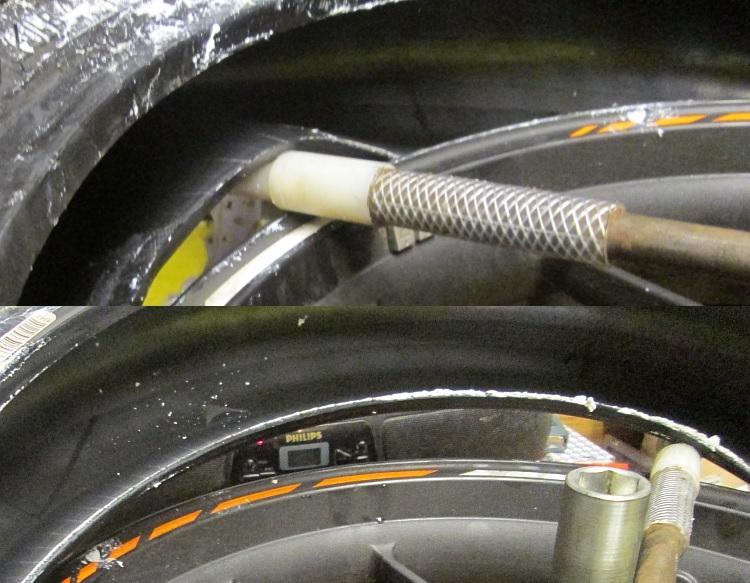
At one ond of the bar is a tough plastic fitment to remove the tyre. Once the bead is broken (again Ebay will sort you out with a bead breaker for around £40) this end is hooked between the bead and the rim. The long lever can then be used to pull the bead over the rim.
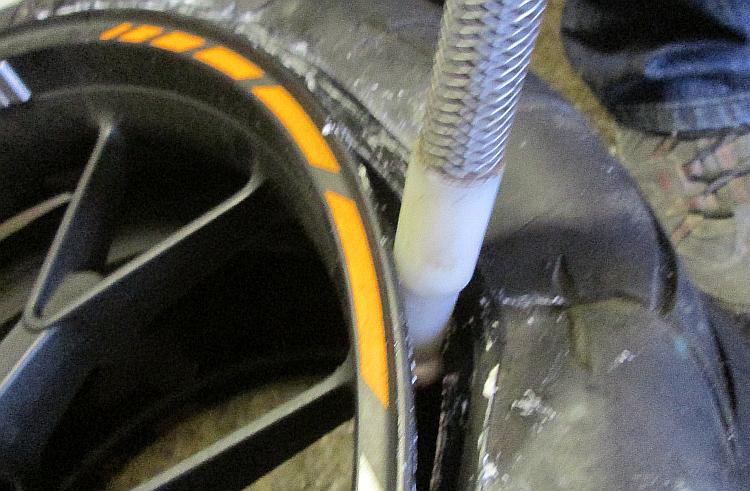 The removal end is inserted so the flared end is under the bead of the tyre.
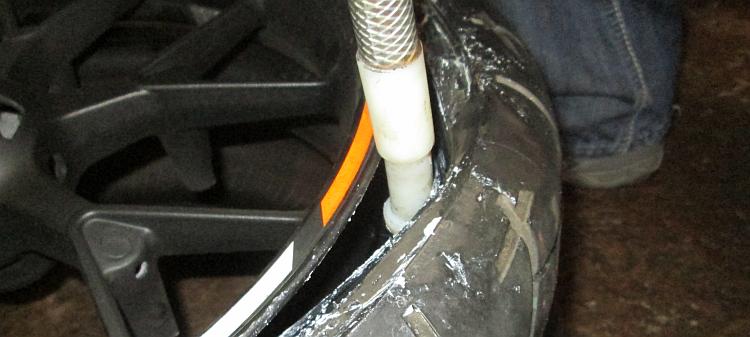 The long lever can then be used to pull the bead over the rim.
With the tyre and wheel placed on an old tyre for protection the wheel spindle and the spacers are placed in the bearings. This gives us a pivot point. Using this pivot point the long lever can be pulled around causing the tool to lift the bead over the rim progressively. The end of the tool being made of plastic is a little softer than the rim which *almost* eliminates scratching the paint. This is why the ends are replaceable. They are designed to wear out over time but you'd have to fit a lot of tyres.
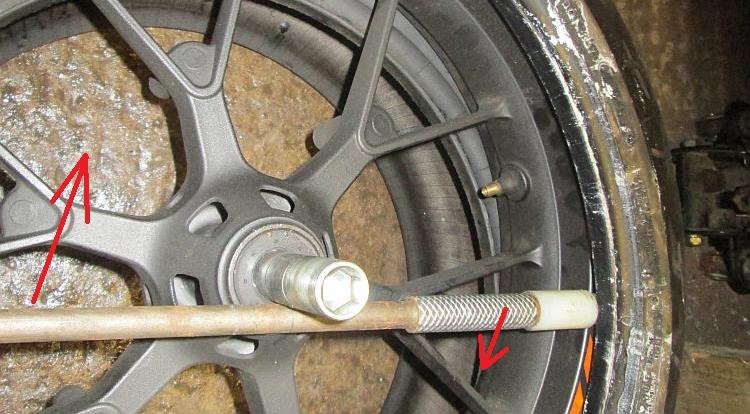 Using the wheel spindle as a pivot point the long lever is rotated around the wheel so the bead comes over the rim.
This process is repeated for the other bead and the tyre should come away without much struggle.
 A repeat of before, it's awkward getting the tool in this time though.
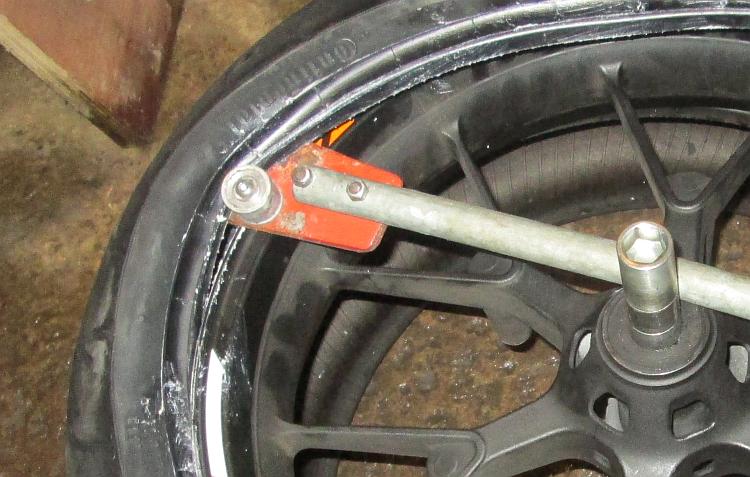
The opposite end of the bar features 3 rollers. One metal "atop" the plate and 2 plastic below. The plastic rollers engage with the rim and are plastic for the same reasons as before. The top metal roller is offset such that it only just pushes the bead over the rim.
 The metal roller pushes the rubber bead, the plastic rollers hold the rim.
With the new tyre lubricated with the paste pushing the first bead over the rim is done manually - usually. It will often just slip on giving a false sense of ease when it comes to putting the remaining bead on. The remaing bead is started manually before the tool is inserted.
Once the bead is started use a clamp of some description to stop the started bead from popping back off. Insert the tool so the plastic rollers are against the rim with the metal roller against the bead.
 Like This.... It is fiddly to get started.
As before with the wheel and tyre on an old tyre and the spindle in place the long bar can be rotated. As the tool forces the bead over the rim the bead needs to be manually pushed into the wheel and into the well (the recess between the rims). Getting the tyre into the well is absolutely critical!.
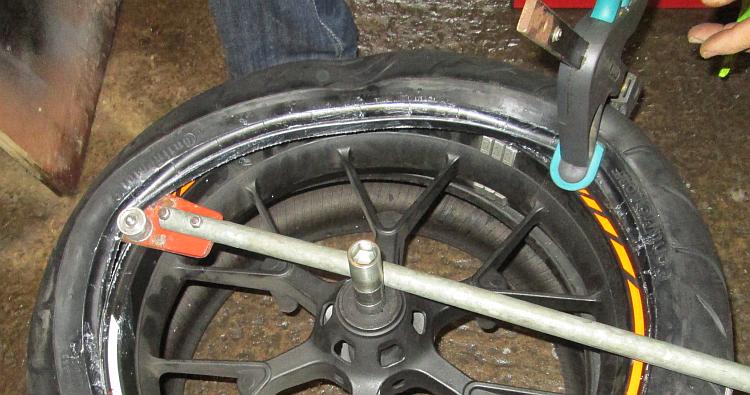 Clamp, rotate and push the bead deep into the well.
It will require some force on both the bar to turn it and the tyre to push the bead into the well. Then as if by magic it all comes together. Now you're left with the tool stuck in place. Simply lift the bar upwards and let the last of the bead fall into place.
 Almost done - and lift then remove.
And that's that. You will need a decent compressor or another source of fast airflow to cause the bead to seat onto the rim correctly. I tried a footpump once - with each stroke the air came right out from the unseated beads. Fast air overcomes this and forces the bead out of the well and onto the rim with a distinctive and scary POP!!
NOTES -
- Ensure the tyre is fitted evenly onto the rim.
- Spin the wheel to ensure there are no wobbles.
- Narrow tyres such as my 125 are considerably harder than fat wheels. This is due to the well being narrow.
- This method does run the rist of scratching your rims. If you are precious about them you're going to want a professional tyre changer
- Be sure to balance the wheel - DIY Wheel Balancer and Balancing
Do you have your own tried and trusted methods? A magic tool that makes the whole task so much easier? We'd love to let our readers know - Click Here.
Reader's Comments
Bob said :-
Good write-up.
May I suggest that removing the valve stem from the valve when inflating the tyre will get the air in much quicker and help with seating the beads on the rim. Once seated, disconnect the compressor - the air will rush out again but the bead will stay seated. Then refit the valve stem and re-inflate in the normal way.
18/03/2017 20:11:46 UTC
Ren - The Ed said :-
Quite right Bob, having no value core in place makes seating the tyre easier. Still wouldn't work with a footpump though!
I have seen a car tyre used as a reservoir of stored pressurised air and a double ended air pipe to seat the bead but a compressor is the way to go.
18/03/2017 23:13:35 UTC
Ian Soady said :-
Looks good although I've just used ordinary tyre levers which worked fine on my Tiger 955i.
I scrounged a half-full tub of tyre soap from the place that does my car tyres which cost me nowt and will last me out. I agree it's far better than the usual fairy liquid etc.
If the beads are reluctant to seat then you can use a ratchet strap round the circumference of the tyre (centre of the tread) which when pulled tight will push the beads out.
And the bang can be truly scary - I foolishly did this with one tyre while resting my hand on the tyre - the bang and shock to my hand nearly gave me a heart attack.
And I see no mention of the Icelandic trick of butane and cigarette lighter........
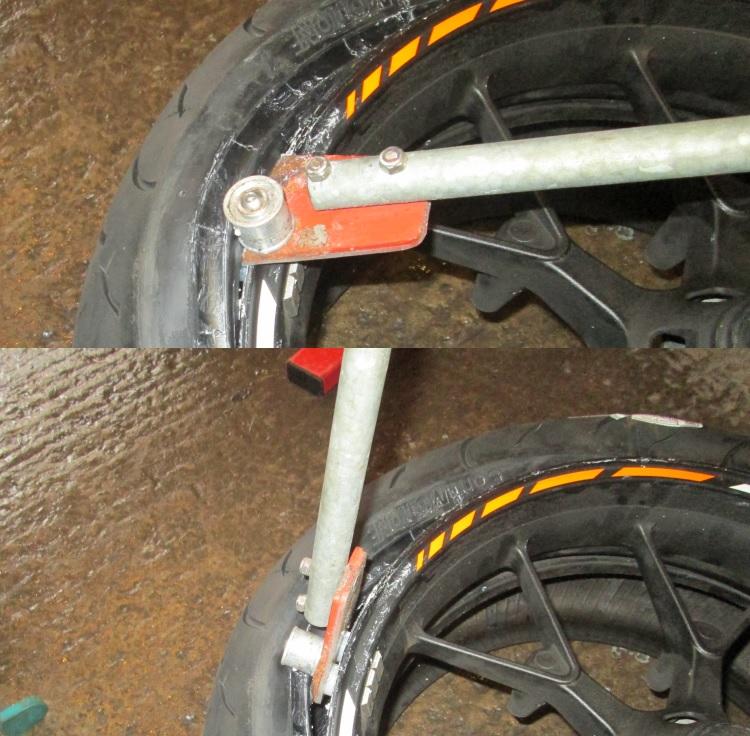
This is my beadbreaker and tyre mounting frame:
 19/03/2017 10:41:20 UTC
Ian Soady said :-
I've just noticed the one thing you don't mention is to get the opposite bead right down into the well. If you do this properly the opposite bead will go on much more easily. It makes it even easier if you have a willing helper to keep it in place....
I actually fitted the (tubed) tyres on the Sunbeam by hand alone without levers.
As an aside, now I've mentioned tubed tyres, the much-maligned Haynes manuals actually describe the correct way to do this (although I think it's been copied from Dunlop or somebody). It involves putting the slightly inflated tube in the tyre before trying to fit it, then poking the valve stem through the hole and putting the retaining ring on a couple of threads. Then fit the first bead then the second one as usual. Avoids all that desperate fishing for the valve and bruised / bashed knuckles.
19/03/2017 13:25:16 UTC
Ren - The Ed said :-
I have heard of the ratchet strap being used to seat the beads although I've never tried it.
I've seen the Icelandic trick too on top gear. I did consider that when failing with the footpump then I considered burst tyres, accident and emergency, burst ear drums and pulling bits of burnt tyre out of my nether regions.
I have NOT considered getting both beads into the well! Of course now thinking about it it makes perfect sense but no it's not part of our methodology. I'll be seeing Ste this evening and put it to him. Thanks for the tip!
The partially inflated tube I do know about. In my youth I was never off push bikes and never far from a puncture. By the time I was 12 I could "do" a tubed tyre with my eyes closed in the rain with no tools. Tubed motorcycle tyres are much stiffer and therefore require much more force but the principals are the same.
Good call on checking both beads, looking forward to doing another tyre now to see what happens.
20/03/2017 06:33:55 UTC
Stuart said :-
If you really can't wait to change another tyre you can come and do mine for me if you want, I don't mind!
20/03/2017 16:11:55 UTC
Ren - The Ed said :-
HA! Stuart - I'm always teasing Latchy about "S.L.Tyres Ltd", suggesting that he's running an illicit tyre changing shop. He's quite forceful about NOT saying things like that otherwise he'll wake up one morning to find 4 bikers outside his house all demanding their tyres changing.
His address is..........................
20/03/2017 16:54:24 UTC
CrazyFrog said :-
Great walk through, thanks Ren....
22/03/2017 14:03:07 UTC
Ren - The Ed said :-
So when you gonna do ya own tyres CrazyFrog? We demand to see pictures as proof.
22/03/2017 14:47:35 UTC
Latchy said :-
It's a yes from me Ren
22/03/2017 18:22:44 UTC
Latchy said :-
Oh and like your ingenuity with wood Ian
22/03/2017 18:30:29 UTC
Ian Soady said :-
I often find wood easier to work with than steel partly because my welding skills are abysmal.
The square frame under the Tiger wheel is just made from 4 x 4 held together with coach bolts and with one leg extended to provide an anchor point for the bead breaker lever which is another length of 4x4 about 5 feet long. The square was dimensioned specifically for the Tiger 19" front wheel to allow the discs to sit inside but has fitted other wheels as well.The orange strap holding it together doesn't look very strong but seemed to do the job.
23/03/2017 10:58:13 UTC
Ren - The Ed said :-
I must admit my nuts, bolts and screws skills are far better than my welding skills. I'd stand more chance of creating a wooden bead breaker than a metal one that's for sure.
The other advantage of wood is there's far less likelyhood of scratching the rim with wood than there is with metal. Again, good call.
24/03/2017 18:21:04 UTC
Tom McQ said :-
£10 Paste, £80 toolbar, £5 Clamp, a compressor(!) and a load of rawling about in the shed risking fingers and damage? Just paid £15 to have my rear tyre changed. No fuss, ride in, ride out, no damage to the rims, no damage to fingers, no stress. Just more riding time.
I can understand DIYing it if you're skint or if the jobs expensive (like valve clearances), but £15?
30/03/2017 08:23:31 UTC
Latchy (SL) said :-
Already had the compressor tom, the bead breaker was £30,the parts cost Ren and I 10 quid each, and I like the fact I can fit and balance my own tyres at home in about 30 mins each, I've done about a dozen for myself so I have saved about £150 by your reckoning.
I have also fixed a few punctures myself saving more dosh
30/03/2017 08:58:25 UTC
Ren - The Ed said :-
There's another thing to consider. Tyre price. If you take your bike to the tyre shop you have to buy the tyre from the tyre shop and their prices are a little elevated. I know the 2 local motorcycle tyre shops around here will not fit a tyre purchased off the internet.
30/03/2017 09:42:15 UTC
Ian Soady said :-
When I started riding you had to DIY as very few bike shops would do anything for you except at an exorbitant price. So I grew up with the attitude that I would always do everything I could, and seeing it as something of a failure if I couldn't manage it. Add this to being very hard up most of my life and having a natural parsimonious streak and the result is extreme reluctance to let anyone do anything to my bikes.
It generally turned out cheaper to buy any special tools required than to pay somebody else to do jobs.
I do however now draw the line at grovelling about under my car.
30/03/2017 13:31:40 UTC
Tom McQ said :-
I buy my tyres from TyreLeader.com saving about 15-20% on shop prices and have them fitted in Horwich.
30/03/2017 17:54:09 UTC
Sharon said :-
Well I think it is good because I usually get quoted around £20 to fit a tyre. Tyres are usually much cheaper on the Internet and if you have a awkward sized tyre on your bike in can be a pain trying to find a garage that stock them. If they buy them in it can take ages. Plus if you already have a spare at home you can be back on the road immediately, no waiting around. Finally if you have several bikes and do high milage the savings doing it yourself soon stack up. Some folks just like the satisfaction of maintaining their own bikes.
30/03/2017 18:08:15 UTC
Name
Comment
Add a RELEVANT link (not required)
Upload an image (not required) -
Uploading...
Home
Repair And Restoration